RICOH Cloud API Keys
First, you’ll need RICOH API Client Credentials. To help you grab the API credentials, we created a guide.
Once you complete the process and log into RICOH’s notes server, you’ll get a client_id and a client_secret. The keys will be look like this 5xm7jIvlPk4, only longer. Be careful. The username and password in get in your email is for the RICOH notes server to download your keys. The email does not contain the actual keys. The client_id and client_secret both look like a string of random characters.
Unified Communications System User ID and password
In addition to the Cloud API client_id and client_secret you will also need user_id and password from the Unified Communications System. The user_id looks like an email address like user@oppkey.com. The password is a user-defined password.
Please refer to the Cloud API Signup guide for more information on what you need, where to get it, and what each credential looks like.
Testing RICOH Cloud API with Node.js
Use npm to install ricohapi-mstorage. I am using Ubuntu 16.04 with node v6.1.0 installed from the Node.js site. You should be able to use node v4.4 despite the warnings. However, I did most of my tests with node v6.1.
$ npm install ricohapi-mstorage
I get minor warnings. Ignore them.
ricoh@xerus:~/Development$ npm install ricohapi-mstorage
/home/ricoh
└── ricohapi-mstorage@1.0.0

npm WARN enoent ENOENT: no such file or directory, open '/home/ricoh/package.json'
npm WARN ricoh No description
npm WARN ricoh No repository field.
npm WARN ricoh No README data
npm WARN ricoh No license field.
We finally get to the fun part. Open up an editor and drop in some code.
const MStorage = require('ricohapi-mstorage').MStorage;
const AuthClient = require('ricohapi-mstorage').AuthClient;

const client = new AuthClient('clientId', 'clientSecret');
client.setResourceOwnerCreds('userID', 'password');

const mstorage = new MStorage(client);
Run the code. Hopefully, there are no error messages.
node cloudtest2.js
Grab an image and save it into the same directory as your test code. In my example, my test code is called cloudtest2.js. My test image is a 360 equirectangular image called beach.jpg.
The big moment of of connecting to the RICOH Cloud server and uploading a 360 image has arrived! Drop the code below onto the end of your program and run it.
mstorage.connect()
.then(() => mstorage.upload('./beach.jpg'))
.then(() => console.log('uploaded')
.catch(e => console.log(e)));
Boom. it works!
ricoh@xerus:~/Development/ricoh-cloud-api$ node cloudtest2.js
uploaded
Grab a listing of your images. Add the code below to the end of your test program.
mstorage.connect()
.then(() => mstorage.list())
.then(list => console.log(list));
Run it and verify the file was upload. I have multiple files in my test account. Your output may be slightly different.
ricoh@xerus:~/Development/ricoh-cloud-api$ node cloudtest2.js
{"media":[{"id":"c516ccd5-db40-438c-8f8b-e306a1c618d5"},{"id":"258f43a9-4d7a-4d4e-b625-f3a149fc7240"},{"id":"b2046fcf-1c86-47bc-a1ff-1922ecd8859a"}],"paging":{"previous":"http://mss.ricohapi.com/v1/media?before=c516ccd5-db40-438c-8f8b-e306a1c618d5\u0026limit=10"}}
uploaded
Grab the ID for one of your media assets in the RICOH Cloud server. Replace the ID below with your own ID.
mstorage.connect()
.then(() => mstorage.downloadTo('258f43a9-4d7a-4d4e-b625-f3a149fc7240', './img/downloadbeach.jpg' )
.then(() => console.log('downloaded')));
Run it.
ricoh@xerus:~/Development/ricoh-cloud-api$ node cloudtest2.js
{"media":[{"id":"9d0f457e-a969-4247-81dc-3f430c2cb06d"},{"id":"c516ccd5-db40-438c-8f8b-e306a1c618d5"},{"id":"258f43a9-4d7a-4d4e-b625-f3a149fc7240"},{"id":"b2046fcf-1c86-47bc-a1ff-1922ecd8859a"}],"paging":{"previous":"http://mss.ricohapi.com/v1/media?before=9d0f457e-a969-4247-81dc-3f430c2cb06d\u0026limit=10"}}
downloaded
ricoh@xerus:~/Development/ricoh-cloud-api$ ll img/
total 4064
drwxrwxr-x 2 ricoh ricoh    4096 May 16 15:32 ./
drwxrwxr-x 4 ricoh ricoh    4096 May 16 16:34 ../
-rw-rw-r-- 1 ricoh ricoh 4151640 May 16 16:45 downloadbeach.jpg
ricoh@xerus:~/Development/ricoh-cloud-api$
Live Stream Video
With your RICOH API credentials and RICOH ID, you can now live stream inside of your browser.
Download live streaming code from GitHub.
Follow the steps and get going.
$ git clone https://github.com/ricohapi/video-streaming-sample-app.git
$ cd video-streaming-sample-app
$ cp samples/config_template.js samples/config.js
put your credentials into the config.js
$ npm install
$ gulp build
If you try running
$ gulp build
and your system can’t find gulp, then do this:
$ npm bin
It will return your path, probably something like this:
/home/ricoh/Development/livestream/video-streaming-sample-app/node_modules/.bin
Build it with the path for gulp.
video-streaming-sample-app$ ./node_modules/.bin/gulp build
(node:23673) fs: re-evaluating native module sources is not supported. If you are using the graceful-fs module, please update it to a more recent version.
[12:57:33] Using gulpfile ~/Development/livestream/video-streaming-sample-app/gulpfile.js
[12:57:33] Starting 'build'...
[12:57:53] Version: webpack 1.13.0
            Asset    Size  Chunks             Chunk Names
./build/bundle.js  354 kB       0  [emitted]  main
[12:57:53] Finished 'build' after 20 s
Run gulp
ricoh@xerus:~/Development/livestream/video-streaming-sample-app$ ./node_modules/.bin/gulp run
(node:23840) fs: re-evaluating native module sources is not supported. If you are using the graceful-fs module, please update it to a more recent version.
[13:06:44] Using gulpfile ~/Development/livestream/video-streaming-sample-app/gulpfile.js
[13:06:44] Starting 'run'...
[13:06:44] Webserver started at http://localhost:8034
[13:06:44] Finished 'run' after 23 ms
It will automatically open up a browser. RICOH recommends Google Chrome 49 or newer. I had problems logging in with Firefox on Linux.
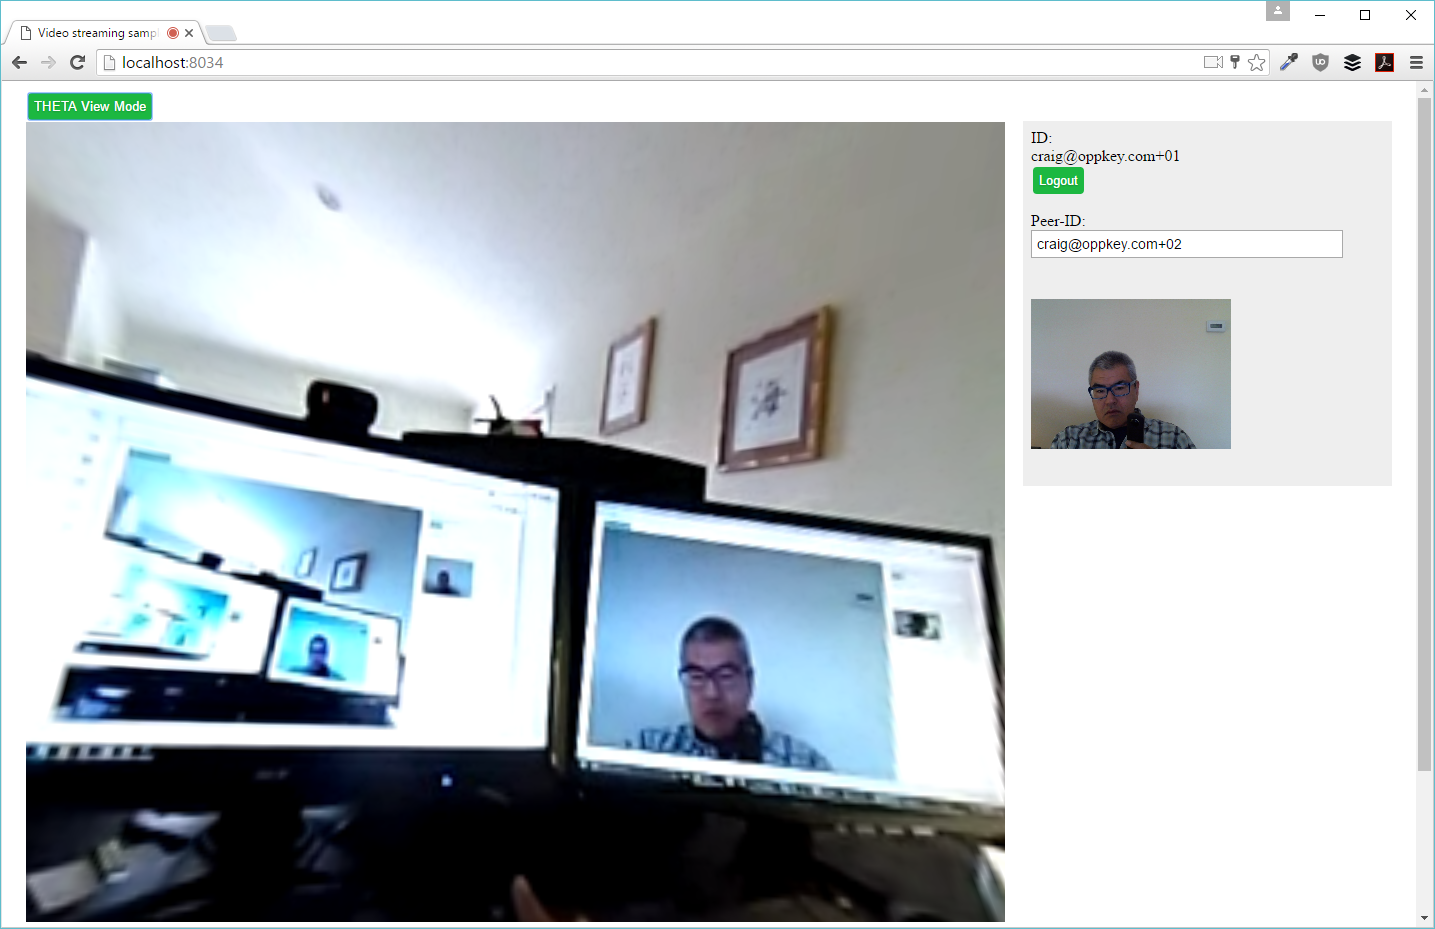
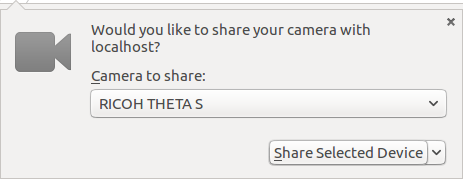
Select RICOH THETA S as the device.
Log in with your modified RICOH username and password.
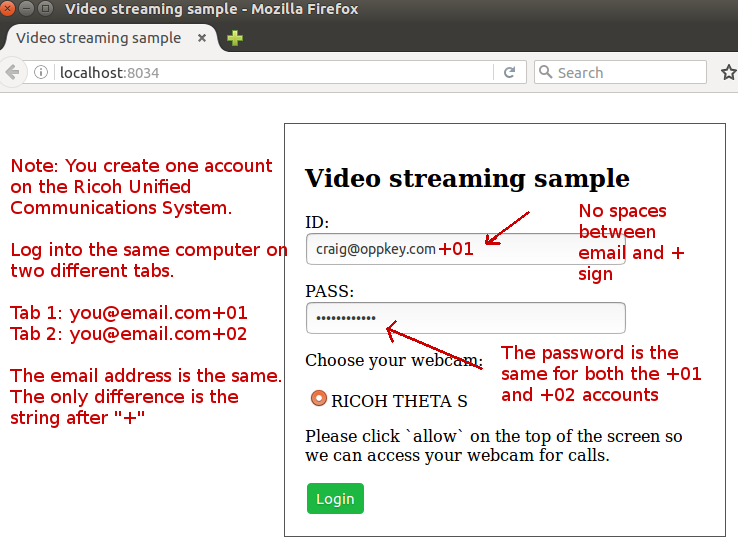
To set up a peer-to-peer connection, use a Ricoh user ID with a plus sign and string after it. For example, craig@oppkey.com+01 or craig@oppkey.com+theta.

In this example, I am using Chrome in two different tabs on the same computer. In the screenshot at the top of this section, the THETA is connected to one USB port of my Windows computer and another webcam (not a THETA) is connected to another USB port on the same computer. The only reason I am only using one THETA is because I only have one THETA at my house.
I am using the THETA S driver, not UVC Blender. The preview window in the right of the browser is in dual fisheye.

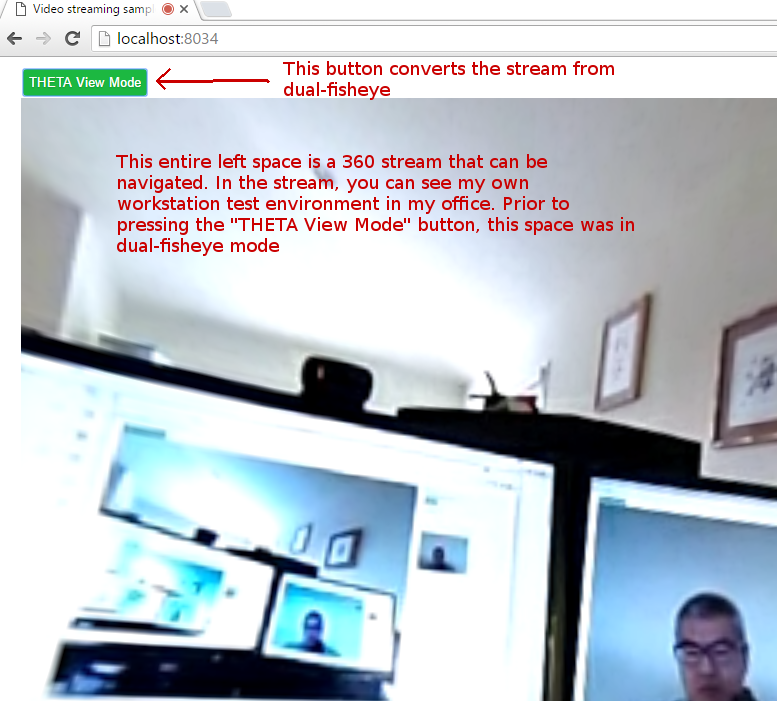
Press the THETA View Mode green button to convert the incoming dual-fisheye video stream into a equirectangular view with the JavaScript in your browser.
![]()
So cool! The view has full navigation.
Network Architecture
Here’s a diagram of the streaming functionality of the application.

Here’s a diagram with some of the technology used.

Using WebRTC Between Two Computers
To view the two 360 streams between two different computers, you’ll need to assign each computer a static IP address on the Internet (not NAT on an internal network) or use NAT traversal.
I have not tried NAT Traversal yet.
You can check out two untested services for STUN / TURN for NAT traversal here:
Article on WebRTC
We have a full slide deck about the RICOH Cloud API available.