This article is translated by @jcasman from the original here. The author is (@meronpan).
INTRODUCTION
Hello, this is @meronpan (because I love the Japanese melon shaped bread called “meronpan”) from Ricoh.  This is a “Hello, World” type introduction about THETA V plug-in development using the SDK.
Here is how to install the SDK.
We are going to make THETA sparkle!
If you are not familiar with THETA plug-ins, please read this article.
Although it’s called a plug-in, it’s the same as developing an Android app. That said, the points below are different from a normal Android smartphone, so some adjustments are necessary.
- 360 degrees photosphere camera (2 cameras work simultaneously)
- No screen
- Unique buttons and LEDs
- 4-channel microphone included
Due to these differences, there are extra differences mainly in the camera and audio sections of the API. pluginlibrary is included in the SKD. This will basically be used as-is without change, and the rest will be altered.
TABLE OF CONTENTS
The following points concerning THETA V plug-ins will be explained:
- Basic use of THETA’s buttons
- Basic use of LEDs
- Creating a plug-in to change the colors of the wireless LED
- Tweets by meronpan
BASIC USE OF THETA’S BUTTONS
I will go over the basics and usage of buttons.
LEARN THE BASICS OF BUTTONS
There are 2 points to remember in using buttons:
- Button types
- Button operation types
Please check before using.
BUTTON TYPES
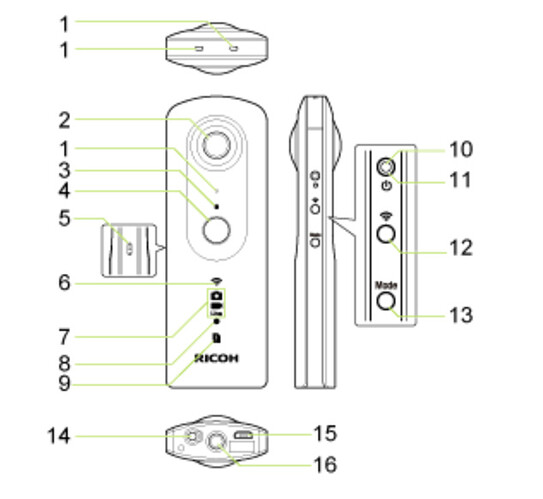
Below are button types. Let’s confirm the key code constant which corresponds to them.
| Number | Button | Keycode |
|---|---|---|
| 4 | Shutter Button | KeyReceiver.KEYCODE_CAMERA |
| 12 | Wi-Fi Button | KeyReceiver.KEYCODE_WLAN_ON_OFF |
| 13 | Mode Button | KeyReceiver.KEYCODE_MEDIA_RECORD |
BUTTON OPERATION TYPES
For button operation, the callback functions below are available.
| Button Operation | Callback Function |
|---|---|
| Press button | onKeyDown |
| Release button | onKeyUp |
| Long press of Mode Button | onKeyLongPress |
HOW TO USE BUTTONS
The concept is you are going to combine button information introduced in the Basics of Buttons section and button operation types.
Let’s see how to use it with the SDK.
When using the SDK, MainActivity is the first to be called, but I’m going to focus in on the explanation of buttons here and just show part of what happens. Please enjoy some melon shaped bread as you watch.

    @Override
    protected void onCreate(Bundle savedInstanceState) {
        super.onCreate(savedInstanceState);
onCreate will be called up at the very beginning just once, when MainActivity is run.
    @Override
    public void onKeyDown(int keyCode, KeyEvent event) {
        if (keyCode == KeyReceiver.KEYCODE_CAMERA) {
            /*
             * To take a static picture, use the takePicture method.
             * You can receive a fileUrl of the static picture in the callback.
             */
            new TakePictureTask(mTakePictureTaskCallback).execute();
        }
    }
onKeyDown will be run when the button is pushed. In the middle, it’s spilt so that if the KEYCODE_CAMERA button is pressed, when the shutter button is pressed new TakePictureTask will be run.
    @Override
    public void onKeyUp(int keyCode, KeyEvent event) {
        /**
         * You can control the LED of the camera.
         * It is possible to change the way of lighting, the cycle of blinking, the color of light emission.
         * Light emitting color can be changed only LED3.
         */
        notificationLedBlink(LedTarget.LED3, LedColor.BLUE, 1000);
    }

    @Override
    public void onKeyLongPress(int keyCode, KeyEvent event) {
        notificationError("");
    }
Similarly, onKeyUp is run when the button is released, and onKeyLongPress is run when the button is pushed for a long time. Unlike onKeyDown where there is a choice, pressing any button will run it.
BASIC USE OF LEDs
I will go over the basic use of LEDs.
Please remember these 3 points:
- 3 types of control—On, Off, Flashing
- Can control LED3 through LED8 for the below list
- LED3’s LED color can be changed
| No. | LED | LED No |
|---|---|---|
| 6 | Wi-Fi LED | LED3 |
| 7 | Shooting Mode LED | (Camera)LED4, (Video)LED5, (Live)LED6 |
| 8 | Video Recording LED | LED7 |
| 9 | Memory Warning LED | LED8 |
Let’s see how to use it with the SDK. Here’s the SKD.
In pluginlibrary, the functions below are available for controlling LEDs.
Specify a color and switch LED3 on.
public void notificationLed3Show(@NonNull LedColor ledColor)
Select LED3 through LED8 and switch the LED on.
public void notificationLedShow(@NonNull LedTarget ledTarget)
Flash the LED
public void notificationLedBlink(@NonNull LedTarget ledTarget, LedColor ledColor, int period)
Turn the LED off
public void notificationLedHide(@NonNull LedTarget ledTarget)
-
LedTarget- Withenum, select one from LED3, LED4, …, LED8 -
LedColor- Withenum, select one from RED, GREEN, BLUE, CYAN, MAGENTA, YELLOW, WHITE. Default is BLUE. -
period- When using flash control, 1 cycle period (ms) is set between 250-2000. A number below 250 will be set at 250, and a number above 2000 will be set at 2000.
CREATING A PLUG-IN TO CHANGE THE COLORS OF THE WIRELESS LED
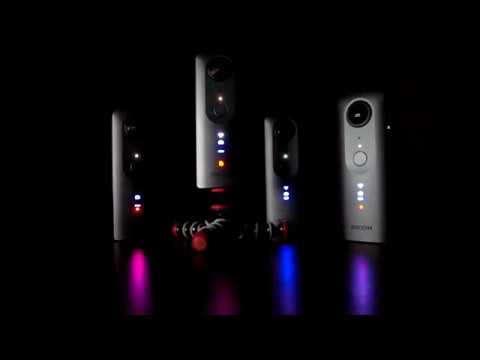
With what I have learned so far, I have made a plug-in that changes the wireless LED colors randomly and stops when the shutter button is pressed. Please see the video at the beginning of this article.
The 2 changes below will be added.
MainActivity- AndroidManifest.xml
CHANGING MainActivity
MainActivity was changed as shown below.
package com.theta360.pluginapplication;

import android.os.Bundle;
import android.view.KeyEvent;
import com.theta360.pluginapplication.task.TakePictureTask;
import com.theta360.pluginapplication.task.TakePictureTask.Callback;
import com.theta360.pluginlibrary.activity.PluginActivity;
import com.theta360.pluginlibrary.callback.KeyCallback;
import com.theta360.pluginlibrary.receiver.KeyReceiver;
import com.theta360.pluginlibrary.values.LedColor;
import com.theta360.pluginlibrary.values.LedTarget;

import java.util.Random;
import java.util.Timer;
import java.util.TimerTask;

public class MainActivity extends PluginActivity {

    //define schedule time interval
    private static final int TIMER_INTERVAL_PERIOD = 250;

    @Override
    protected void onCreate(Bundle savedInstanceState) {
        super.onCreate(savedInstanceState);
        setContentView(R.layout.activity_main);

        //set timer so LED color will renew at certain time interval
        Timer timer = new Timer();

        Random ledColorRand = new Random();
        Random ledTargetRand = new Random();
        Random ledHideRand = new Random();

        //set run to perform every 250ms
        timer.schedule(new TimerTask() {
            @Override
            public void run() {
                //select LED color randomly
                int ledColorNum = ledColorRand.nextInt(LedColor.values().length);
                //select turning on LED randomly
                int ledTargetNum = ledTargetRand.nextInt(LedTarget.values().length);
                //select turning off LED randomly
                int ledHideNum = ledHideRand.nextInt(LedTarget.values().length);

                //turn on LED3 with randomly selected color
                notificationLed3Show(LedColor.values()[ledColorNum]);
                //turn on randomly selected LED
                notificationLedShow(LedTarget.values()[ledTargetNum]);
                //turn off randomly selected LED
                notificationLedHide(LedTarget.values()[ledHideNum]);
            }
        }, 0, TIMER_INTERVAL_PERIOD);


        // Set a callback when a button operation event is acquired.
        setKeyCallback(new KeyCallback() {
            @Override
            public void onKeyDown(int keyCode, KeyEvent event) {
                if (keyCode == KeyReceiver.KEYCODE_CAMERA) {
                    //by ending Timer, end randomly flashing color with certain interval
                    timer.cancel();
                    //turn off LED
                    notificationLedHide(LedTarget.LED3);
                    notificationLedHide(LedTarget.LED4);
                    notificationLedHide(LedTarget.LED5);
                    notificationLedHide(LedTarget.LED6);
                    notificationLedHide(LedTarget.LED7);
                    notificationLedHide(LedTarget.LED8);
                }
            }

            @Override
            public void onKeyUp(int keyCode, KeyEvent event) {
            }

            @Override
            public void onKeyLongPress(int keyCode, KeyEvent event) {
                //by ending Timer, end randomly flashing color with certain interval
                timer.cancel();
                //turn off LED
                notificationLedHide(LedTarget.LED3);
                notificationLedHide(LedTarget.LED4);
                notificationLedHide(LedTarget.LED5);
                notificationLedHide(LedTarget.LED6);
                notificationLedHide(LedTarget.LED7);
                notificationLedHide(LedTarget.LED8);
                //notification that plug-in has ended correctly
                notificationSuccess();
            }
        });
    }
}
Looking at the details…
//set run to perform every 250ms
timer.schedule(new TimerTask() {
    @Override
    public void run() {
        //select LED color randomly
        int ledColorNum = ledColorRand.nextInt(LedColor.values().length);
        //select turning on LED randomly
        int ledTargetNum = ledTargetRand.nextInt(LedTarget.values().length);
        //select turning off LED randomly
        int ledHideNum = ledHideRand.nextInt(LedTarget.values().length);

        //turn on LED3 with randomly selected color
        notificationLed3Show(LedColor.values()[ledColorNum]);
        //select turning on LED randomly
        notificationLedShow(LedTarget.values()[ledTargetNum]);
        //select turning off LED randomly
        notificationLedHide(LedTarget.values()[ledHideNum]);
    }
}, 0, TIMER_INTERVAL_PERIOD);
timer.schedule will be called only once after running, because it was placed within onCreate. However, the run inside of onCreate will be called up periodically. With timer.schedule, run will be performed every 250ms.
    @Override
    public void onKeyDown(int keyCode, KeyEvent event) {
        if (keyCode == KeyReceiver.KEYCODE_CAMERA) {
            //by ending Timer, end randomly flashing color with certain interval
            timer.cancel();
            //turn off LED
            notificationLedHide(LedTarget.LED3);
            notificationLedHide(LedTarget.LED4);
            notificationLedHide(LedTarget.LED5);
            notificationLedHide(LedTarget.LED6);
            notificationLedHide(LedTarget.LED7);
            notificationLedHide(LedTarget.LED8);
        }
    }
Originally, the code to take pictures with the camera was placed inside onKeyDown, but that part was rewritten to deal with turning off the LED. run, which had been periodically running with timer.cancel, is stopped. After that, updating the LED ends.
The last step is to turn the LED off by notificationLedHide.
        @Override
        public void onKeyLongPress(int keyCode, KeyEvent event) {
            //by ending Timer, end randomly flashing color with certain interval
            timer.cancel();
            //turn LED off
            notificationLedHide(LedTarget.LED3);
            notificationLedHide(LedTarget.LED4);
            notificationLedHide(LedTarget.LED5);
            notificationLedHide(LedTarget.LED6);
            notificationLedHide(LedTarget.LED7);
            notificationLedHide(LedTarget.LED8);
            //notification that plug-in has ended correctly
            notificationSuccess();
        }
onKeyLongPress is called up when the Mode Button is pressed for a long time.
Inside of onKeyLongPress, the process of ending the plug-in is performed.
timer.cancel and notificationLedHide have the same processing purpose as onKeyDown.
Finally, notificationSuccess is run to notify that the plug-in has ended correctly.
CHANGING AndroidManifest.xml
Because the THETA has no screen, the following change was made.
AndroidManifest.xml
        <activity android:name=".MainActivity"
            android:screenOrientation="portrait"
            >
            <intent-filter>
                <action android:name="android.intent.action.MAIN" />

                <category android:name="android.intent.category.LAUNCHER" />
            </intent-filter>
        </activity>
In order to set the screen orientation, android:screenOrientation=“portrait” was added.
Without this code, when the THETA is tilted, it would be recognized that the screen has turned and onCreate would be run. As long as Android is running, when the screen is turned, the app is initialized.
TWEETS BY MERONPAN
How do you like a camera that can’t take a picture, but can sparkle with flashing LEDs? By using the code introduced here, I think it’s really fun to make an original plug-in that flashes LEDs, changing button types and button operation types.
I’m sure by now you are in love with THETA plug-ins!
If you are interested in THETA plug-in development, please register for the partner program!
Please be aware that the THETA with its serial number registered with the program will no longer be eligible for standard end-user support.
For detailed information regarding partner program please see here.
The registration form is here.

