This article is translated by @jcasman from the original here (JAPANESE).
Introduction
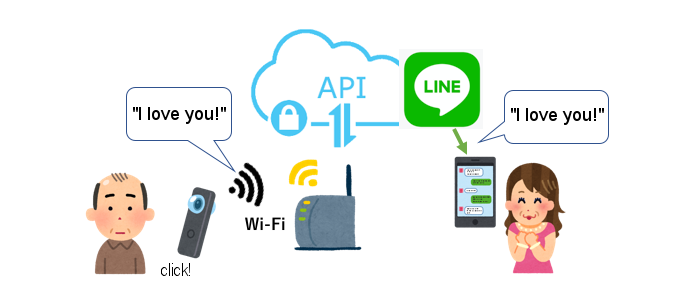
Hello, this is @ueue from RICOH. I’m a middle aged man who doesn’t recover from summertime fatigue till, oh, the end of the year. Do you tell your loved ones that you love them? If you are like me, sometimes it’s hard to say “I love you” directly to loved ones. So, I’ve made a plug-in to send a love note via the messaging service LINE using RICOH THETA.
For this plug-in, set the THETA to wireless client mode and keep it connected to a network, then utilize the LINE messaging API to send out messages.
This is the basic idea.
For people wondering “What are plug-ins?” here is a quick explanation. The newest model (as of August 6, 2018), the RICOH THETA V, uses an Android-based OS, so functionality can be expanded by installing apps. In the world of THETA, apps are called plug-ins.
If you are interested in developing plug-ins, please register for the Partner Program.
Please also follow this Twitter account (JAPANESE) for more information regarding the THETA plug-ins!
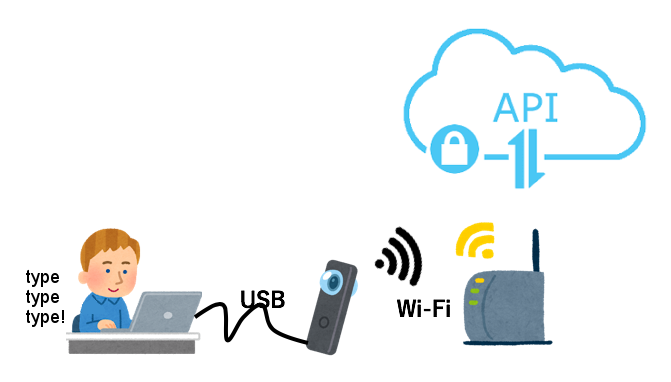
A key point of this article, for development purposes, is connecting a THETA to a desktop computer using USB and Wi-Fi simultaneously. THETA is set not to be connected to Wi-Fi when connected to USB. However, this makes it hard to develop plug-ins that access the network. So, I’m going to introduce a trick that can only be used in developer mode that allows a THETA to be connected to both USB and Wi-Fi.
Here is what the development looks like when using this trick.
Preparing the LINE Messaging API
Let’s prepare to send a message to LINE. From the LINE Developer console, create a provider and channel and issue an access token (long term). For this procedure, I’ve referenced this article (JAPANESE).
When you are testing for yourself, write down the User ID, which is in the Developer console’s channel main settings. When you send a message to this User ID, the message is send to you.
When you want to send a message to your loved one, set up Webhook, use the QR code in the same channel main settings, guide the loved one to register to the channel (app) as a friend. As soon as your loved one is added as a friend, the loved one’s User ID will be sent to Webhook, so please write down the ID.
The way to send message from the created app is in the Messaging API Reference called Sending Push Messages.
Below is how you can send message using the curl command.
curl -v -X POST https://api.line.me/v2/bot/message/push \
-H 'Content-Type:application/json' \
-H 'Authorization: Bearer <Access Token>' \
-d '{
    "to": "<User ID>",
    "messages":[
        {
            "type":"text",
            "text":"I love you"
        },
        {
            "type":"text",
            "text":"I love you so much"
        },
        {
          "type": "sticker",
          "packageId": "1",
          "stickerId": "409"
        }
    ]
}'
Input the access token issued above in , and input the User ID you wrote down in . To test it first, input your User ID.
For Message Objects, please see this link.
To send a stamp, input “sticker” for the type value, and input sticker ID and package ID for the stamp you want to send. For correspondence between stamps and package ID and sticker ID, please see this list.
You’ve succeeded if you inputted the above curl command from a terminal and received a message on LINE.
Connecting the THETA to a Network
It is possible to connect the THETA to a network, by switching THETA to wireless client mode. Please see “Connecting to a Smartphone via Wireless LAN” for the procedure.
How to Activate THETA’s Wi-Fi While Connected to the USB
For development, connect the THETA to a desktop computer via USB. The Wi-Fi indicator will turn off when the THETA is connected.
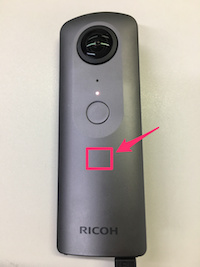
No Wi-Fi - Compare to next image below
THETA is set so that Wi-Fi is unavailable while connected to USB. But this will make development more difficult for network connected plug-ins. However, in development mode, Wi-Fi becomes available while connected to USB using the command below.
adb shell settings put global usb_debug true
Disconnect USB from the THETA once, wait for Wi-Fi to become available, then connect the THETA to USB again. If the Wi-Fi indicator, which was off before, stays lit, then you have succeeded.
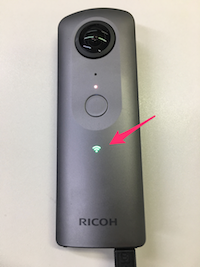
Wi-Fi indicator on
In this state, since USB and Wi-Fi connections are both available, it becomes possible to install an apk using Android Studio, and also confirm the network connection.
Explanation of the Plug-in Code
Below is the plug-in source code.
package com.theta360.pluginapplication;

import android.os.AsyncTask;
import android.os.Bundle;
import android.util.Log;
import android.view.KeyEvent;

import com.theta360.pluginlibrary.activity.PluginActivity;
import com.theta360.pluginlibrary.callback.KeyCallback;

import java.io.IOException;
import java.io.OutputStream;
import java.net.HttpURLConnection;
import java.net.URL;

public class MainActivity extends PluginActivity {

    @Override
    protected void onCreate(Bundle savedInstanceState) {
        super.onCreate(savedInstanceState);

        setKeyCallback(new KeyCallback() {

            @Override
            public void onKeyDown(int keyCode, KeyEvent event) {
                new SendMessageTask().execute();
            }

            public void onKeyUp(int keyCode, KeyEvent event) {
            }

            public void onKeyLongPress(int keyCode, KeyEvent event) {
            }
        });
    }

    private static class SendMessageTask extends AsyncTask<Void, Void, Void> {

        @Override
        public Void doInBackground(Void... params) {
            final String token = "<Access Token>";
            final String user_id = "<User ID>";

            final String data = "{"
                    + "\"to\":\""
                    + user_id
                    + "\","
                    + "\"messages\":["
                    + "{\"type\":\"text\",\"text\":\"I love you\"},"
                    + "{\"type\":\"text\",\"text\":\"I love you so much\"},"
                    + "{\"type\":\"sticker\",\"packageId\":\"1\",\"stickerId\":\"4\"}"
                    + "]}";
            try {
                final String url = "https://api2.line.me/v2/bot/message/push";
                HttpURLConnection connection = createConnection(url, token);
                sendData(data, connection);
            } catch (Exception e) {
                e.printStackTrace();
            }
            return null;
        }

        private HttpURLConnection createConnection(String url, String token) throws IOException {
            HttpURLConnection connection = (HttpURLConnection) new URL(url).openConnection();
            // Settings for connecting
            connection.setRequestMethod("POST");
            connection.setRequestProperty("Content-Type", "application/json");
            connection.setRequestProperty("Authorization", "Bearer " + token);
            connection.setRequestProperty("Accept", "application/json");

            // Allows settings for return value from API and data to be sent
            connection.setDoOutput(true);

            return connection;
        }

        private void sendData(String data, HttpURLConnection connection) throws IOException {
            try (OutputStream out = connection.getOutputStream()) {
                // Connecting
                connection.connect();

                // Write data to be sent
                out.write(data.getBytes("UTF-8"));
                out.flush();
                connection.getResponseCode();
            } finally {
                connection.disconnect();
            }
        }
    }
}
Here are some things to be careful of.
There was an error message when the official Messaging API domain was set to api.line.me in the API’s URL specified part, so it was switched to api2.line.me which was registered in CNAME.
final String url = "https://api2.line.me/v2/bot/message/push";
I have re-written the access token’s value and User ID in this sample code.
final String token = "<Access Token";
final String user_id = "<User ID>";
For the parameters for the access token and User ID, I recommend setting up using the 5 steps shown here. (Trans - This is the English version of the link included in the original article, but it is unclear if this is related information.)
From the plug-in side, the Web server will start inside the plug-in as described here. For how to implement, I am hoping someone else in the RICOH THETA plug-in community will explain further.
For handling exceptions, I’m not including that here, so please implement it on your own.
Experimenting with Running the Plug-in
I’m going to be a guinea pig and send the love note to my wife. First, I’m going to send her the QR code, in order to have her register with the created channel (app) as a friend.
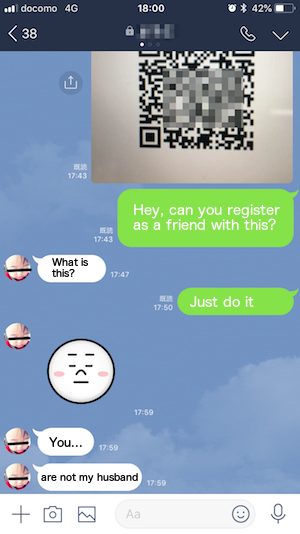
Yikes. A stumble. She thinks I’m a fake. My wife is very careful about internet scams. I failed to have her register with the app as friend. (I went for reality, and didn’t tell my wife ahead of time that I was doing this. It backfired.)
Since that didn’t work, I changed the User ID to me, and ran it. Here’s the screenshot.
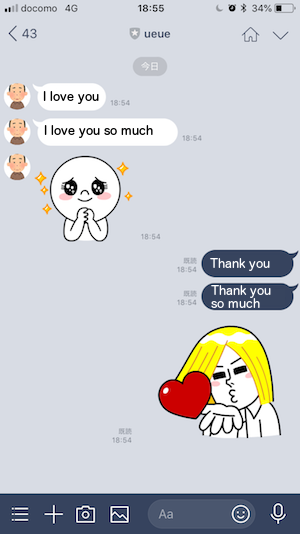
So, that’s actually me sending a message to myself and replying to myself. Not quite as romantic as originally intended.
I noticed that you cannot confirm if you got a reply or not with the THETA. (You can confirm using the Webhook’s URL.)
I am planning to write a sequel to this article for a method to send 360 degrees images via LINE. LINE’s viewer is compatible of handling 360 degrees images, so I think that will look great.
Conclusion
-
I’ve explained a way to connect a THETA in developer mode to a desktop computer via USB and Wi-Fi at the same time.
-
I’ve created a plug-in to send LINE messages using a THETA connected to Wi-Fi.
-
This is compatible not only to LINE but to other cloud service APIs.
If you are interested in THETA plug-in development, please register for the partner program!
Please be aware that the THETA with its serial number registered with the program will no longer be eligible for standard end-user support.
For detailed information regarding partner program please see here.
The registration form is here.
Extra Resources
If you’ve registered with the Partner Program (putting your THETA in developer mode) and have sent in your serial number (allowing you to develop and upload plug-ins), I’ve got some super useful resources for you!
theta360.guide has pulled together a Top 10 THETA Developer Tips, pulling together feedback from developers, saving you time. We also have some choice apks that you can load immediately and try out with documentation and source code.
Work with speaker volume, record audio files, build a Web GUI for your THETA and lots more!
Send us your contact info and you’ll get an email will all the download links.