A Theta 360 plugin for providing live view over WebRTC, assisted with TensorFlow based object detection.

Story
Introduction
In this project I will show how I built the AI Assisted 360° Live View plugin for the Theta V camera.
The plugin provides 360° Live View functionality using WebRTC , and object detection using TensorFlow .
In a more advanced form, the plugin could be used to remotely assist personnel in different use cases , like for example in rescue operations .
The Theta V camera could be either wear by a person , or mounted on remote controlled vehicles like drones / rovers .
More about the project idea can be found here .
The source code of the plugin can be found in the GitHub repository linked to the project
A pre-compiled APK of the plugin is available here .
The plugin is in the process to being published in the Theta 360 plugin store .
Web RTC based Live View
The live view functionality is based the the WebRTC sample plugin .
shrhdk_ the author of the WebRTC sample plugin , describes the plugin’s functioning in the following article .
(note: the article is in Japanese, but Google Translate can be used pretty well to read it)
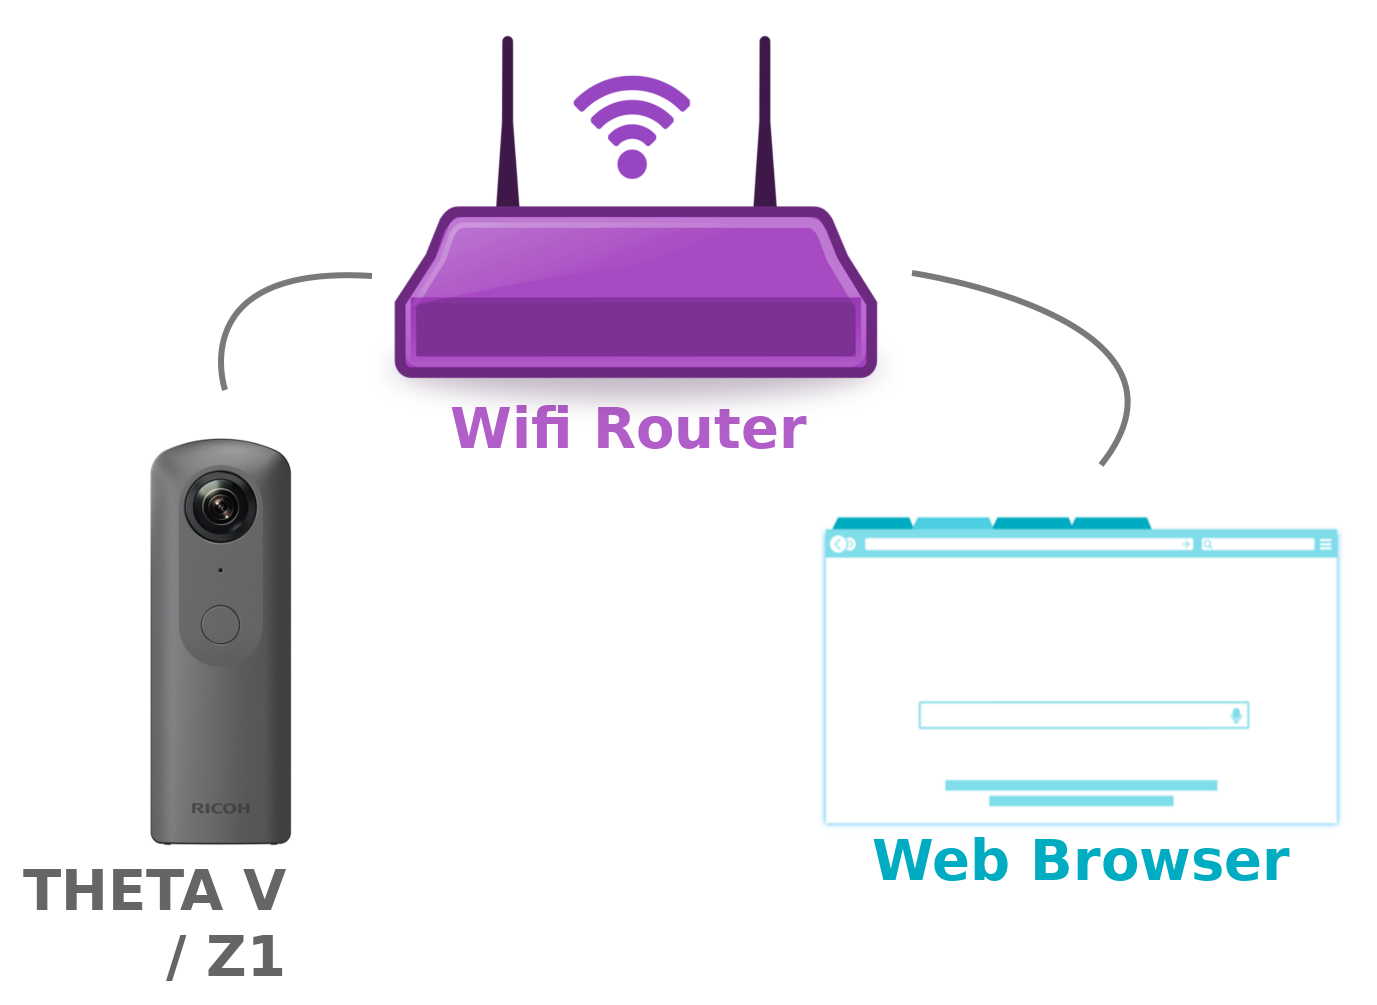
The plugin uses three communication channels with the web interface :
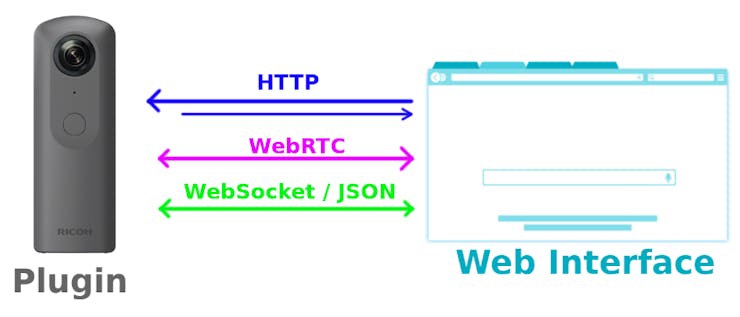
- a HTTP server is used serve the web interface and to provide control over the camera
- WebRTC is used for the for the video and audio live streaming
- a WebSocket connection with a JSON based protocol is used to negotiate the WebRTC connection details
TensorFlow based Object Detection
TensorFlow can be easily used to on the Theta V cameras. Craig Oda explains how to do this in the following article .
The source code can be found in the mktshhr/tensorflow-theta repository. This is basically a fork of the official tensorflow repository with the Android TensorFlow example packed into a Theta plugin and adjusted to work on the Theta V / Z1.
Building the AI Assisted 360° Live View plugin
The plugin was built using Android Studio :
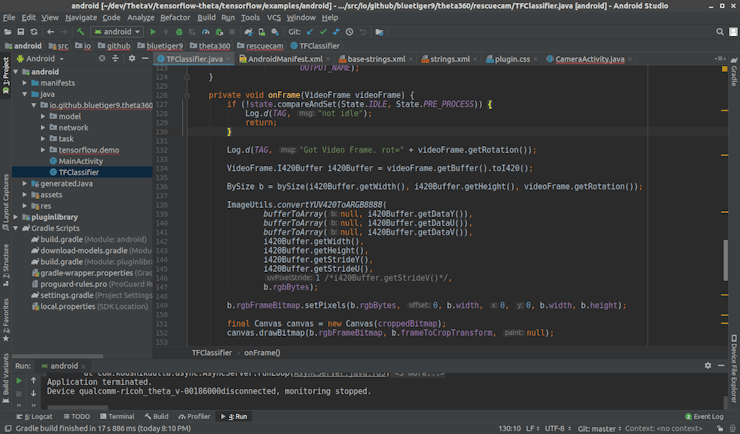
I started from the theta360developers/tensorflow-theta repository. I built the project and using Vysor I checked the plugin is working as expected.
The I added the WebRTC functionality from the ricohapi/theta-plugin-webrtc-sample repository. This also worked, so at this point I had a plugin with the WebRTC functionality and support for writing TensorFlow code.
The next step was to add TensorFlow object detection functionality over the WebRTC video streaming .
This was a little bit trickier as the the TensorFlow examples ( ClassifierActivity , CameraActivity ) used the Android Media API to capture images from the camera , while the WebRTC plugin used native video sinks and the two are not compatible.
To fix this from a created a new class TFClassifier with just TensorFlow functionality object detection functionality from ClassifierActivity , but not he media API part.
Next, I added to the WebRTC class a callback interface that can be used to get access to the camera’s MediaStream when it is ready.
public class WebRTC {
  ...
  private Consumer<MediaStream> mediaStreamCallback;
  ...
  public void setMediaStreamCallback(Consumer<MediaStream> mediaStreamCallback) {
      this.mediaStreamCallback = mediaStreamCallback;
  }
  ...
  private void setupLocalStream(...) {
      mLocalStream = mFactory.createLocalMediaStream("android_local_stream");
      ...
          if (mediaStreamCallback != null) {
              mediaStreamCallback.accept(mLocalStream);
          }
      ...
  }
Then we can use this interface to give the TFClassifier class a VideoTrack :
mWebRTC = new WebRTC(this);mWebRTC.setMediaStreamCallback(mediaStream -> {
   Log.d(TAG, "Got Media Stream: " + mediaStream);
   new TFClassifier(mediaStream.videoTracks.get(0), getAssets(),
           ...
           });
});
To the VideoTrack we can then in TFClassifier add a custom VideoSink :
public TFClassifier(VideoTrack videoTrack, ...) {
   ...
   videoTrack.addSink(this::onFrame);
   ...
}

private void onFrame(VideoFrame videoFrame) {
   ...
}
The VideoFrame we get here, with a little bit of image processing magic, can be converted to the Bitmap needed by TensorFlow :
private final Map<String, BySize> bySize = new HashMap<>();private static class BySize {
   final int[] rgbBytes;
   final int width;
   final int height;
   final int rotation;
   final Matrix frameToCropTransform;
   final Bitmap rgbFrameBitmap;
   BySize(int width, int height, int rotation) {
       this.width = width;
       this.height = height;
       this.rotation = rotation;
       rgbBytes = new int[width * height];
       rgbFrameBitmap = Bitmap.createBitmap(width, height, Bitmap.Config.ARGB_8888);
       frameToCropTransform = ImageUtils.getTransformationMatrix(
               width, height,
               INPUT_SIZE, INPUT_SIZE,
               rotation, MAINTAIN_ASPECT);
   }
}

private void onFrame(VideoFrame videoFrame) {
   ...
   Log.d(TAG, "Got Video Frame. rot=" + videoFrame.getRotation());
   VideoFrame.I420Buffer i420Buffer = videoFrame.getBuffer().toI420();
   BySize b = bySize(i420Buffer.getWidth(), i420Buffer.getHeight(), videoFrame.getRotation());
   ImageUtils.convertYUV420ToARGB8888(
           bufferToArray(null, i420Buffer.getDataY()),
           bufferToArray(null, i420Buffer.getDataU()),
           bufferToArray(null, i420Buffer.getDataV()),
           i420Buffer.getWidth(),
           i420Buffer.getHeight(),
           i420Buffer.getStrideY(),
           i420Buffer.getStrideU(),
           1 /*i420Buffer.getStrideV()*/,
           b.rgbBytes);
   b.rgbFrameBitmap.setPixels(b.rgbBytes, 0, b.width, 0, 0, b.width, b.height);
   final Canvas canvas = new Canvas(croppedBitmap);
   canvas.drawBitmap(b.rgbFrameBitmap, b.frameToCropTransform, null);
   ...
Note: that the VideoFrame cumming may not always be the same size , as the plugin may switch between different resolutions . The BySize sub-class is a helper structure used to cache structures for each resolution.
Then we can run image recognition on the obtained BitMap ;
public TFClassifier(...) {
   ...
   classifier =
           TensorFlowImageClassifier.create(
                   assetManager,
                   MODEL_FILE,
                   LABEL_FILE,
                   INPUT_SIZE,
                   IMAGE_MEAN,
                   IMAGE_STD,
                   INPUT_NAME,
                   OUTPUT_NAME);
}

private void recognize() {
   final long startTime = SystemClock.uptimeMillis();
   final List<Classifier.Recognition> results = classifier.recognizeImage(croppedBitmap);
   long lastProcessingTimeMs = SystemClock.uptimeMillis() - startTime;
   Log.i(TAG, String.format("Detect: %s (time=%dms)", results, lastProcessingTimeMs));
   ...
}
Because the image recognition can be time consuming (~100+ ms) it is ran on a separate thread (Android Handler / HandlerThread ). When a new frame arrives, it is pre-processed , the job is passed to a Handler in which the image recognition is done.
private void onFrame(VideoFrame videoFrame) {
   if (!state.compareAndSet(State.IDLE, State.PRE_PROCESS)) {
       Log.d(TAG, "not idle");
       return;
   }
   ...
   handler.post(() -> {
      if (!state.compareAndSet( State.PRE_PROCESS,  State.PROCESS)) {
          Log.d(TAG, "not pre-process");
          return;
      }
      recognize();
      if (!state.compareAndSet(State.PROCESS, State.IDLE)) {
          Log.d(TAG, "not process");
          return;
      }
   });
To avoid over-loading the Handler thread, when the image recognition is still running for a frame , any new frame is dropped . This way the image recognition may run at lower frame rate compared to the live video stream , but it remain be up to date instead of getting delayed.
The result of the image recognition is passed to a callback :
private final Consumer<String> detectionCallback;

private void recognize() {
   ...
   final String json = new Gson().toJson(results);
   detectionCallback.accept(json);
}
Then, in the MainActivity class, the result is sent to the web interface , over a WebSocket connection using a custom-type message:
new TFClassifier(mediaStream.videoTracks.get(0), getAssets(), detectionJson -> { mWsClient.send( "{ \"type\":\"tf-detection\", \"data\" : " + detectionJson + " }"); });
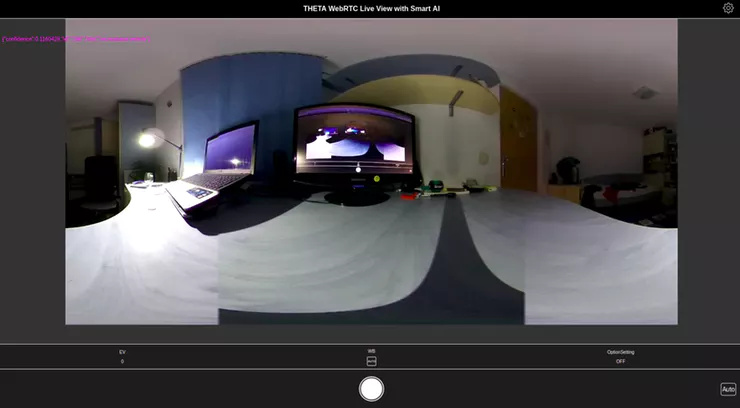
On the Web Interface size, right now the result is just displayed over the video stream in a RAW form on a Canvas .
webSocket.onmessage = function(evt) {
   console.log('WebSocket onmessage() data:', evt.data);
   let message = JSON.parse(evt.data);
   switch (message.type) {
   ...
   case 'tf-detection': {
       console.log(message);
       ctx.fillStyle = "#ff00ff";
       ctx.font = "12px Arial";
       let y = 50;
       for (var i = 0; i < message.data.length; i++) {
           let text = JSON.stringify(message.data[i]);
           ctx.fillText(text, 10, y);
           y += ctx.measureText(text).height;
       }
       break;
Future Work
Note that the plugin is still in a PoC / Beta / phase and can be improved a lot.
The enhancements I plan to do are:
- a much better User Interface
- TensorFlow models that also provide location data of the recognized objects , so that these can be show on the live stream
- multi box detection - currently the camera image is scaled / cropped before the image recognition is done
- support to use for custom TensorFlow models provided by the user
- OpenCV based image filtering / pre-processing
Enjoy!