Just heard from Ichi Hirota that he plans to update his plug-in with the option for 9 bracketing shots covering +4EV. Thanks for your work with this.
2 Likes
Very nice info! @codetricity
I hope to have a couple of different type’s apk. 3 bracketing, 5, or 9…etc. to switch apks in the various scenes.
Current 3 bracketing (±1) may be good for outside shooting.
Thanks.
Toyo
2 Likes
Very promising development!
Has anyone attempted to extract a raw dual fisheye image?
Which of the three scenarios is the most convenient for you?
- separate plug-ins, one for a specific purpose?
- one plug-in that gives you the ability to toggle between different presets using the side buttons on the camera?
- use a mobile app to configure a single plug-in?
I can pass the information on to Ichi Hirota and also see if some developers we met at the workshop are interested in continuing the development to meet the needs of the active streetview photography community.
I do not think this is possible. The dual-fisheye image is still a jpeg image that has been processed and compressed. The main difference is that it hasn’t been stitched.
If you can provide more information as to why you need the RAW format and what type of information you need in the RAW format, I can send this to people I know at Ricoh.
As the RAW format is broad, it might help if they could incorporate only a portion of the information in a file-type.
I read through the Wikipedia entry on RAW format, but I can’t understand it too much. I’m assuming that there is a RAW format produced by other cameras that you can open in Photoshop or similar software. That format doesn’t have noise reduction or compression applied to it. You can then get rid of mosaic, noise, and adjust color per region? I’ve never used RAW format, so I am just guessing.
Hi, @codetricity
No.1
Currently, this is the reasonable choice. I do so now. I have three different APKs in my THETA V.
No.2
There is a possibility of failure to switch the presets. Because button operations(Mode,Wifi) are sensitive.
No.3
If we can connect Theta V with both Wifi and Bluetooth during the Plugin mode, No.3 would be the best solution in the scenarios.
1 Like
RAW format is preferable for HDR capture as it provides the data directly from the sensor. Compared to JPEG images this has the following advantages:
- larger bit depth (usually 10 to 14 bits vs 8bits) so greater dynamic range
- linear data without post-processing, so we avoid WB correction, gamma or SRGB conversion and other aesthetic tweaks as well as JPEG compression.
This allows for more direct and accurate HDR stacking. It’s particularly good for avoiding chromatic edge artefacts.
A number of other 360 cameras now offer raw output in DNG format, so it would be great if the Theta could do so also.
2 Likes
This is great, detailed information. I’ll include this post verbatim in a meeting @jcasman and I have scheduled with the THETA product manager.
It seems like the image file should have
- 10 to 14 bits
- linear data
I found an easy to understand explanation of linear data images here.
2 Likes
Thank you for this feedback. I’ll ask @jcasman to send this to Ichi Hirota and other developers he is in contact with.
BTW, I think we can resolve the side button sensitivity by adding code to handle long button presses.
The current plug-in may not handle long button presses and camera orientation changes. In the future, we can write some code to handle these conditions.
For number 3, it’s unlikely the community can implement Bluetooth in the short term as we lack a good example with source code.
The configuration tool would have to use Wi-Fi. It would need to be set only once and the configuration would be saved to the camera and survive power off.
I’m now thinking that this might be an inconvenience for the workflow and that scenario 1 or 2 might be better and easier.
1 Like
Hi Craig,
Thanks for picking this up.
I’ll add two other points:
-
most cameras now use DNG format as a documented and standard raw format rather than a proprietary encoding. This is the case for the other Theta competitors that already support raw output.
-
I haven’t experimented with the android.api.camera implementation on the Theta but it seems that raw support is sometimes possible through this API, although in somewhat non-standard ways. The best way to provide raw support would be to simply expose it ro the higher level interfaces through OSC and the Theta app.
But… If anyone has spent time trying to access raw data already using the plugin APIs please share your findings either positive or negative!
Thanks
Daniel
1 Like
Daniel, thanks for this additional insight.
I don’t think anyone has experimented with the API extensively. It’s possible that there is functionality that is not in the documentation.
If the community can figure something out that does not require firmware modifications from Ricoh, this would be the best solution. There’s Android shell and API access, but no root right now.
If we need Ricoh to make a change, it will likely take or long time or be impossible.
My understanding from talking to a Ricoh manager in a casual conversation a year ago is that there are concerns about exposing too much information in the metadata. To review the metadata and get authorization to release the metadata with the RAW image would take a long time. Right now, I don’t think Ricoh has anyone assigned to review the metadata for possible OK to release.
Thus, it would be best if we can figure out something from the community.
Thanks for this info.
Hi, @codetricity, @jcasman
I’ve reproduced the issue above mentioned with my THETA V. Got it!
Please try the following steps to confirm my reproducing it.
Steps.
1.Power on Theta V.
2.Connect your phone with Theta V over wifi and Bluetooth.
3.Start Theta app and set HDR rendering mode while seeing the preview.
4.Take s shot! and transfer the photo to your phone and view it.
5.Close Theta app.
6.Toggle off wifi and Bluetooth on your phone.
7.Press Mode button for 2sec.to enter Plugin Mode.
8.Press Wifi button to change bracketing mode.
9.Press shutter button to take 3 shots.
10.Press Mode button to enter normal mode.
11.Shut down Theta V and reboot it.(You can skip step.10)
12.Press Mode button to enter Plugin mode.
13.Press wifi button to change bracketing mode.
14.Press shutter button again to take 3 shots.
15.Plug Theta V to your computer and browse DCIM folder.
16.You’ll find 4 Dual Fisheye images 3 equirectangular images.
That’s all.
Hope this helps.
Toyo
1 Like
Thanks for this test. Just to confirm, you’re using the dual-fisheye plug-in from the THETA Store, correct? The one published by Ichi Hirota?
1 Like
Yes, Craig san(@codetricity)
Thanks. We’ll reproduce this and send the tests to Ichi Hirota.
1 Like
hi, Craig(@codetricity)
I’ve found useful Tips for Dual Fisheye Plugin.
- Reboot Theta V every time to switch over Plugin Mode.
- Do not use “Start plug-in” option on app.
- Do not sleep for Plugin Mode.
- At the first shooting of the day, there would be a lot of noises.
Do you believe me?
And, today I visted the 4th. RICOH THETA official Photo Exhibition in Osaka/Japan.

I took some shots with Dual Fisheye Plug-in at the booth. Now on stitching.
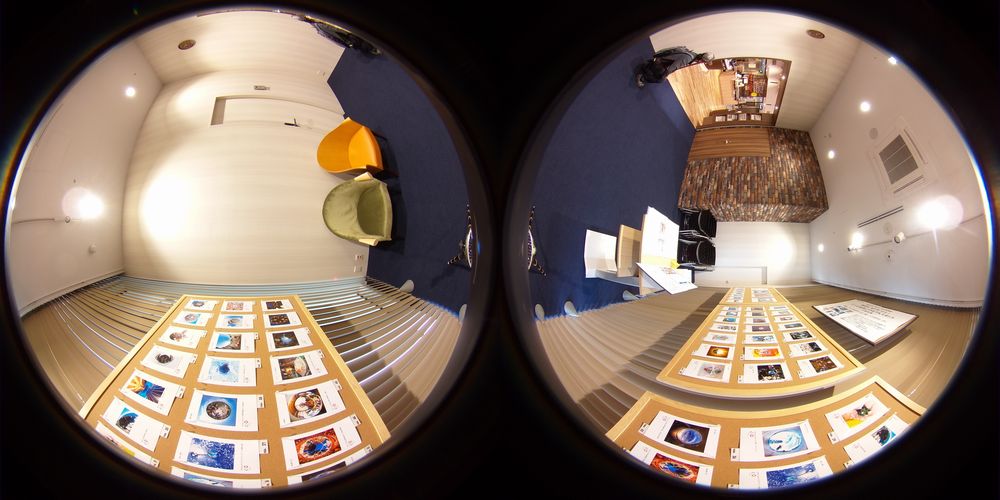
Stay tuned!
Toyo
2 Likes
This is great. Is any of your work displayed?
You take great shots.
Thanks for all this wonderful information.
@Juantonto Thanks for posting! I’m interested in this exhibition. Is this held at RICOH Imaging Square? I found this link here: http://www.ricoh-imaging.co.jp/english/community/squareosaka/
1 Like
Are you planning to go?
You should organize a theta360 Street View exhibition at the Google campus in Mountain View. It would require a cheap computer like a chromebook to show each picture.
1 Like
Yes,
You can enjoy the place above in my Theta.BIZ Virtual Tour.

I will add the latest images on it.
Caution; annoying ad banner is displayed right in the center.
Stay tuned!
Toyo
2 Likes