Try Out Slit-Scan with a THETA Plug-in
This article originally appeared here in Japanese.
Introduction
I’m KA-2, I work at RICOH, nice to meet you!
We have a camera called RICOH THETA that can shoot in 360 degrees. The models RICOH THETA V and RICOH THETA Z1 use Android as their OS. This allows you to customize your THETA by making an Android app. The way to do this is called building a “plug-in” (see the end of this article for more details).
This time through, the content here on the level of "I experimented with it.” The resulting video doesn’t look too good, but as a still image, you can get a feel for what’s possible.
https://twitter.com/thetaplugin/status/1341568621659660289 (The tweet is in Japanese, but it provides examples in a short video. Turn on audio for musical accompaniment.)
Can THETA use this type of video method known as “Slit-Scan” when taken with a normal camera? I decided to try it.
What is Slit-Scan?
If you search online, you will find many articles that appear easy to understand. This one from wikipedia, appears at the top of the search results. This one is in Japanese but has abundant examples.
For the time being, if I give my own explanation, I interpret Slit-Scan as a method of “creating images with staggered lines.” It seems that it is called “Slit-Scan” because “line” = slit and “shift time” = scan.
A scanner such as a copier is something that is easy to understand in your immediate surroundings. In examples where the time lag is too short to be noticed, the image is actually created by moving the slit even when the shutter speed is very high in a camera with a mechanism called a mechanical shutter (focal plane shutter). Furthermore, such a phenomenon also occurs in digital cameras (especially smartphones) that do not have a mechanical shutter, and some people may be familiar with the phenomenon known as "rolling shutter distortion.” When you take a video from the window of a train, the utility pole collapses and the car or train that crosses the video looks distorted.
It is a shooting method or type of video expression that intentionally causes distortion.
In this experiment, the scanning direction was from top to bottom or bottom to top. When scanning side to side, pedestrians look like needles, a cat’s torso disappears or stretches, and long trains shrink. If you scan slowly, you may get a picture close to a ghost town effect (in Japanese).
Before digital cameras evolved so much, I saw people who made their own cameras that could take high-resolution digital images by scanning light like film cameras with a line scanner for copiers.
How did I do it with THETA?
Based on this project (in Japanese) that makes live preview easier to handle with a THETA plug-in, when the plug-in receives continuous frames, it simply repeats "adopt only one horizontal image as a new image and discard the rest.” I will use the first frame.
Therefore, the update of one screen will be delayed. The higher the image resolution, the longer it takes to complete one frame of video.
The video looks like this when it is a live preview image at 1024 x 512 pixel 30fps. It takes about 17 seconds to complete one screen, so the subject can afford to make 9 to 10 rotations in front of the camera.
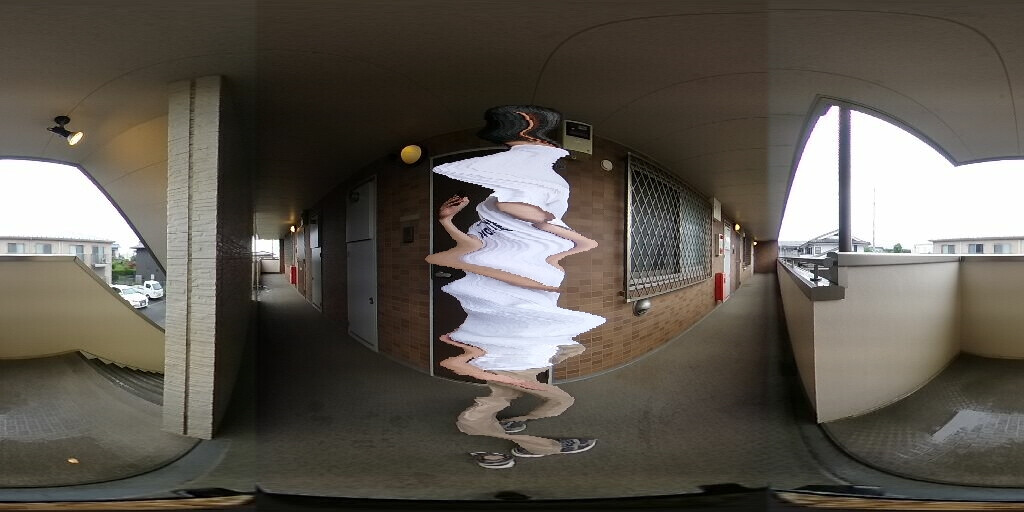
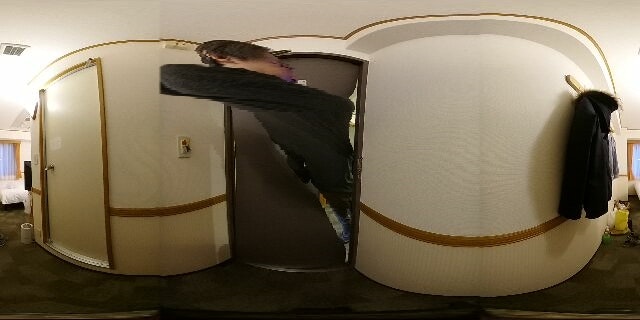
At this speed, it is quite difficult to show the entrance and exit of the door… At 640 x 320 30fps, I finally got something like this.
In music video examples that come from searching online, you can see that it is doing a fairly fast line scan.
Source Code
As mentioned above, only the thread part in Main Activity of this project has been modified. To change the resolution and frame rate, you can also change the fixed value in JavaScript in the WebUI, but check the previous article (in Japanese).
Only the thread part that makes the line scan video is excerpted.
   //==============================================================
    // OLED Thread
    //==============================================================
    public void drawOledThread() {
        new Thread(new Runnable() {
            @Override
            public void run() {
                int outFps=0;
                long startTime = System.currentTimeMillis();
                Bitmap beforeBmp = null;

                int imgWidth=0;
                int imgHeight=0;
                int posWidth=0;
                int posHeight=0;
                Bitmap bmpSlitScan=null;

                while (mFinished == false) {

                    byte[] jpegFrame = latestLvFrame;
                    if ( jpegFrame != null ) {

                        //JPEG -> Bitmap
                        Bitmap bitmap = BitmapFactory.decodeByteArray(jpegFrame, 0, jpegFrame.length);

                        if ( bmpSlitScan != null ) {
                            //vertical scan
                            Bitmap bmpSlit = Bitmap.createBitmap(bitmap, 0, posHeight, imgWidth, 1, null, true);
                            Canvas canvasSlitScan = new Canvas(bmpSlitScan);
                            Paint mPaint = new Paint();
                            canvasSlitScan.drawBitmap(bmpSlit, 0, posHeight, mPaint);

                        } else {
                            imgWidth=bitmap.getWidth();
                            imgHeight=bitmap.getHeight();
                            bmpSlitScan = Bitmap.createBitmap(imgWidth, imgHeight, Bitmap.Config.ARGB_8888);
                            Canvas canvasSlitScan = new Canvas(bmpSlitScan);
                            Paint mPaint = new Paint();
                            canvasSlitScan.drawBitmap(bitmap, 0, 0, mPaint);
                        }

                        /*
                        //Update Vertical scan position (top → bottom)
                        posHeight++;
                        if ( posHeight >= imgHeight ) {
                            posHeight=0;
                        }
                         */
                        //Update Vertical scan position (bottom → top)
                        posHeight--;
                        if ( posHeight < 0 ) {
                            posHeight = imgHeight-1;
                        }

                        //set result image
                        ByteArrayOutputStream baos = new ByteArrayOutputStream();
                        bmpSlitScan.compress(Bitmap.CompressFormat.JPEG, 100, baos);
                        latestFrame_Result = baos.toByteArray();

                        outFps++;
                    } else {
                        try {
                            Thread.sleep(33);
                        } catch (InterruptedException e) {
                            e.printStackTrace();
                        }
                    }

                    long curTime = System.currentTimeMillis();
                    long diffTime = curTime - startTime;
                    if (diffTime >= 1000 ) {
                        Log.d(TAG, "[OLED]" + String.valueOf(outFps) + "[fps]" );
                        startTime = curTime;
                        outFps =0;
                    }

                }
            }
        }).start();
    }
Since jpeg frames can be received, after converting the format to bitmap to make it easier to use Android standard image processing methods, update one line, using Canvas or Paint, to display the edited video on the Web UI. The video is jpeg.
If you do the following, it will be a horizontal scan.
                           //horizontal scan
                            Bitmap bmpSlit = Bitmap.createBitmap(bitmap, posWidth, 0, 1, imgHeight, null, true);
                            Canvas canvasSlitScan = new Canvas(bmpSlitScan);
                            Paint mPaint = new Paint();
                            canvasSlitScan.drawBitmap(bmpSlit, posWidth, 0, mPaint);
“Top to bottom” and “bottom to top” scan direction switching is done by updating posHeight.
When scanning in the horizontal direction, shift posWidth.
Conclusion
For the time being, it turned out that if you take the time with the image quality of the image obtained by live preview, you can create a Slit-Scan image. In order to be able to use it as-is, the resolution must be reduced…
It’s still in the early stages, and it feels like it’s probably difficult to add to the RICOH THETA Plug-in Store. (It would need to smooth the video while buffering it, and then implement it with NDK, etc.)
Also, be aware that you must fix the exposure parameters (aperture, shutter speed, ISO sensitivity) and white balance. In this experiment, it is set to auto, so the difference between the frames can be seen as a line.
We will continue to experiment with this. Everyone, please try different things!
About the RICOH THETA Plug-in Partner Program
If you are not familiar with the THETA plugin, please click here.
The theta360.guide developer community has a large collection of tutorials, useful articles and code samples.