This is part 2 of the FastCV article series by roohi_3 of Ricoh. This article was originally published in Japanese by roohi_3.
Part 1 - FastCV introduction and installation
Preparing the Project File
I’ll explain how to use the RICOH THETA Plug-in SDK to prepare a project file that works with Android NDK projects.
Of course, you can also create a project file from scratch.
Make sure to implement name changes prior to putting your application in the plug-in store.
In this example, the project name is theta-plugin-fastcv-simple-sample and the package name is fastcvsimplesample
Download RICOH THETA Plug-in SDK
Download the RICOH THETA Plug-in SDK from here. It is an Android Studio project.
Name Change
1 Change project file name
Rename the downloaded Android Studio project name (directory name) to an arbitrary one.
2 Change application ID and package name
Change referring to setting of application ID etc
3 Change plugin name
Open
app > res > values > strings.xml
from the project tree and change it to an arbitrary name
Example:
<string name="app_name">FastCV Simple Sample</string>
Import and Build FastCV
Import FastCV into the created project file, modify the build file, and build the project.
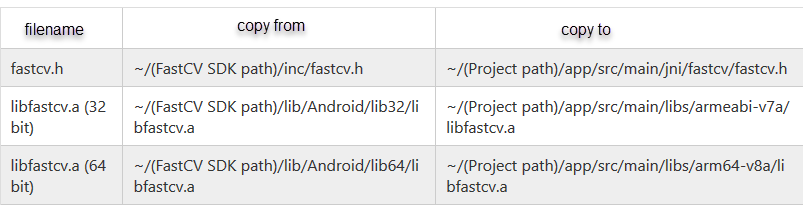
Copy the library file
Copy and paste the FastCV library file to the project you created.
- The source and destination of the file are summarized below
- Create the copy destination directory as appropriate
Edit Android.mk
- Modify the NDK build file
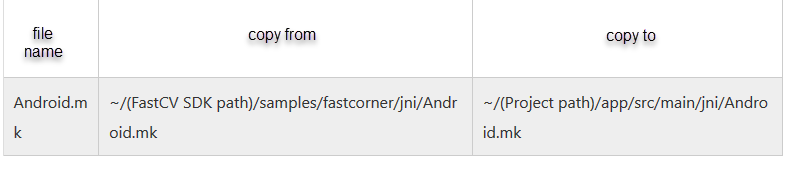
- Here, we will divert the sample project of FastCV and modify it accordingly
- Copy Android.mk to the project by referring to the table below
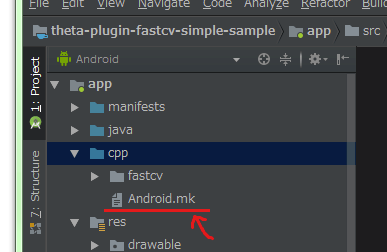
Make sure the Android Studio project tree shows the following in Android view
app > cpp > Android.mk
has been added.
Open Android.mk on Android Studio and make the following modifications
- include $(CLEAR_VARS) - add
- LOCAL_MODULE := libfastcv - add
- LOCAL_SRC_FILES := ../libs/$(TARGET_ARCH_ABI)/libfastcv.a - add
- include $(PREBUILT_STATIC_LIBRARY) - add
- LOCAL_LDLIBS from -lfastcv - comment out
- LOCAL_LDFLAGS := -Wl, --no-fix,cortex-a8 - comment out
- LOCAL_MODULE := - change name
- LOCAL_SRC_FILES := - delete value
- LOCAL_SHARED_LIBRARIES := liblog libGLESv2 - comment out
- LOCAL_MODULE_OWNER := change name
- LOCAL_JNI_SHARED_LIBRARIES := change name
- LOCAL_PACKAGE_NAME := change name
Example Android.mk
LOCAL_PATH:= $(call my-dir)
include $(CLEAR_VARS)
LOCAL_MODULE := libfastcv
LOCAL_SRC_FILES := ../libs/$(TARGET_ARCH_ABI)/libfastcv.a

include $(PREBUILT_STATIC_LIBRARY)

include $(CLEAR_VARS)
LOCAL_PRELINK_MODULE:= false

# This variable determines the OpenGL ES API version to use:
# If set to true, OpenGL ES 1.1 is used, otherwise OpenGL ES 2.0.

USE_OPENGL_ES_1_1 := false

# Set OpenGL ES version-specific settings.

ifeq ($(USE_OPENGL_ES_1_1), true)
    OPENGLES_LIB  := -lGLESv1_CM
    OPENGLES_DEF  := -DUSE_OPENGL_ES_1_1
else
    OPENGLES_LIB  := -lGLESv2
    OPENGLES_DEF  := -DUSE_OPENGL_ES_2_0
endif

# An optional set of compiler flags that will be passed when building
# C ***AND*** C++ source files.
#
# NOTE: flag "-Wno-write-strings" removes warning about deprecated conversion
#       from string constant to 'char*'

LOCAL_CFLAGS := -Wno-write-strings $(OPENGLES_DEF)

# The list of additional linker flags to be used when building your
# module. This is useful to pass the name of specific system libraries
# with the "-l" prefix.

LOCAL_LDLIBS := \
    -llog $(OPENGLES_LIB)
#      -lfastcv
# LOCAL_LDFLAGS:= -Wl,--no-fix-cortex-a8

LOCAL_MODULE    := fastcvsimplesample
LOCAL_CFLAGS    := -Werror
LOCAL_SRC_FILES := \

LOCAL_STATIC_LIBRARIES := libfastcv
# LOCAL_SHARED_LIBRARIES := liblog libGLESv2
LOCAL_C_INCLUDES += $(TARGET_OUT_HEADERS)/fastcv/inc \
LOCAL_C_INCLUDES += $(TARGET_OUT_HEADERS)/fastcv

LOCAL_MODULE_OWNER := theta360
LOCAL_PROPRIETARY_MODULE := true

include $(BUILD_SHARED_LIBRARY)

include $(CLEAR_VARS)

LOCAL_STATIC_JAVA_LIBRARIES :=
LOCAL_JNI_SHARED_LIBRARIES := libfastcvsimplesample
LOCAL_SRC_FILES := $(call all-subdir-java-files)
LOCAL_PACKAGE_NAME := pluginapplication

include $(BUILD_PACKAGE)
Edit build.gradle (Module: app)
- Open “Gradle Scripts> build.gradle (Module: app)”
- Add “ndk” value to “android> defaultConfig” as below
Example build.gradle
android {
    ...
    defaultConfig {
        ...
        ndk {
            moduleName "libfastcvsimplesample"
            abiFilters 'armeabi-v7a', 'arm64-v8a'
        }
    }
}
Click Sync Now displayed at the top of the editor window.
Linking with native library and Gradle
- Right-click “app” in the project tree and select “Link C ++ Project with Gradle”
- Specify “ndk-build” in Build System of open window, “Android.mk” in Project Path and click OK

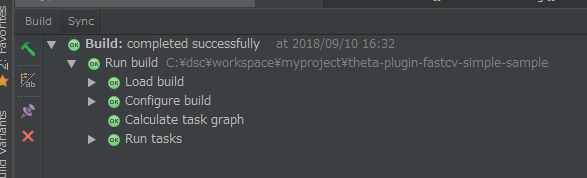
Build
- Click “Build> Build APK (s)” from the menu
- Check “Build” in the tool window to confirm that the build succeeded
The next article will cover how to create a FastCV application.