Demos
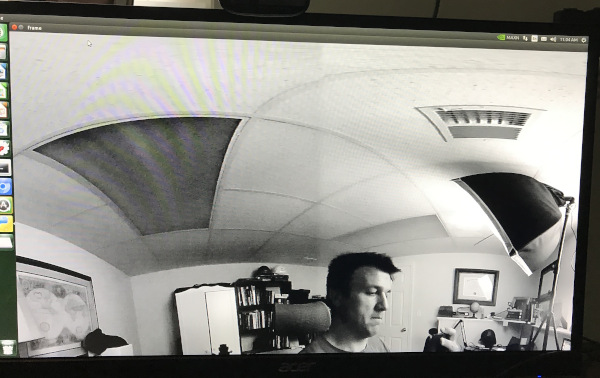
Using Nvidia Jetson Nano live streaming from a THETA V. Processing done with Python3, OpenCV 4.4. Scroll down for code.
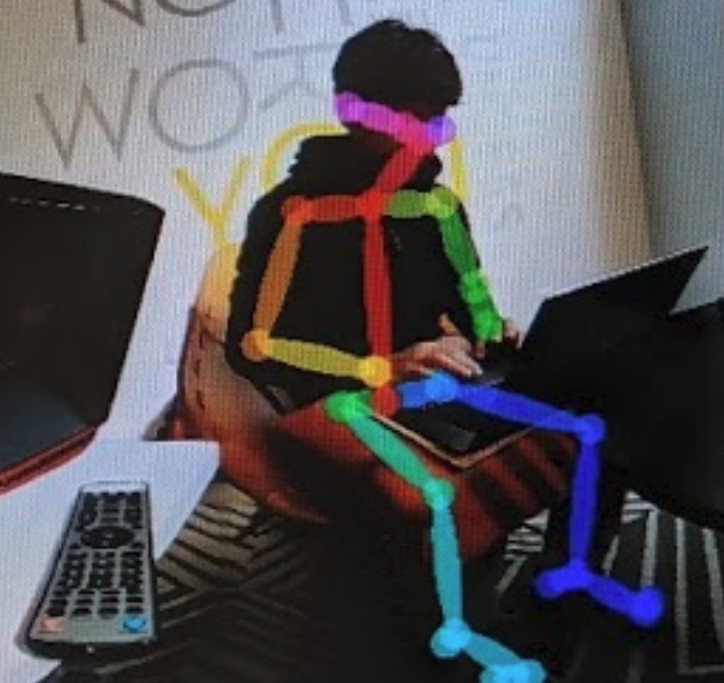
DetectNet
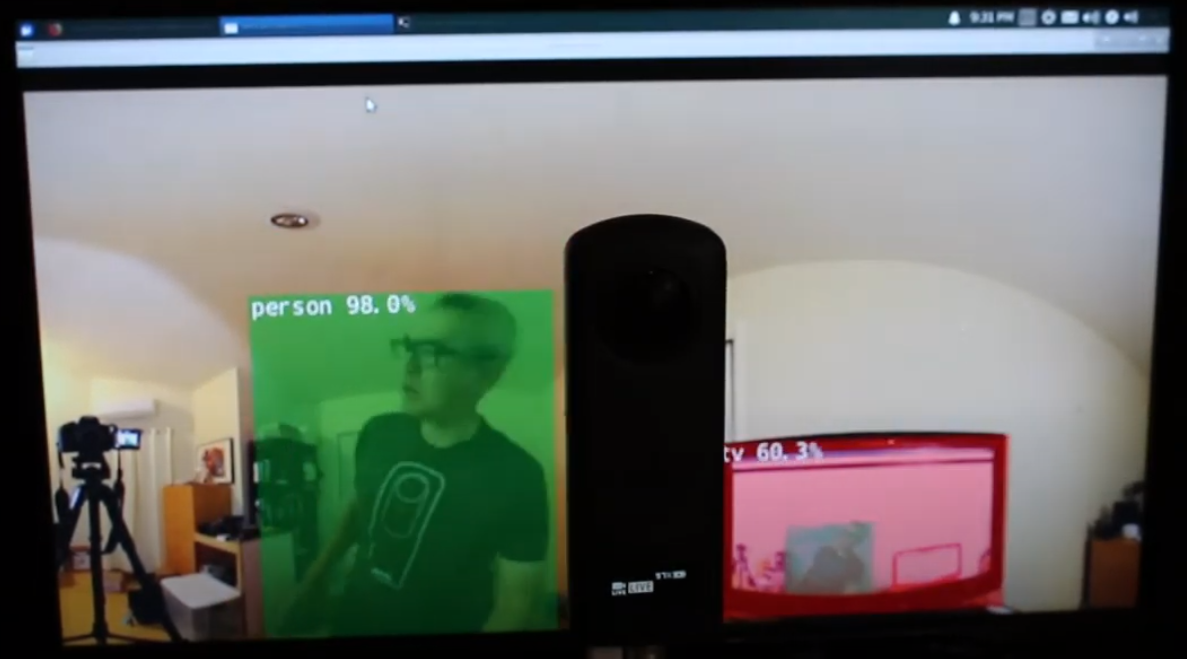
Running live on Jetson Nano with RICOH THETA Z1.
DetectNet applied to both single frame with SSD Mobilenet-v2 to assess accuracy and to live stream to assess framerate. Works good on both.
See Jetson Nano inference benchmarks.
Code is available in the at GitHub - dusty-nv/jetson-inference: Hello AI World guide to deploying deep-learning inference networks and deep vision primitives with TensorRT and NVIDIA Jetson.
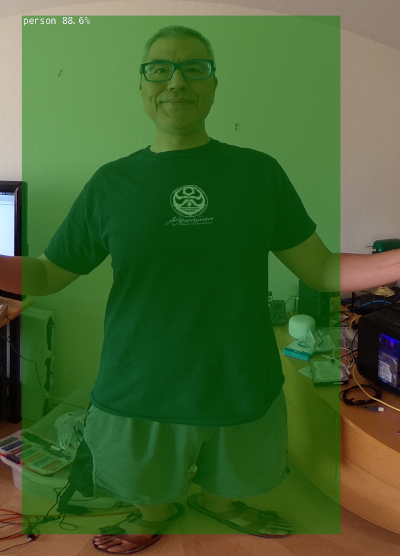
There is super small text in the green box that says, “person”. The system accurately detected the only person in the image.
It is 88.6 percent confident that I am a person. Nice.
Despite the distorted view of my feet, the program does detect the human form.
Even at night, in low-light conditions with me on the side of the shutter button, the program did detect me.

However, there were many frames where I was not detected.
To proceed, you will likely need a database of fisheye or equirectangular images to build your own model.
Sample Code
import jetson.inference
import jetson.utils

net = jetson.inference.detectNet("ssd-mobilenet-v2", threshold=0.5)
camera = jetson.utils.gstCamera(1280, 720, "/dev/video0")
display = jetson.utils.glDisplay()

while display.IsOpen():
    img, width, height = camera.CaptureRGBA()
    detections = net.Detect(img, width, height)
    display.RenderOnce(img, width, height)
    display.SetTitle("RICOH THETA Detection | Network {:.0f} FPS".format(net.GetNetworkFPS()))
OpenCV Python
Works on live stream.
Procedure
- install libuvc-theta
- install libuv-theta-sample
- install v4l2loopback
- load kernel modules for v4l2loopback and verify that /dev/video0 or equivalent shows THETA stream
- run Python script with cv2
Recommend you recompile OpenCV 4.4 from source code. May take 2.5 hours if you compile on the Nano.
Simple Python cv2 Test
Frame resize test.
import cv2

cap = cv2.VideoCapture(0)

# Check if the webcam is opened correctly
if not cap.isOpened():
    raise IOError("Cannot open webcam")

while True:
    ret, frame = cap.read()
    frame = cv2.resize(frame, None, fx=0.25, fy=0.25, interpolation=cv2.INTER_AREA)
    cv2.imshow('Input', frame)

    c = cv2.waitKey(1)
    if c == 27:
        break

cap.release()
cv2.destroyAllWindows()
Build OpenCV
One script to install OpenCV 4.3 is from AastaNV here.
The script I used is from mdegans here
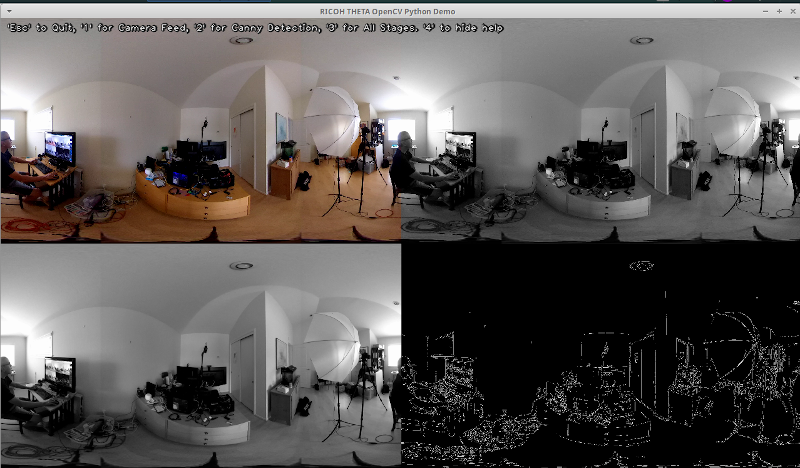
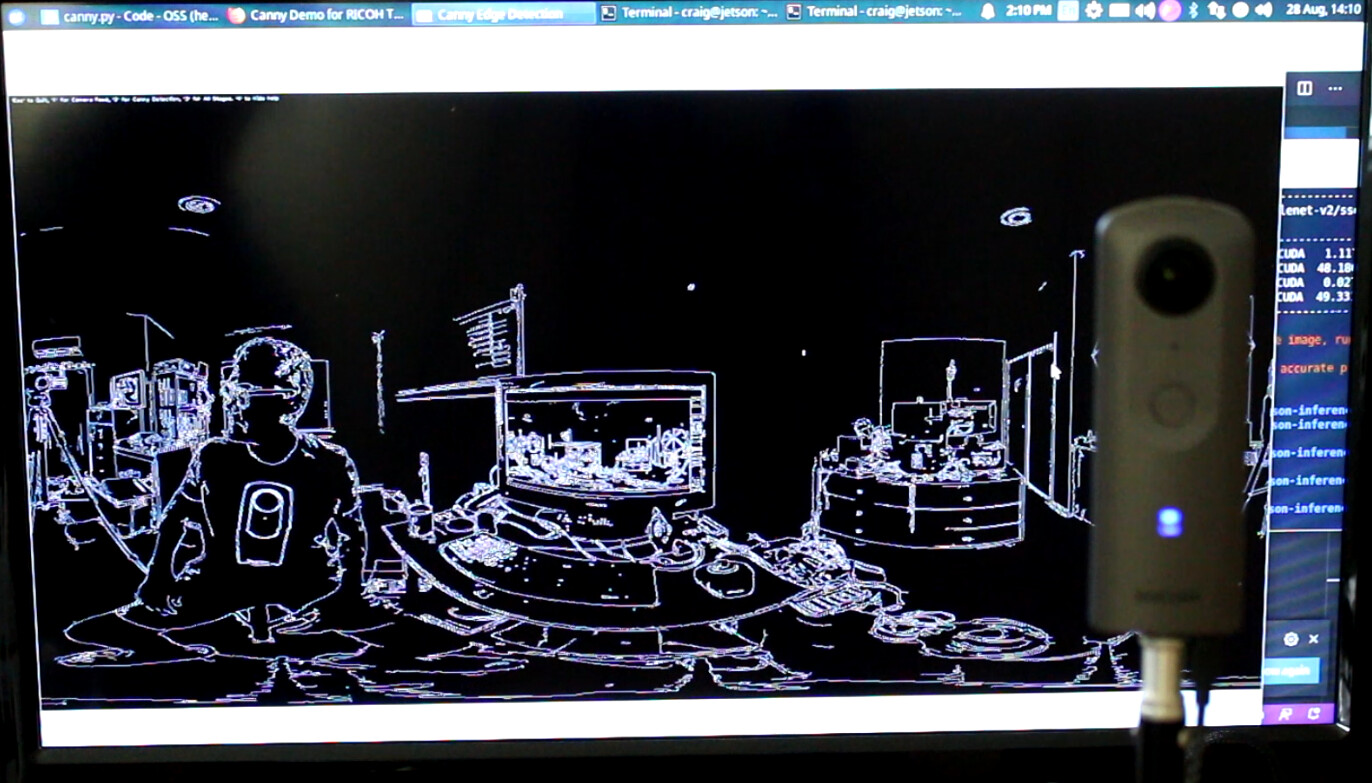
Canny Edge Detection Test
- Code for OpenCV Demo with Canny from RICOH THETA V. This is the edge detection demo with the white lines on black background.
- video demo
import sys
import argparse
import cv2
import numpy as np

def parse_cli_args():
    parser = argparse.ArgumentParser()
    parser.add_argument("--video_device", dest="video_device",
                        help="Video device # of USB webcam (/dev/video?) [0]",
                        default=0, type=int)
    arguments = parser.parse_args()
    return arguments

# On versions of L4T previous to L4T 28.1, flip-method=2
# Use the Jetson onboard camera
def open_onboard_camera():
    return cv2.VideoCapture(0)

# Open an external usb camera /dev/videoX
def open_camera_device(device_number):
    return cv2.VideoCapture(device_number)


def read_cam(video_capture):
    if video_capture.isOpened():
        windowName = "main_canny"
        cv2.namedWindow(windowName, cv2.WINDOW_NORMAL)
        cv2.resizeWindow(windowName,1280,720)
        cv2.moveWindow(windowName,0,0)
        cv2.setWindowTitle(windowName,"RICOH THETA OpenCV Python Demo")
        showWindow=3  # Show all stages
        showHelp = True
        font = cv2.FONT_HERSHEY_PLAIN
        helpText="'Esc' to Quit, '1' for Camera Feed, '2' for Canny Detection, '3' for All Stages. '4' to hide help"
        edgeThreshold=40
        showFullScreen = False
        while True:
            if cv2.getWindowProperty(windowName, 0) < 0: # Check to see if the user closed the window
                # This will fail if the user closed the window; Nasties get printed to the console
                break;
            ret_val, frame = video_capture.read();
            hsv=cv2.cvtColor(frame, cv2.COLOR_BGR2GRAY)
            blur=cv2.GaussianBlur(hsv,(7,7),1.5)
            edges=cv2.Canny(blur,0,edgeThreshold)
            if showWindow == 3:  # Need to show the 4 stages
                # Composite the 2x2 window
                # Feed from the camera is RGB, the others gray
                # To composite, convert gray images to color.
                # All images must be of the same type to display in a window
                frameRs=cv2.resize(frame, (640,360))
                hsvRs=cv2.resize(hsv,(640,360))
                vidBuf = np.concatenate((frameRs, cv2.cvtColor(hsvRs,cv2.COLOR_GRAY2BGR)), axis=1)
                blurRs=cv2.resize(blur,(640,360))
                edgesRs=cv2.resize(edges,(640,360))
                vidBuf1 = np.concatenate( (cv2.cvtColor(blurRs,cv2.COLOR_GRAY2BGR),cv2.cvtColor(edgesRs,cv2.COLOR_GRAY2BGR)), axis=1)
                vidBuf = np.concatenate( (vidBuf, vidBuf1), axis=0)

            if showWindow==1: # Show Camera Frame
                displayBuf = frame
            elif showWindow == 2: # Show Canny Edge Detection
                displayBuf = edges
            elif showWindow == 3: # Show All Stages
                displayBuf = vidBuf

            if showHelp == True:
                cv2.putText(displayBuf, helpText, (11,20), font, 1.0, (32,32,32), 4, cv2.LINE_AA)
                cv2.putText(displayBuf, helpText, (10,20), font, 1.0, (240,240,240), 1, cv2.LINE_AA)
            cv2.imshow(windowName,displayBuf)
            key=cv2.waitKey(10)
            if key == 27: # Check for ESC key
                cv2.destroyAllWindows()
                break ;
            elif key==49: # 1 key, show frame
                cv2.setWindowTitle(windowName,"Camera Feed")
                showWindow=1
            elif key==50: # 2 key, show Canny
                cv2.setWindowTitle(windowName,"Canny Edge Detection")
                showWindow=2
            elif key==51: # 3 key, show Stages
                cv2.setWindowTitle(windowName,"Camera, Gray scale, Gaussian Blur, Canny Edge Detection")
                showWindow=3
            elif key==52: # 4 key, toggle help
                showHelp = not showHelp
            elif key==44: # , lower canny edge threshold
                edgeThreshold=max(0,edgeThreshold-1)
                print ('Canny Edge Threshold Maximum: ',edgeThreshold)
            elif key==46: # , raise canny edge threshold
                edgeThreshold=edgeThreshold+1
                print ('Canny Edge Threshold Maximum: ', edgeThreshold)
            elif key==74: # Toggle fullscreen; This is the F3 key on this particular keyboard
                # Toggle full screen mode
                if showFullScreen == False :
                    cv2.setWindowProperty(windowName, cv2.WND_PROP_FULLSCREEN, cv2.WINDOW_FULLSCREEN)
                else:
                    cv2.setWindowProperty(windowName, cv2.WND_PROP_FULLSCREEN, cv2.WINDOW_NORMAL)
                showFullScreen = not showFullScreen

    else:
     print ("camera open failed")


if __name__ == '__main__':
    arguments = parse_cli_args()
    print("Called with args:")
    print(arguments)
    print("OpenCV version: {}".format(cv2.__version__))
    print("Device Number:",arguments.video_device)
    if arguments.video_device==0:
      video_capture=open_onboard_camera()
    else:
      video_capture=open_camera_device(arguments.video_device)
    read_cam(video_capture)
    video_capture.release()
    cv2.destroyAllWindows()
OpenPose
Works on live stream with Jetpack 4.3, not 4.4.
Usage Examples
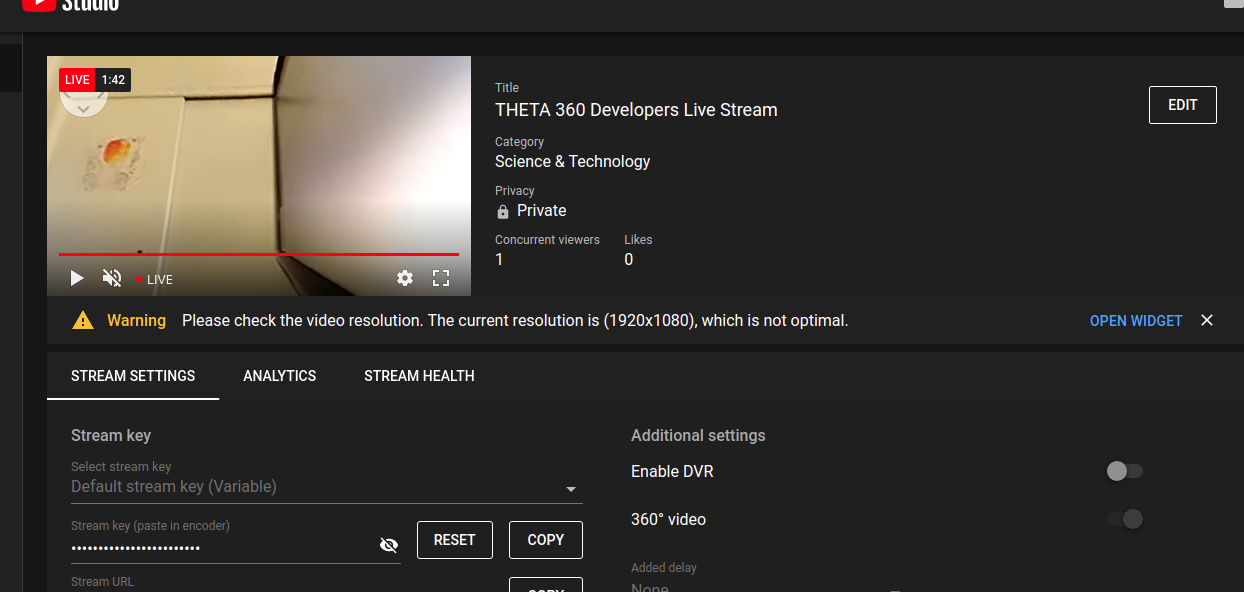
stream to YouTube with ffmpeg
from Paul Gullett. post
ffmpeg -f lavfi -i anullsrc \
-f v4l2 -s 3480x1920 -r 10 -i /dev/video0 \
-vcodec libx264 -pix_fmt yuv420p -preset ultrafast \
-strict experimental -r 25 -g 20 -b:v 2500k \
-codec:a libmp3lame -ar 44100 -b:a 11025 -bufsize 512k \
-f flv rtmp://a.rtmp.youtube.com/live2/secret-key
As my knowledge of ffmpeg is weak, I simplified Paul’s video pipeline.
 ffmpeg -f lavfi -i anullsrc -f v4l2 -s 1920x960 -r 10 -i /dev/video2 \
-vcodec libx264 -pix_fmt yuv420p \
 -b:v 2500k \
-codec:a libmp3lame -ar 44100 -b:a 11025 -bufsize 512k \
-f flv rtmp://a.rtmp.youtube.com/live2/$SECRET_KEY
stream to another computer with gstreamer
in gst_viewer.c
pipe_proc = " rtph264pay name=pay0 pt=96 ! udpsink host=127.0.0.1 port=5000 sync=false ";
with gst-rtsp-server
./test-launch "( udpsrc port=5000 ! application/x-rtp, media=(string)video, clock-rate=(int)90000, encoding-name=(string)H264 ! rtph264depay ! h264parse ! rtph264pay name=pay0 pt=96 )"
Receive on ROS.
GSCAM_CONFIG="rtspsrc location=rtspt://10.0.16.1:8554/test latency=400 drop-on-latency=true ! application/x-rtp, encoding-name=H264 ! rtph264depay ! decodebin ! queue ! videoconvert" roslaunch gscam_nodelet.launch
Simplified computer to computer streaming with rtsp and gstreamer
This was tested going from an x86 machine to a Jetson Nano. The THETA Z1 is connected to the x86 Linux machine. It is not working with the Jetson as the sender.
On x86 computer sending THETA video.
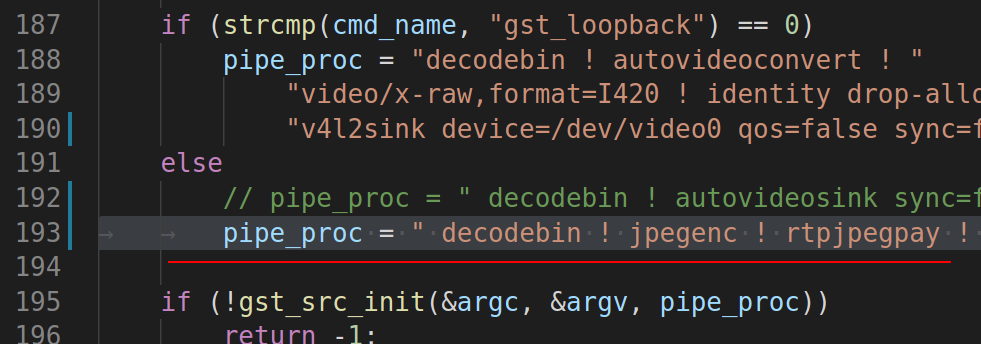
Modify the pipeline in gst_viewer.c
This example has the IP address hardcoded in. Switch to a variable in your code.
pipe_proc = " decodebin ! jpegenc ! rtpjpegpay ! udpsink host=192.168.2.100 port=5000 qos=false sync=false";
If you are looking for the IP address of the receiver, you can use arp-scan on the command line.
Example:
sudo arp-scan --interface=eth0 --localnet
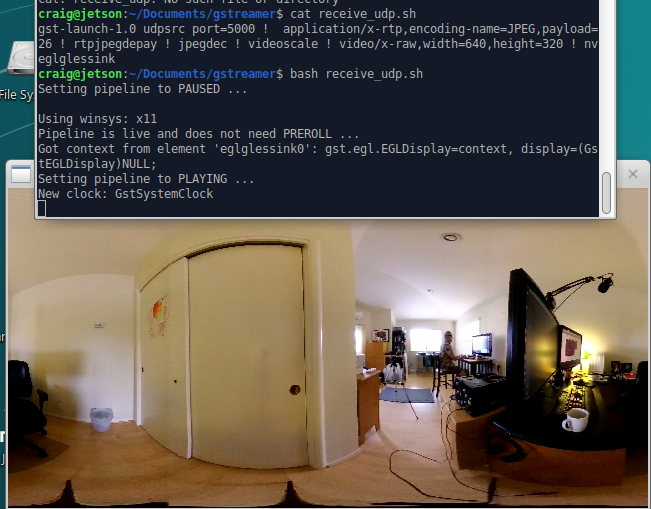
On the receiving device, if the receiver is a NVIDIA Jetson Nano.
$ cat receive_udp.sh
gst-launch-1.0 udpsrc port=5000 !  application/x-rtp,encoding-name=JPEG,payload=26 ! rtpjpegdepay ! jpegdec ! videoscale ! video/x-raw,width=640,height=320 ! nveglglessink
If you’re on x86, change nveglglessink to autovideosink. You may want to make the width and height bigger as well.
Save to File
Using the v4l2loopback capability and thetaV loopback example, here are 2 example gstreamer pipelines to grab the video:
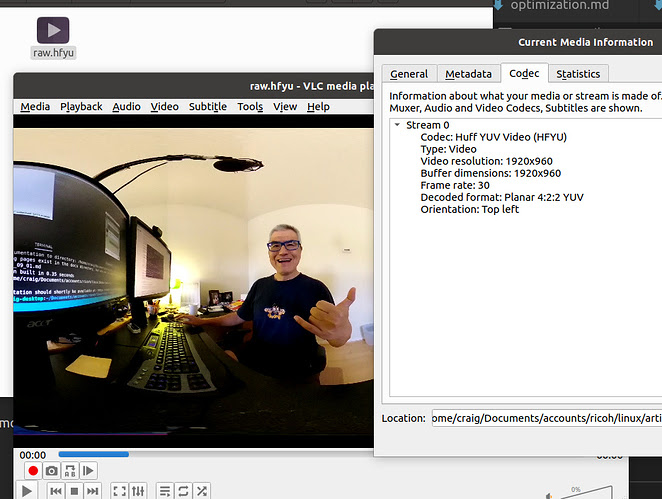
As a lossless huffman encoded raw file:
gst-launch-1.0 v4l2src device=/dev/video99 ! video/x-raw,framerate=30/1 \
! videoconvert \
! videoscale \
! avenc_huffyuv \
! avimux \
! filesink location=raw.hfyu
And with default h.264 encoding on a Jetson:
gst-launch-1.0 v4l2src device=/dev/video99 ! video/x-raw,framerate=30/1 \
! nvvidconv \
! omxh264enc \
! h264parse ! matroskamux \
! filesink location=vid99.mkv
Pro tip, when you install v4l2loopback, use the video_nr option to create the video device somewhere high so it does not get displaced by PnP of other cameras.
The Huffyuv format is a large file format. VLC can play it.
Here’s a shot of me playing a file that I generated with Les’s pipeline.
On x86, this is the pipeline I used to save to a H.264 file.
$ gst-launch-1.0 v4l2src device=/dev/video2 ! video/x-raw,framerate=30/1 ! autovideoconvert ! nvh264enc ! h264parse ! matroskamux ! filesink location=vid_test.mkv
Example of playing file with gst-launch.
gst-launch-1.0 playbin uri=file:///path-to-file/vid_test.mkv

Community member Nakamura_Lab indicated that the he experienced significant frame loss when using lossless Huffman to save to file with the Xavier NX. He could save to file with H.264. However for his use case with multiple face detection, he needed higher resolution than provided by H.264.
He ended up using H.265 encoding to save to file, which provided both high quality and no frame loss.
gst-launch-1.0 v4l2src num-buffers=600 \
device=/dev/video0 \
! video/x-raw \
! nvvidconv \
! nvv4l2h265enc \
! h265parse \
! qtmux \
! filesink location=test.mp4 -e
Stream From Raspberry Pi 4 to a Windows PC
Thanks to Shun Yamashita of fulldepth for this solution to stream the Z1 video to a Raspberry Pi 4 with USB then restream it to a Windows PC.
This is the process:
- Use GStreamer to stream UDP(RTP) to the Windows PC
- Do not use H264 decoding on the Raspberry Pi as the Windows machine is handling it and it’s likely that the RPi4 can’t use hardware decoding for 4K H.264.
- Tested with Raspberry Pi4 modelB with 4GB of RAM running Raspberry Pi OS
On the Raspberry Pi, the following was changed in the GStreamer pipeline in gst/gst_viewer.c.
src.pipeline = gst_parse_launch(
        " appsrc name=ap ! queue ! h264parse ! queue"
        " ! rtph264pay ! udpsink host=192.168.0.15 port=9000",
        NULL);
RViz in ROS2 Dual-Camera Setup with OpenCV
Robot displays live images from two THETA V cameras on RViz in ROS2 using the following pipeline and OpenCV.
credit: H. Usuba from Kufusha - Robotics development
thetauvcsrc mode=2K ! queue ! h264parse ! nvv4l2decoder ! queue ! nvvidconv ! video/x-raw, format=BGRx ! videoconvert ! video/x-raw, format=BGR ! queue ! appsink