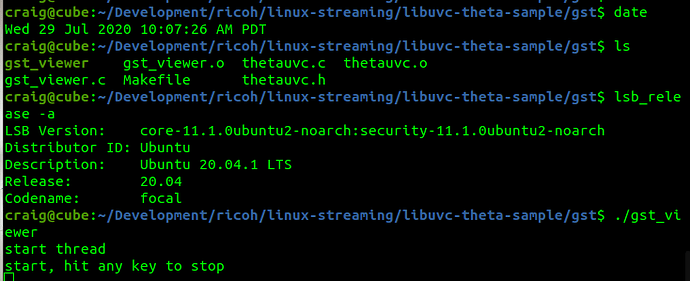
Tested using Ubuntu 20.04 or 22.04
git clone https://github.com/ricohapi/libuvc-theta.git
sudo apt install libjpeg-dev
cd libuvc-theta
mkdir build
cd build
cmake ..
make
sudo make install
cd ../..
git clone https://github.com/ricohapi/libuvc-theta-sample.git
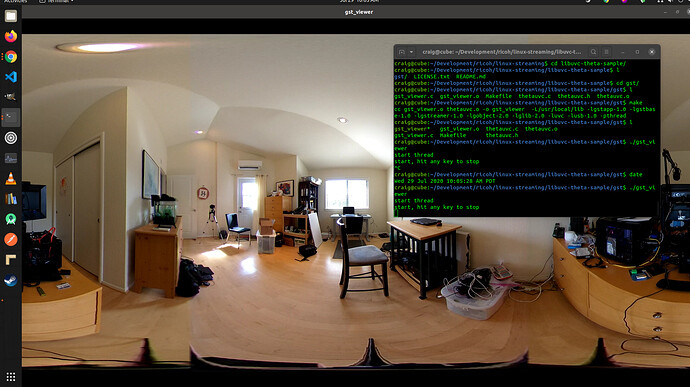
cd libuvc-theta-sample/gst
make
# THETA must be plugged into your computer and in
# live streaming mode
$ ./gst_viewer
If the build fails, you may need a few gstreamer packages. The command below installs everything. You do not need everything
sudo apt-get install libgstreamer1.0-0 gstreamer1.0-plugins-base gstreamer1.0-plugins-good gstreamer1.0-plugins-bad gstreamer1.0-plugins-ugly gstreamer1.0-libav gstreamer1.0-doc gstreamer1.0-tools gstreamer1.0-x gstreamer1.0-alsa gstreamer1.0-gl gstreamer1.0-gtk3 gstreamer1.0-qt5 gstreamer1.0-pulseaudio libgstreamer-plugins-base1.0-dev
Software Requirements
You need to download the two GitHub repos below and compile the driver and sample code.
If you want to use /dev/video0, you will also need
In addition, there are numerous dependencies to compile the tools listed above. However, have no fear, we will walk you through it.
Using gstreamer and OpenCV without v4l2loopback
v4l2loopback add complexity and latency. If your objective is to use OpenCV, consider using gstthetauvc instead.
How To Compile and Install Software
- Build and install on x86 Ubuntu 20.04
- Jetson Nano with OpenCV and VLC on /dev/video0
- Compile libuvc-theta on Jetson Nano - silent screencast
- Build and run v4l2loopback on Jetson Nano. Needed for
/dev/video0
Getting Stream on /dev/video0
Steps:
- compile and install libuvc-theta
- compile and install libuvc-theta-sample
- compile and install v4l2loopack
- run
gst_loopbackfromlibuvc-theta-sample - access the correct video device with OpenCV or any video 4 Linux 2 application such as VLC. The video device is specified in the source code.
Compile and Install v4l2loopback
git clone https://github.com/umlaeute/v4l2loopback.git
cd v4l2loopback
make
sudo make install
sudo depmod -a
Load and use
This assumes that you have adjusted the video device in gst_viewer.c.
$ sudo modprobe v4l2loopback
$ cd path_to_gst_loopback_directory
$ ./gst_loopback
$ cvlc v4l2:///dev/video2
VLC media player 3.0.9.2 Vetinari (revision 3.0.9.2-0-gd4c1aefe4d)
[0000556fc2bd6db0] dummy interface: using the dummy interface module...
How to Load v4l2loopback automatically
In the file /etc/modules-load.d/modules.conf add a new line v4l2loopback.
$ pwd
/etc/modules-load.d
craig@jetson:/etc/modules-load.d$ cat modules.conf
# /etc/modules: kernel modules to load at boot time.
#
# This file contains the names of kernel modules that should be loaded
# at boot time, one per line. Lines beginning with "#" are ignored.

# bluedroid_pm, supporting module for bluetooth
bluedroid_pm
# modules for camera HAL
nvhost_vi
# nvgpu module
nvgpu

# for RICOH THETA live streaming
# v4l2loopback device on /dev/video0. specify in gst_viewer.c
v4l2loopback

craig@jetson:/etc/modules-load.d$
Check kernel module load
$ lsmod
Module                  Size  Used by
bnep                   16562  2
zram                   26166  4
overlay                48691  0
spidev                 13282  0
v4l2loopback           37383  0
nvgpu                1579891  18
bluedroid_pm           13912  0
ip_tables              19441  0
x_tables               28951  1 ip_tables
craig@jetson:/etc/modules-load.d$
v4l2loopback tests and examples
gst-launch-1.0 pipeline
$ gst-launch-1.0 v4l2src device=/dev/video2 ! video/x-raw,framerate=30/1 ! xvimagesink
Setting pipeline to PAUSED ...
Pipeline is live and does not need PREROLL ...
Setting pipeline to PLAYING ...
New clock: GstSystemClock

VLC command line example
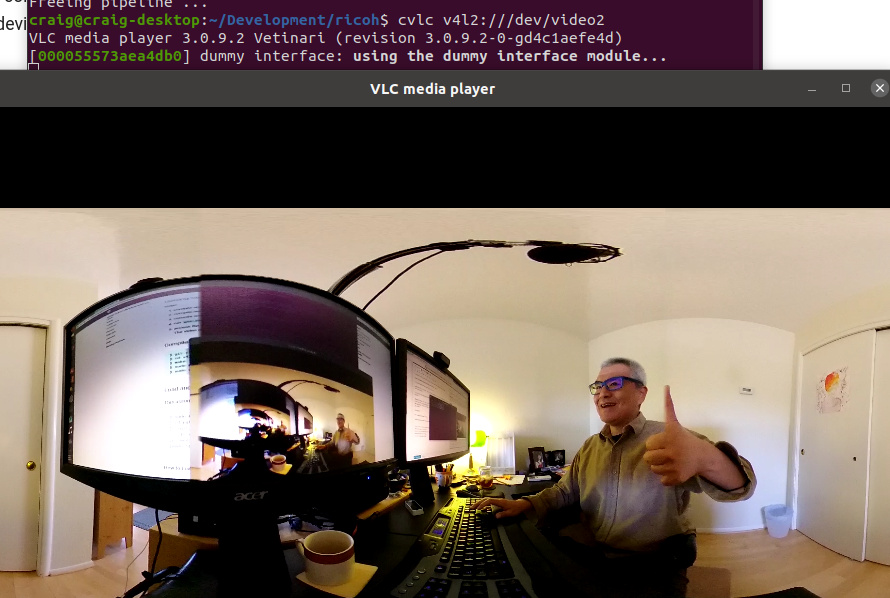
$ cvlc v4l2:///dev/video2
VLC media player 3.0.9.2 Vetinari (revision 3.0.9.2-0-gd4c1aefe4d)
[000055573aea4db0] dummy interface: using the dummy interface module...
Use v4l2-ctl to get video device output
I’ve modified the source to stream 2K video.
$ v4l2-ctl --list-formats-ext --device  /dev/video2
ioctl: VIDIOC_ENUM_FMT
    Type: Video Capture

    [0]: 'YU12' (Planar YUV 4:2:0)
        Size: Discrete 1920x960
            Interval: Discrete 0.033s (30.000 fps)
Using gstthetauvc to eliminate v4l2loopback
gstthetauvc is an alternative to using libuvc-theta-sample with v4l2loopack. In these example, there is no /dev/video*. To get the stream into OpenCV, set VideoCapture to the pipeline as shown in the examples below.
The plug-in is installed in /usr/lib/x86_64-linux-gnu/gstreamer-1.0.

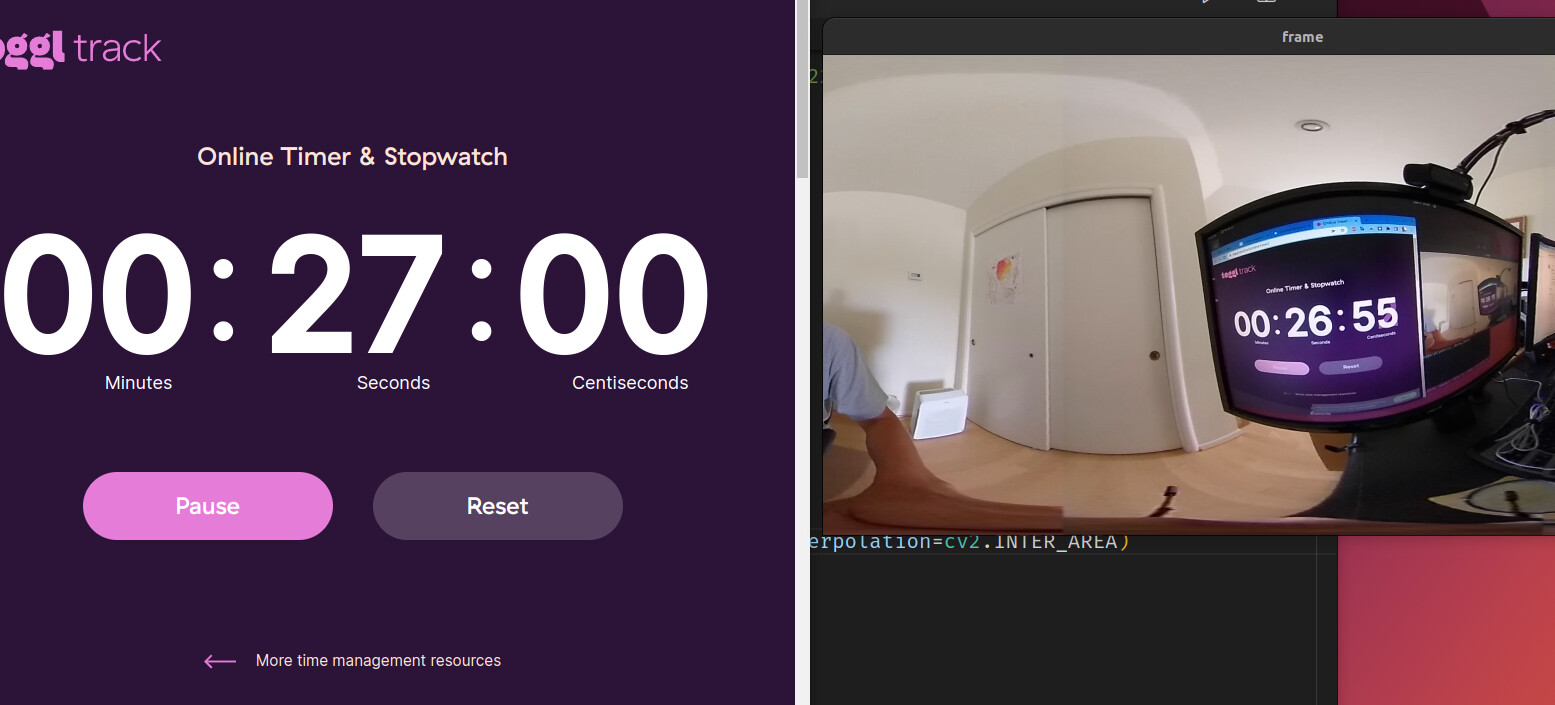
Latency is about 360ms latency and the stream is stable.

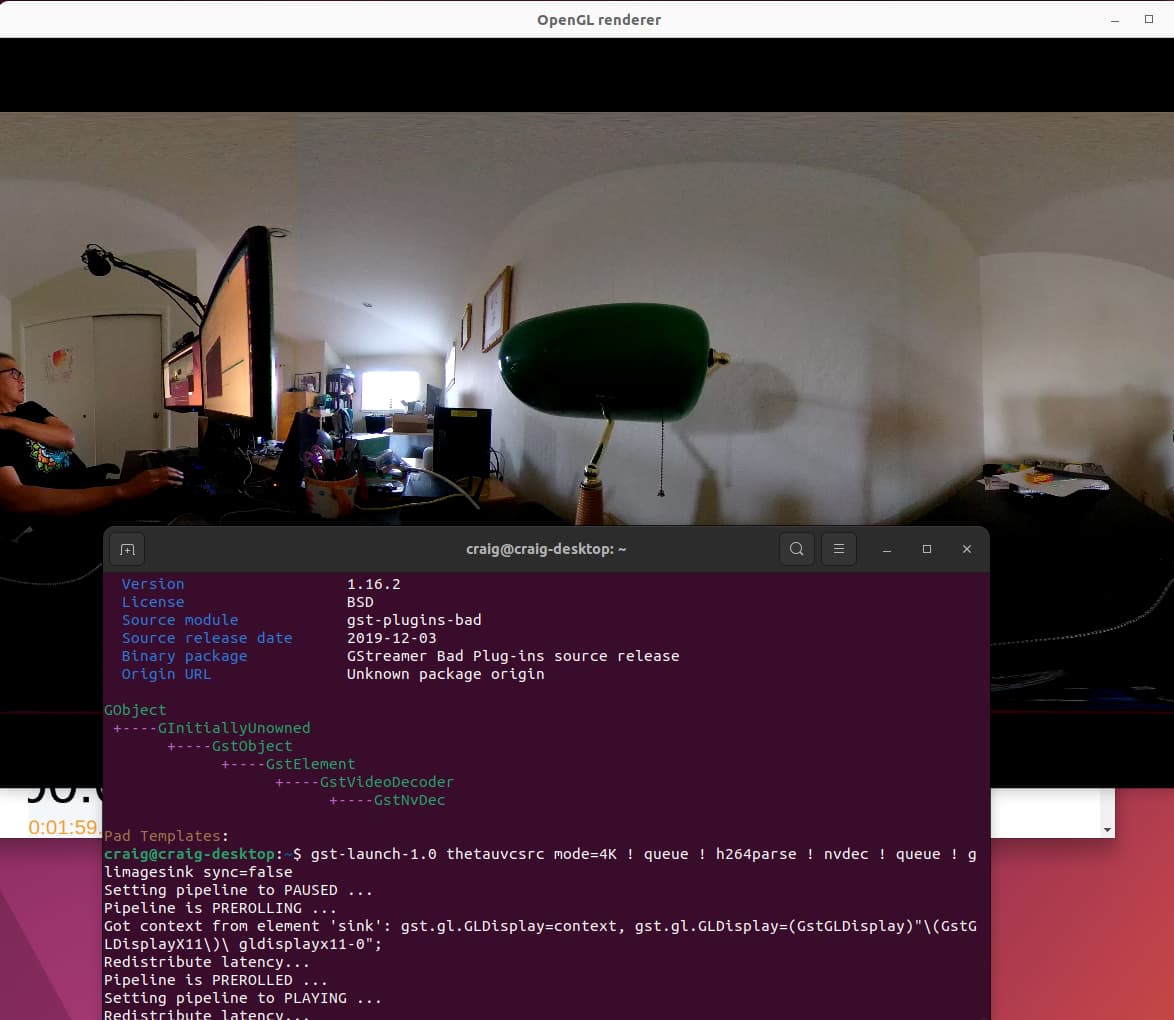
Display thetauvcsrc to monitor with gst-launch-1.0
This example is using hardware acceleration on x86 with NVIDIA card with Linux NVIDIA driver 510.
gst-launch-1.0 thetauvcsrc mode=4K \
  ! queue \
  ! h264parse \
  ! nvdec \
  ! queue \
  ! glimagesink sync=false
Using gstthetauvc with OpenCV
import cv2
# pipeline below worked
# cap = cv2.VideoCapture("thetauvcsrc \
#     ! decodebin \
#     ! autovideoconvert \
#     ! video/x-raw,format=BGRx \
#     ! queue ! videoconvert \
#     ! video/x-raw,format=BGR ! queue ! appsink")

# pipeline suggestion thanks to nickel110
# attempt to force hardware acceleration
# tested with NVIDIA 510.73 with old GTX 950 on Ubuntu 22.04
cap = cv2.VideoCapture("thetauvcsrc \
    ! queue \
    ! h264parse \
    ! nvdec \
    ! gldownload \
    ! queue \
    ! videoconvert n-threads=0 \
    ! video/x-raw,format=BGR \
    ! queue \
    ! appsink")

if not cap.isOpened():
    raise IOError('Cannot open RICOH THETA')

while True:
    ret, frame = cap.read()
    frame = cv2.resize(frame, None, fx=0.25, fy=0.25, interpolation=cv2.INTER_AREA)
    cv2.imshow('frame', frame)


    c = cv2.waitKey(1)
    if c == 27:
        break

cap.release()
cv2.destroyAllWindows()
Hardware Requirements for Linux and the RICOH THETA
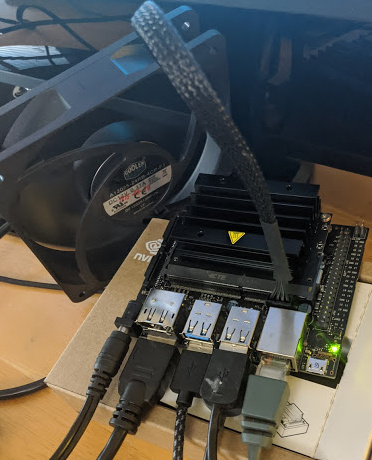
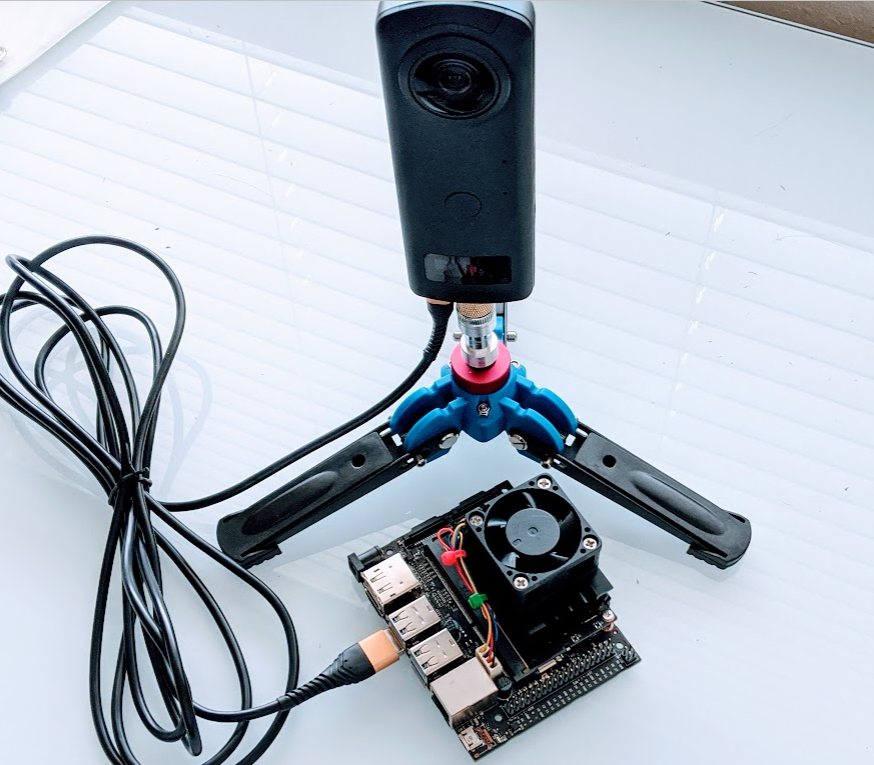
Jetson Nano - Reference Platform
Our reference platform is the NVIDIA Jetson Nano, ref. I am using B01, but A02 should also work.
Initially, the Jetson was running JetPack 4.4, which is Ubuntu 18.04. Tests were updated to JetPack 4.6.4.
cat /etc/nv_tegra_release
# R32 (release), REVISION: 7.1
The Nano is an ARM A57 with a 128-core Maxwell GPU, 4GB 64-bit LPDDR4.
The nano is powered by a 5V 4A barrel connector, not the microUSB which is 5V 2A. Our Nano has an external fan on the PWM header and a 64GB microSD card.
Parts
- NVIDIA Jetson Nano Developer Kit B01
- SMAKIN DC 5V/4A power supply with barrel connector
- Waveshare 5V PWM fan - cheaper option - we used this one as we are frugal. It worked.
- Noctua 5V PWM fan - better option, around $15 - most people use this one.
- For Z1 streaming 10’ USB-C live streaming cable - it works for me, but it is over the recommended length. I only have the long cable for convenience. You should use as short a cable as possible.
NVIDIA Jetson Xavier
The Xavier is better for testing. However, it is more expensive. If your budget permits, it is better to get the Xavier. You may have problems with 4K AI processing with the Nano.
On Jetson Xavier, auto plugin selection of the gstreamer seems to be not working well, replacing “decodebin ! autovideosink sync=false” to “nvv4l2decoder ! nv3dsink sync=false” will solve the problem. Edit this line in the sample code and recompile.
x86 Linux
We’ve also tested the libuvc-theta (streaming) and libuvc-theta-sample (streaming sample application) on x86 64bit Linux using Ubuntu 20.04 LTS, Focal Fossa.
Watch this build video walkthrough.
A video showing latency on x86 is here.
We’ve tested v4l2loopback with gst_loopback on a low-end Pentium x86 computer. It works fine. Thanks to commuity member Yu You for this fix to gst_view.c. Note the addition of qos=false to the pipeline. This is currently on line 190.
if (strcmp(cmd_name, "gst_loopback") == 0)
    pipe_proc = "decodebin ! autovideoconvert ! "
        "video/x-raw,format=I420 ! identity drop-allocation=true !"
        "v4l2sink device=/dev/video0 qos=false sync=false";
Screenshot of loopback running on /dev/video0, tested with vlc.

Addtional x86 Information
If you’re having problems after making the modification described above, you can try to temporarily disable your dedicated graphics card on x86. In our tests on Ubuntu 20, Focal Fossa, the gstreamer vaapi plugin can’t use the hardware decoder on the NVIDIA GPU with the proprietary NVIDIA driver. The causes gstreamer to use a software decoder instead.
This will likely cause many frame drops on your system. You can verify this by setting the GST_DEBUG environment variable to 2 or 3 and then running gst_loopback. You will likely see many frame drop messages.
There are two possible workarounds:
- Use the nvdec plugin Although the nvdec plugin is a part of the gstreamer-plugins-bad, it is not included in binary distribution due to license problem. Thus, you have to build the plugin by yourself. You also need to modify the pipeline of the gst_loopback accordingly.
- Use hardware decoder on the iGPU You may need additional setup to run X server on the iGPU,
You can try the X.Org driver.
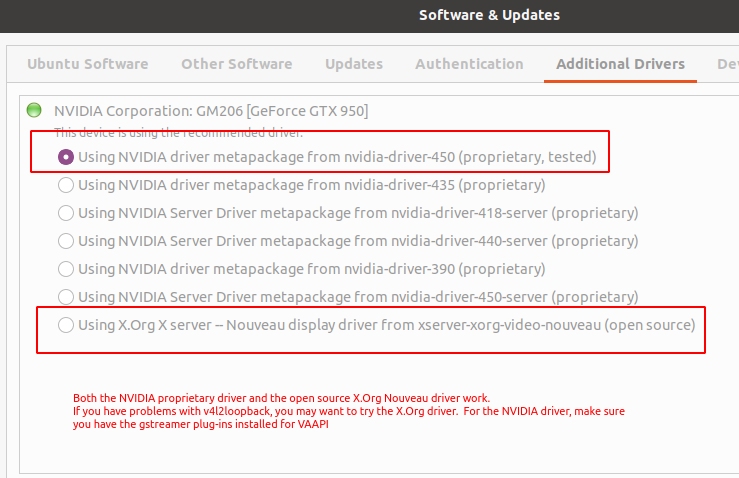
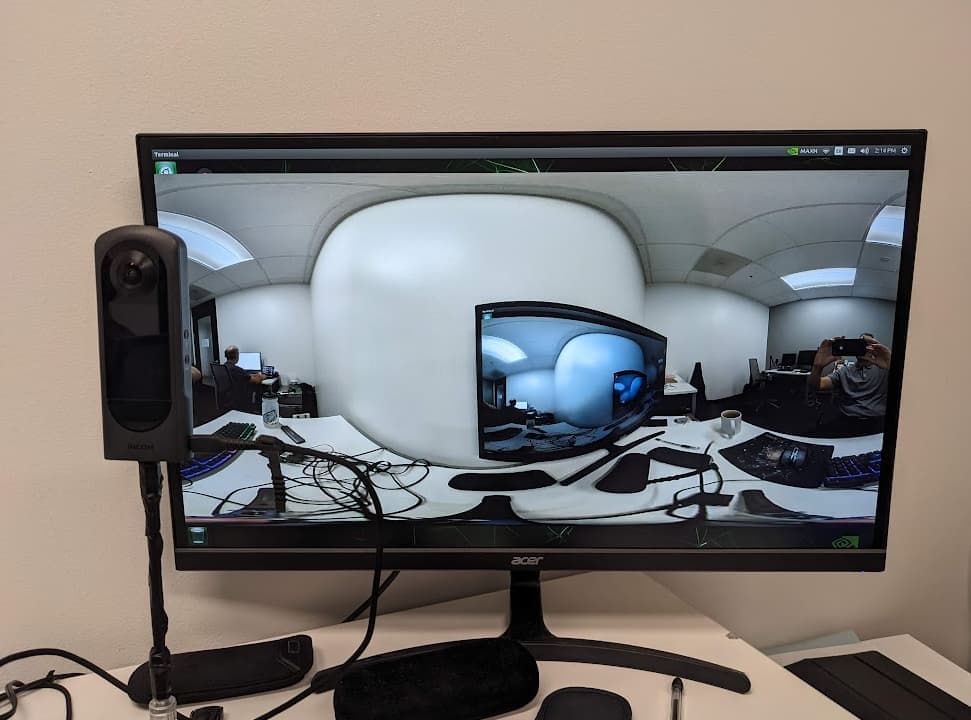
This is a video test clip of a THETA Z1 running with the X.Org driver on Intel i7-6800K CPU and NVIDIA GeForce GTX 950 GPU.
You can check the graphics driver with one of these commands.
glxinfo -B
or
sudo lshw -c video
Raspberry Pi
The Raspberry Pi will work great with the USB API. However, you will not have a good experience streaming 4K, even with the Raspberry Pi 4.
The Raspberry Pi’s H.264 hardware decoder does not support 4K resolution even on the Raspberry Pi4. In addition, older Pis’ (Pi to Pi3) memory bandwidth(32bit DDR2) is too poor to handle even FHD stream from THETA V/Z1.
Heat and Cooling of Linux Computer
You need to cool the Nano. Without a fan, you may get thermal throttling when live streaming with AI processing.

The fan is 5V pwm. I’ve also used a 12V fan before I ordered the 5V fan from Amazon.
Hardware Acceleration
You will need to use hardware acceleration to get reasonable performance.
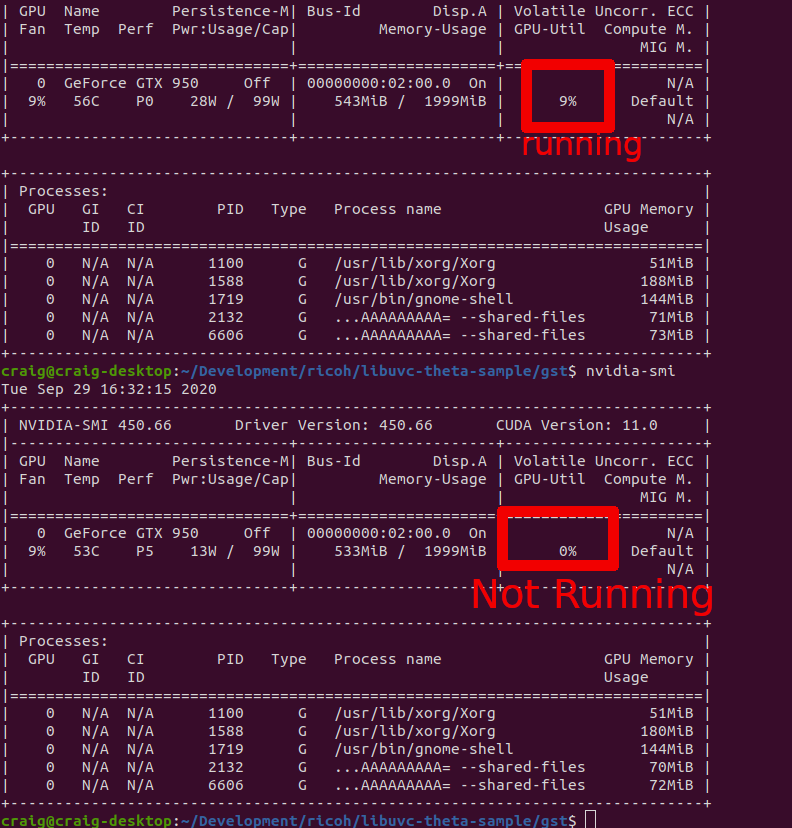
To verify that you are using GPU acceleration, you can use tegrastats on Jetson and nvidia-smi on x86.
Jetson
You can either use tegrastats or jetson-stats to see information on your CPU and GPU to identify performance bottlenecks.
tegrastats
On NVIDIA Jetson, tegrastats is useful for seeing information on the GPU. In the example below, I’ve inserted line breaks to make the output easier to read. The output is shown before streaming starts.
craig@jetson:~$ tegrastats
RAM 1122/3964MB (lfb 28x4MB)
SWAP 211/1982MB (cached 20MB)
CPU [5%@102,9%@102,0%@102,0%@102]
EMC_FREQ 0%
GR3D_FREQ 0%
PLL@25.5C CPU@27C PMIC@100C
GPU@27.5C AO@35C thermal@27.5C
POM_5V_IN 1805/1805
POM_5V_GPU 0/0
POM_5V_CPU 123/123
Let’s start the stream and review it again.
RAM 1288/3964MB (lfb 28x4MB)
SWAP 210/1982MB (cached 20MB)
CPU [100%@1479,89%@1479,85%@1479,86%@1479]
EMC_FREQ 0%
GR3D_FREQ 35%
PLL@32C CPU@35C PMIC@100C
GPU@30.5C AO@40.5C thermal@32.25C
POM_5V_IN 5607/5561
POM_5V_GPU 118/98
POM_5V_CPU 2843/2791
The GR3D_FREQ and POM_5V_GPU provide information on the GPU. GR3D is the Jetson GPU engine. More information on tegrastatus is here.
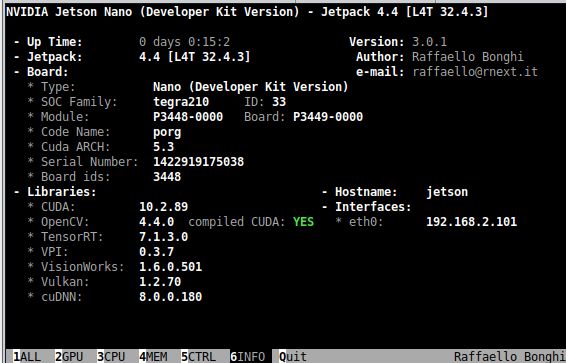
jetson-stats
Another nice package is jetson-stats.
You can verify if your base libraries such as OpenCV have features such as CUDA enabled.
Prior to streaming, your system should show very little load.
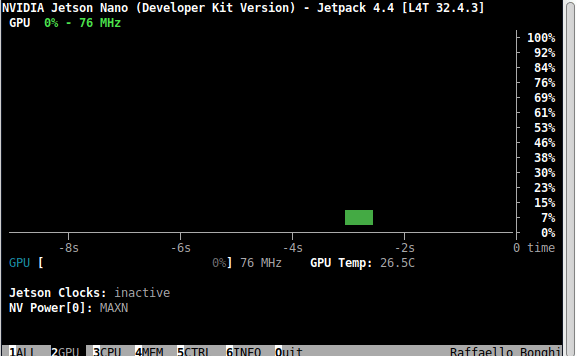
Once streaming starts, the load on your GPU should increase. The example below shows OpenCV and a Python script for canny edge detection.

The example below is using OpenCV to convert the color space.

x86
gstreamer plug-in
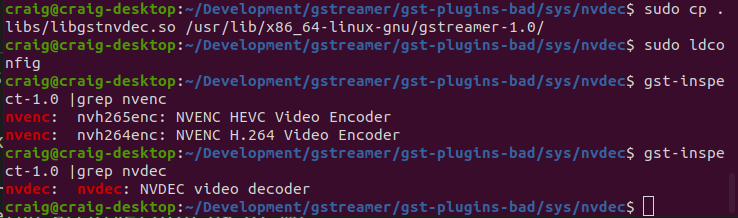
You can check to see if the nvdec plug-in is installed with:
gst-inspect-1.0 nvdec
If you see this, the plug-in is not installed.
No such element or plugin 'nvdec'
If nvdec and nvenc are installed, you should see this:
gst-inspect-1.0 | grep nvenc
nvenc:  nvh264enc: NVENC H.264 Video Encoder

gst-inspect-1.0 | grep nvdec
nvdec:  nvdec: NVDEC video decoder
There are several online tutorials for installing nvdec and nvenc.
- LifeStyle transfer: How to install Nvidia Gstreamer plugins (nvenc, nvdec) on Ubuntu? by Taras Lishchenko
- README from gst-plugins-bad/sys/nvenc
- gist from corenel
plugin build example
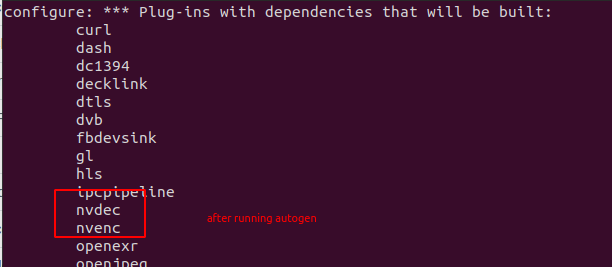
$ NVENCODE_CFLAGS="-I/home/craig/Development/gstreamer/gst-plugins-bad/sys/nvenc" ./autogen.sh --disable-gtk-doc --with-cuda-prefix="/usr/local/cuda"
Monitoring Tools
Prior to starting the stream.
$ nvidia-smi
Mon Sep 14 06:14:55 2020
+-----------------------------------------------------------------------------+
| NVIDIA-SMI 440.100      Driver Version: 440.100      CUDA Version: 10.2     |
|-------------------------------+----------------------+----------------------+
| GPU  Name        Persistence-M| Bus-Id        Disp.A | Volatile Uncorr. ECC |
| Fan  Temp  Perf  Pwr:Usage/Cap|         Memory-Usage | GPU-Util  Compute M. |
|===============================+======================+======================|
|   0  GeForce GTX 950     Off  | 00000000:02:00.0  On |                  N/A |
|  1%   52C    P5    14W /  99W |    355MiB /  1999MiB |      0%      Default |
+-------------------------------+----------------------+----------------------+

+-----------------------------------------------------------------------------+
| Processes:                                                       GPU Memory |
|  GPU       PID   Type   Process name                             Usage      |
|=============================================================================|
|    0      1051      G   /usr/lib/xorg/Xorg                            52MiB |
|    0      1619      G   /usr/lib/xorg/Xorg                           113MiB |
|    0      1820      G   /usr/bin/gnome-shell                         102MiB |
|    0      2822      G   ...AAAAAAAAAAAACAAAAAAAAAA= --shared-files    73MiB |
+-----------------------------------------------------------------------------+
With gst-viewer running.
$ nvidia-smi
Tue Sep 29 16:29:33 2020
+-----------------------------------------------------------------------------+
| NVIDIA-SMI 450.66       Driver Version: 450.66       CUDA Version: 11.0     |
|-------------------------------+----------------------+----------------------+
| GPU  Name        Persistence-M| Bus-Id        Disp.A | Volatile Uncorr. ECC |
| Fan  Temp  Perf  Pwr:Usage/Cap|         Memory-Usage | GPU-Util  Compute M. |
|                               |                      |               MIG M. |
|===============================+======================+======================|
|   0  GeForce GTX 950     Off  | 00000000:02:00.0  On |                  N/A |
|  9%   56C    P0    28W /  99W |    543MiB /  1999MiB |      9%      Default |
|                               |                      |                  N/A |
+-------------------------------+----------------------+----------------------+

+-----------------------------------------------------------------------------+
| Processes:                                                                  |
|  GPU   GI   CI        PID   Type   Process name                  GPU Memory |
|        ID   ID                                                   Usage      |
|=============================================================================|
|    0   N/A  N/A      1100      G   /usr/lib/xorg/Xorg                 51MiB |
|    0   N/A  N/A      1588      G   /usr/lib/xorg/Xorg                188MiB |
|    0   N/A  N/A      1719      G   /usr/bin/gnome-shell              144MiB |
|    0   N/A  N/A      2132      G   ...AAAAAAAAA= --shared-files       71MiB |
|    0   N/A  N/A      6606      G   ...AAAAAAAAA= --shared-files       73MiB |
+-----------------------------------------------------------------------------+