Multi Bracket Shooting Settings Now Available

Firmware 01.82 added the ability for set multi bracket shooting parameters in the WiFi API 2.1 (API V2 Reference)

There is now a new option for _autoBracket

Bracketing

From Wikipedia.

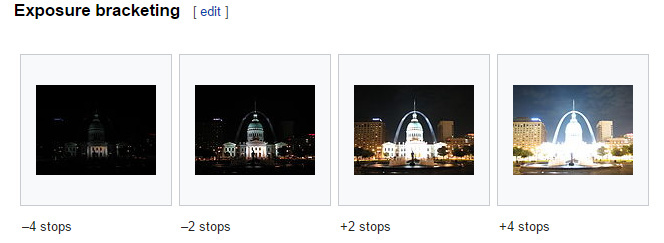
In photography, bracketing is the general technique of taking several shots of the same subject using different camera settings. Bracketing is useful and often recommended in situations that make it difficult to obtain a satisfactory image with a single shot, especially when a small variation in exposure parameters has a comparatively large effect on the resulting image. Autobracketing is automatic bracketing by using a setting on the camera to take several bracketed shots (in contrast to the photographer altering the settings by hand between each shot). Given the time it takes to accomplish multiple shots, it is typically, but not always, used for static subjects.

API

Example:

{
    "_autoBracket": {
        "_bracketNumber": 3,
        "_bracketParameters": [
            {
                "shutterSpeed": 0.004,
                "iso": 400,
                "_colorTemperature": 5100
            },
            {
                "shutterSpeed": 0.004,
                "iso": 320,
                "_colorTemperature": 5100
            },
            {
                "shutterSpeed": 0.004,
                "iso": 2500,
                "_colorTemperature": 5000
            }
        ]
    }
}

exposure bracketing

from Wikipedia.

Exposure bracketing is indicated when dealing with high-contrast subjects and/or media with limited dynamic range, such as transparency film or CCD sensors in many digital cameras.

Exposure bracketing is also used to create fade-in or fade-out effects, for example in conjunction with multi-vision slide shows, or in combination with multiple exposure or flash.

Images produced using exposure bracketing are often combined in postprocessing to create a high dynamic range image that exposes different portions of the image by different amounts.

White balance bracketing

White balance bracketing, which is specific to digital photography, provides a way of dealing with mixed lighting by shooting several images with different white point settings, often ranging from bluish images to reddish images.

ISO bracketing

ISO bracketing is a form of simulated exposure bracketing in which aperture and shutter speed (thus depth of field and motion blur) remain constant. The brightness levels in this case are only altered by increasing or decreasing gain, or amplification of the digital signal prior to the conversion to an image file such as a JPEG or Tagged Image File Format (TIFF). This type of bracketing must be performed with the camera in Manual mode but is easy to implement simply by shooting a single properly exposed image in RAW and applying exposure compensation in post processing. This is analogous to “pushing” or “pulling” in film processing, and as in film processing, will affect the amount of “grain” or image noise.

It is also possible to apply a type of ISO bracketing which brackets the signal gain while maintaining a constant level of brightness in the finished photograph. In this case the exposure compensation (EV value) setting remains constant while bracketing the ISO value in Av, Tv, or P mode, which will have a corresponding effect on the shutter speed, aperture value, or both. This form of ISO bracketing could potentially affect not only image noise, but also depth of field and motion blur.

In-camera automatic ISO bracketing is uncommon and therefore must usually be performed manually.

2 Likes

This is good, however ± 2.0 ev and only 13 images are sometimes still not enough, need the auto exposure measurement.

Thank you for the feedback. I am a very novice photographer and do not understand much of the settings. I’ll pass this on the THETA product manager. Thank you for taking the time to explain the requirement.

As I posted on the Ricoh forum, it’s nice to see the feature directly supported in the API but as it stands, it doesn’t offer anything that couldn’t be done with individual API calls previously.

I was hoping that they may have implemented this so that all of the images were captured before any of the dewarping is done in order to minimize the time offsets between images. Unfortunately it just seems to iterate through the usual capture/dewarp cycle for each image so actually takes longer between images than careful use of individual API calls.

But… now that the API support is there, Ricoh could easily improve this as suggested, without going down the path of supporting undewarped or raw output. @codetricity @jcasman Is this something you could please bring up with your contacts at Ricoh?

Thanks
Daniel

We’ll add this to a report we send to the product manager. Thank you for the explanation.

I’m having trouble getting the autobracket settings to register with the Z1.
Personally I find the API docs a bit confusing. The example listed here does not actually specify where that information needs to be placed. Is it within the “options” block which is contained in the “parameters” block, or is it placed only in the “parameters” block? When I place this within the “options” block I get an error. When I place outside of the “options” block but within the “parameters” block there is no error, however it also does not register any change.

This is how I think it should be called but results in an error.

Call to: “http://192.168.1.1:80/osc/commands/execute”

    {
        "name": "camera.setOptions",
        "parameters": {
            "options": {
                "fileFormat": {
                            "type": "raw+",
                            "width": 6720,
                            "height": 3360
                },
                "exposureProgram": 1,
                "_function": "normal",
                "_autoBracket": {
            	    "_bracketNumber": 3,
            	    "_bracketParameters": [
                	    {
                    	    "iso": 400,
                    	    "aperture": 2.1,
                    	    "shutterSpeed": 0.011,
                    	    "exposureCompensation": 0.0,
                    	    "_colorTemperature": 5000,
                    	    "whiteBalance": "auto"
                	    },
                	    {
                    	    "iso": 400,
                    	    "aperture": 2.1,
                    	    "shutterSpeed": 0.033,
                    	    "exposureCompensation": 0.0,
                    	    "_colorTemperature": 5000,
                    	    "whiteBalance": "auto"
                	    },
                	    {
                    	    "iso": 400,
                    	    "aperture": 2.1,
                    	    "shutterSpeed": 0.066,
                    	    "exposureCompensation": 0.0,
                    	    "_colorTemperature": 5000,
                    	    "whiteBalance": "auto"
                	    }
            	    ]
        	    }
            }   
        }
    }

but this produces an error:

    {
        "error": {
            "code": "missingParameter",
            "message": "Any required parameter is not specified."
        },
        "name": "camera.setOptions",
        "state": "error"
    }

Working example:

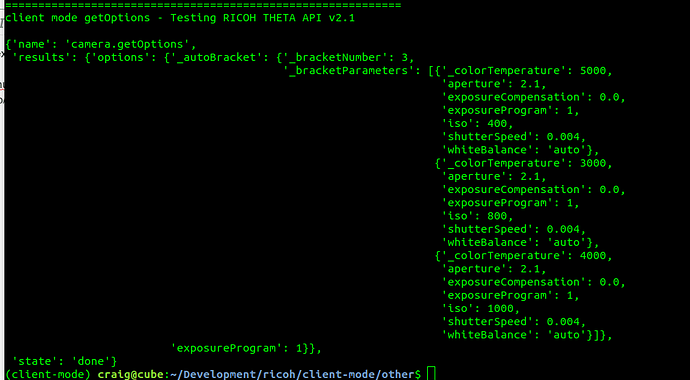
Output of getOptions

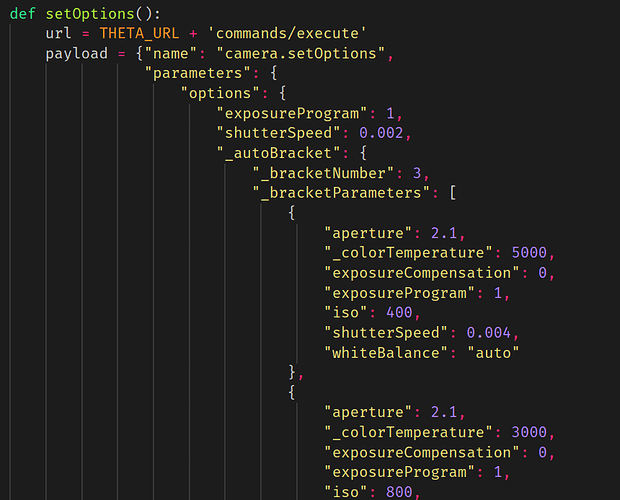
JSON payload setup

Notes

Example is using client mode because it is easier for me to test on my workstation, but it should work with access point mode. I think you just need the parameters example and think you can adjust it to a AP mode application.

It’s possible that you need to set the “exposureProgram” for every bracket. I have not tested it without the exposureProgram set for every bracket.

Please report back on your success/fail.

Thank you for the response.

When I test my code with Postman (where I can submit the Json payload) the request succeeds. The problem seems to be when I try to create and send the Json payload through swift. It only fails when I include the “_autoBracket” block. Otherwise I am able to change the camera options as expected.

I’ve outlined my code and issue here:

https://stackoverflow.com/questions/58264675/swift-jsonserialization-how-to-properly-format-for-rest-server

If you have a working Swift example I would be very grateful to see it.

-t

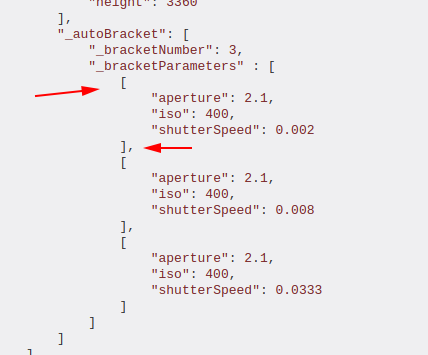
The example you have on StackOverflow looks like it is using an array? It should be curly brackets where the arrows are. Is that specific to Swift which converts it into JSON?

image

Is your error message still the same about missing a parameter?

image

Actually my error is now:

[“error”: {

code = invalidParameterValue;

message = “Any input parameter or option name is recognized, but its value is invalid.”;

}, “state”: error, “name”: camera.setOptions]

This is how Swift deals with a mixture of Dictionary and Array object types. so it allows a reference such as:
JSON_bodyObj[“parameters”][“options”][“_autoBracket”][“_bracketParameters”][0][“aperture”]

The JSONSerilaizer call “should” properly convert that to JSON, though I suspect this is where I am doing something wrong. Thank you for taking a look. I’ll update you when I get that figured out.

-t

Apologies,

When I reduce the code to just the three _bracketParamter options I provide in the example I do still get the same error:

[“error”: {

code = missingParameter;

message = “Any required parameter is not specified.”;

}, “name”: camera.setOptions, “state”: error]

I saw the above error in my tests when I used values that were outside of the valid range for each parameter. For example, when I set the shutterSpeed to an unsupported value, I saw that error.

I notice that in your Stackoverflow post, you indicated that you have it working on Postman. It seems that you’re very close.

Hi,

Is there a way to merge all the pictures taken directely on the camera automatically, like it is done with simple hdr option, to make a super-hdr option ?

Thanks

Please note that Z1 support is limited. Please refer to the forum discussion before use.

That’s indeed a very nice plugin, and correspond to what I need.
I was looking for a native solution, that would have been fast to implement.
So I guess it is not possible without a plugin.
Thanks :slight_smile:

Can you confirm that the latest update to the firmware to support handheld HDR does not meet your requirements?

https://api.ricoh/news/2019/10/24/ricoh-theta-api-update-z1-1.20.1-v-3.10.1/

https://api.ricoh/docs/theta-web-api-v2.1/options/_filter/

In addition to the web API, this is also available with Bluetooth:
https://api.ricoh/docs/theta-ble-api/shooting_control_command/filter/

and the USB API
https://api.ricoh/docs/theta-usb-api/property/filter/

To be honnest it’s quite hard for me to understand what is the Handled HDR mode.
Is it just a more sofisticated version of the hdr that can handle some movement during the hdr shooting ?
If so, it’s not what I’m looking for unfortunately…

I see what you mean. The documentation doesn’t really explain the difference.

Update: Nov 7, evening

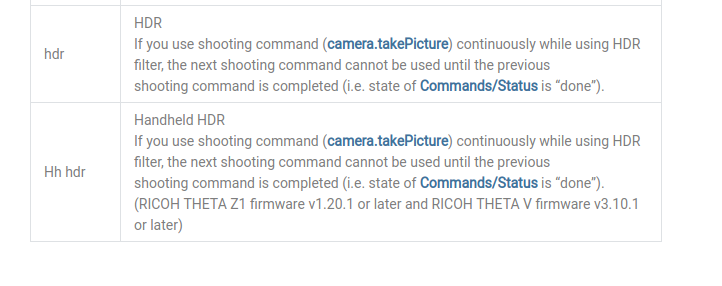
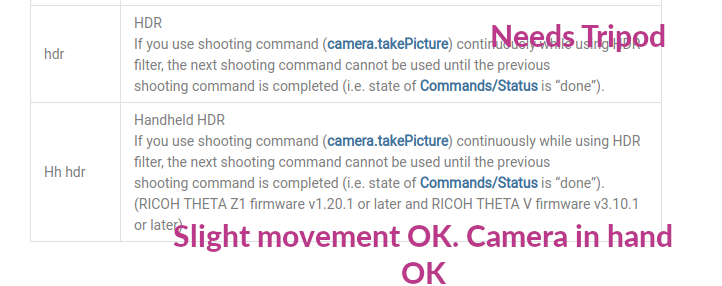
Handheld HDR or Hh hdr has some photo-processing to eliminate slight shaking from HDR image. To some extent, it can eliminate the “ghost” image.

The standard HDR or hdr does not compensate for movement and should be used with the camera in a tripod.

Hello,

Is there already a plug in or app for auto exposure bracketing that will do these settings?

  • Aperture Priority
  • ISO 200 preferred or 400 is ok too
  • 3 shot exposure bracket 2 stops apart -1, +1, +3
  • 5 shot exposure bracket 1 stop apart -1, 0, +1, +2, +3
  • Auto White Balance

.I’d tried some apps but they miss the mark or glitch…

The official RICOH mobile app has the ability to set brackets. If you have a Z1, this plug-in is popular.