New Wireless Streaming Guide Available

If you have a THETA S or want to stream the THETA V with a USB cable, please see the RICOH THETA Live Streaming Guide


RICOH THETA V Wireless Live Streaming Guide

There are two parts to this guide:

  1. Configuring THETA V prior to streaming event

  2. Using THETA V to broadcast a streaming event

Quickstart Summary

Configuration Summary

  1. Locate Wireless Live Streaming Plug-in in the THETA Store

  2. Connect THETA V to computer with USB cable

  3. Install Plug-in into THETA V using THETA Desktop Application

  4. Set Wireless Live Streaming plug-in to launch

  5. Reboot camera

  6. Configure THETA V to connect to Internet using a Wi-Fi router or mobile phone hotspot

  7. Configure YouTube Live 360° Event with web browser

  8. Put THETA V into Plug-in mode

  9. Save YouTube Live Events server URL and stream key into THETA V

Usage Summary

  1. Connect THETA V to Wi-Fi router or mobile phone hotspot

  2. Start broadcast

  3. Optional: verify broadcast is working properly

Step-by-Step Configuration Guide

Locate Plug-in in THETA Store

Go to https://pluginstore.theta360.com/

image

Find the Wireless Live Streaming plug-in.

Connect your THETA V to your computer

Connect the camera to your computer with a USB cable.

image

You must have the Ricoh Desktop Application installed on your computer. If you do not have the desktop application installed, download it from https://theta360.com/en/support/download/

Install

Click on the Install button.

image

Set Wireless Live Streaming Plug-in to Launch

With your camera and the computer still connected with a USB cable, set the active Plug-in with the Desktop App. Under the file menu, select Plug-in management….

image

Check the radio button for Wireless Live Streaming.

image

Reboot camera

To be safe, reboot the camera. A reboot may not be needed in some cases, but if you have time, hold the power key down for 8 seconds. Once the camera has turned off, press the power button again.

Be careful not to do a short press of the power button, which places the camera into sleep mode and will not reboot the camera.

Configure THETA V to Connect to Internet

The objective of this step is to configure your THETA V to connect to the Internet using Client Mode Wi-Fi.

In Client Mode, the Wi-Fi LED on the front of the camera is solid green.

If you have already configured your camera with Client Mode, you can skip this step.

Continue on if you do not have a green LED as shown in the picture below.

image

There is a more detailed guide for Client Mode configure here.

Most routers have a mode called, “WPS”, which stands for Wi-Fi Protected Setup. This will enable you to connect your THETA V directly to your router with a few button presses.

WPS Setup

Hold your THETA V and press the Wi-Fi, Mode, and Shutter buttons down.

image

On your Wi-Fi router, press the WPS button, usually on the back of the router.

wps-button

The THETA V should now be configured for Client Mode. In the future, you can place the THETA V into Client Mode by pressing the Wi-Fi button on the side of the camera.

Find IP Address

You will need the IP address of your camera to save the YouTube settings to your camera. The easiest way to get the IP address of your THETA V is to use the Ricoh mobile application.

For this step, you need to connect your mobile phone to the camera with Client Mode (green LED).

From the screen where you can see your camera images, go to the Settings gear in the upper right corner. Go to Camera Settings -> Camera versions -> IP Address.

image

image

mobile-ip

If you can’t connect your mobile app to your camera with client mode, there is a separate article shows a number of other ways to get the IP address of your camera.

Manual Setup

If you do not have access to WPS on your router or you are connecting the camera to your mobile hotspot, please look at this configuration guide for information on manual configuration.

Configure YouTube Live Event

With any web browser, configure YouTube Live Event. You must be logged into the

YouTube account that you plan to use for live streaming.

Go to YouTube Creator Studio.

image

In the left-hand pane, select LIVE STREAMING -> Events.

image

With the pane for Live Event selected, click on the button for New live event that is located in the upper right of your window.

image

Click on the Advanced settings tab.

image

Check the box for This live stream is 360°.

image

Select Reusable stream key.

image

Create a new stream.

image

You will need the Stream Name and the Primary Server URL for the next step.

image

Put THETA V into Plug-in Mode

Press the lower mode button on the side for longer than two seconds.

The LED above the shutter button should be solid white.

The Wi-Fi LED should be solid green.

image

Save YouTube Settings to Camera

You need to use a web browser to connect to the camera at:

http://your-camera-ip:8888

For example, my camera was assigned an IP address of 192.168.2.100.

I can access my camera’s configuration at:

http://192.168.2.100:8888

image

Copy and paste the YouTube server and stream key into the boxes on the camera configuration tool.

image

Congratulations! You’ve finished the configuration of the Wireless Live Streaming plug-in.

To start the stream, press the shutter button of the camera.

Testing

Camera Configuration Tool

In the camera configuration tool, you will see a red dot with the words, Streaming, next to it.

image

You will also see a button that says, Stop streaming.

image

YouTube Control Room

Preview.

image

With the event live.

image

View from YouTube.

image

View from other browsers on Internet.

image

Additional Information

Updated versions of this wireless streaming document will be published here: http://theta360developers.github.io/wireless-plugin-guide/

Would be nice to see in this GUI the temperature (to monitor heat) and battery level!

Im not able to develop, does it too hard to be developed? Would be such a great improvement for peopple like me interested in streaming for more than 40-50m.

It’s possible, would be easy to moderate difficulty.

The first step to assess how difficult it is to check to see if the temperature values exist. Information does exist.

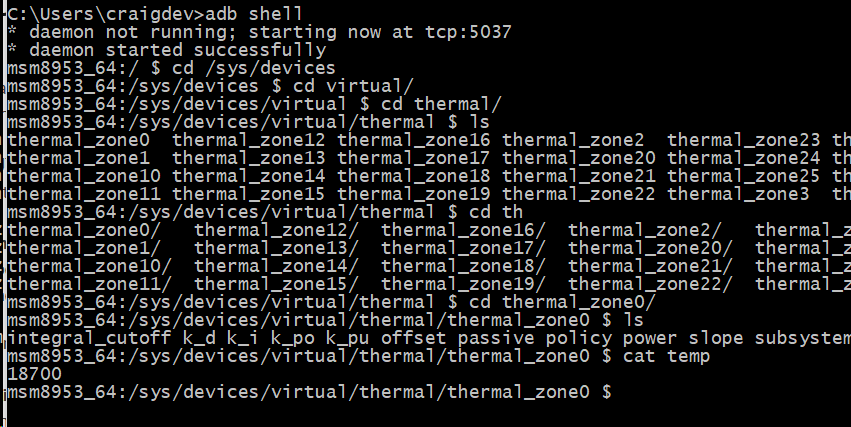
It appears to exist, so testing with a pre-made app.

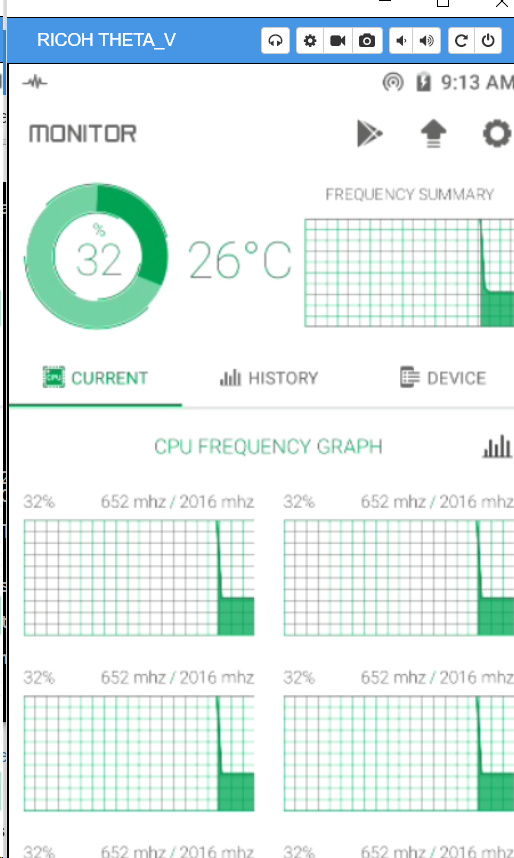
You can’t run the sensor app with the plug-in app at the same time, so the streaming app would need to pull the sensor information and display it. Looks doable, but needs to be done.

1 Like

You are fast! thanks for reply

Do you have an idea on which temperature the theta v halts when streaming with this plugin?

Edit: Now i saw… theres 25 hot areas monitored! Maybe there are 25 different temperatures to monitore :exploding_head:

No. I don’t know the temperature which causes the plug-in to halt. I remember trying to grab the temperature with a pre-made app, but I couldn’t run the pre-made app and the streaming plug-in at the same time.

Can you take a standard household fan and blow it on the camera body, possibly from below so the fan is out of the main video? A normal fan will reduce temperature a lot.


The idea of adding the temperature into the GUI is a great idea. However, it will take some time to implement. Ideally, a developer sees this post and adds it. :slight_smile: :

Providing feedback on what is needed is important. Thank you.

@jcasman and I will try and organize this information and help the developers understand the requirements. Usually, the professional photographers like you know the camera better than the developers. It’s a good thing to exchange information.

1 Like

Yeah thanks!

I saw the heatsink ideas and also thought on a fan to help cooling the camera. I´ll play macgyver in the next days :sweat_smile:

1 Like

I’m personally using a Vornado fan for some tests. This is a round fan that I place on floor with a wind that blows in one direction. In the picture below, I’m using the fan because I’m testing HEVC compression for a 90 minute video test, which was making the camera hotter than normal.


I was hoping to use the Android Sensor class to pull Sensor.TYPE_AMBIENT_TEMPERATURE. It didn’t work. sensor.getDefaultSensor(Sensor.TYPE_AMBIENT_TEMPERATURE) returns null.

I also checked the available sensors using Sensor Box and it’s not showing a separate temperature sensor.

It’s still possible to pull the information from /sys/devices/virtual/thermal/

This tools might be useful for anyone working on adding this into the plug-in

1 Like

Hello @codetricity!

Is it possible that this wireless streaming approach with Theta V could work with a custom RTMP (like NGINX or MonaServer) rather than Youtube or Facebook?

It would be even better if I could combine Wireless Live Streaming Plug-in with the THETA RTSP Streaming Plug-in (because I want least possible delay). Or the THETA RTSP Streaming Plug-in works wirelessly by default?

Thank you in advance,
Dimitris