THETA Z1 OLED Drawing Library
Introduction
Original article appeared in Japanese here.
This is Ricoh’s @ KA-2.
RICOH manufactures a camera called RICOH THETA that can shoot in 360° - in all directions.
RICOH THETA V and RICOH THETA Z1 use Android as the OS. You can customize them as if you were making an Android app, which are called “plug-ins” (see the end of this article for details).
The RICOH THETA Z1, which went on sale in Japan on May 24, 2019, is equipped with an OLED display.
The basic method of manipulating the OLED through a THETA plug-in is introduced in this article (in Japanese). Along with this article, you can read the API for manipulating the OLED (please see the section “Control the OLEDs” in “Broadcast Intent”) THETA Plug-in API documentation. If you use the API as-is, be aware of the following issues:
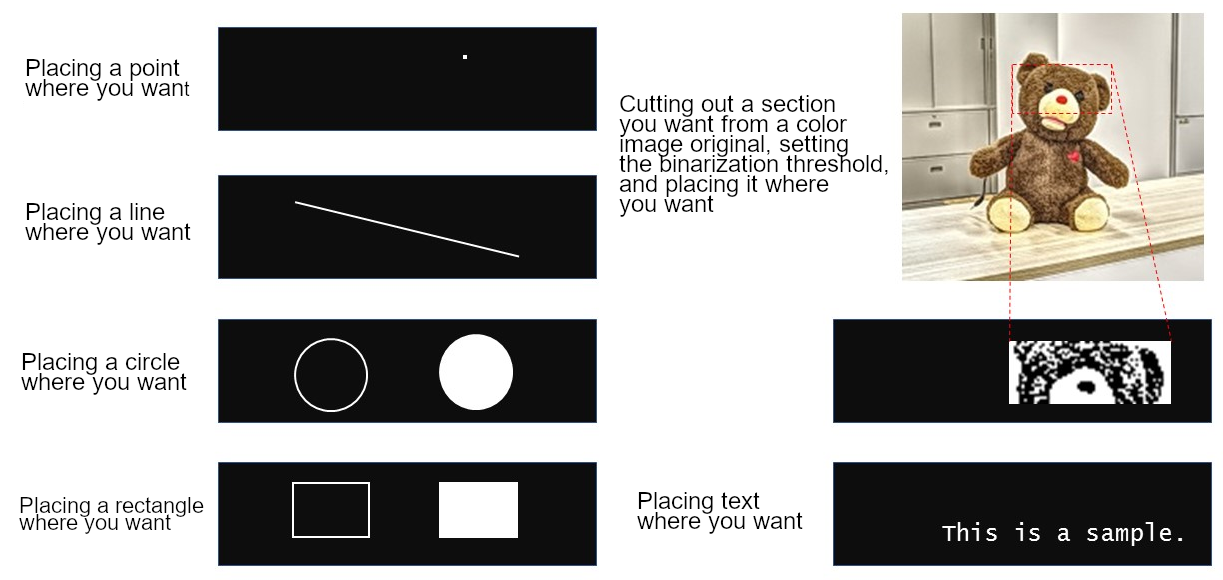
- It is difficult to draw basic figures such as points, lines, squares, and circles. (It’s just a matter of packing data in the Bitmap class…)
- When a color image is input, the brightness threshold for binarization cannot be specified.
- The image display is only for the area that can be controlled by the plug-in (bottom 128 x 24 dots). Partial display is not possible.
- Images and text cannot be mixed.
- When displaying text, even if lowercase letters are specified, they are converted to uppercase letters.
- Since it is not a monospaced font, when a changing value is displayed, the display may sway from side to side, or the vertical lines may not be aligned, resulting in poor appearance.
As a quick start, I pulled together something like an “OLED drawing library.”
I think these are similar to electronic work clusters that have been used as graphical black and white displays.
“Drawing turn (create display data) → display the completed data”
Since this is the flow, you can also make more elaborate screens by matching the library with the drawing turn.
The following video is an example of what you can create with the library: https://www.youtube.com/watch?v=7eYaUrlwmGk
Library Description
The title of this article is “THETA Z1 OLED Drawing Library.” This might make you think that the source code is included in the “plug-in library” used by the THETA Plugin SDK. However, it is not included as of the end of May 2019.
Please take some time to look through the library and see if there is anything useful missing.
Prepared Methods
| Classification | Name of Method | Summary |
|---|---|---|
| Constructor | Oled (Context context) | Pass the context of MainActivity from the argument. |
| Official OLED API wrapper | displaySet(String mode) brightness (int value) hide () blink (int msec) | This is a wrapping of the OLED-related Broadcast Intent published here so that it can be easily called. |
| Basic Processing | draw() clear() *two types of different arguments invert (boolean invFlag) | draw is a process to display drawing processed data with the official OLED API (Broadcast Intent). clear clears the drawing data. invert inverts the drawing data. |
| Image Drawing | setBitmap() *four types of different arguments | Draw by specifying the brightness threshold and the image file name in the assets folder, or the Bitmap object. There are two types, one that draws on the entire OLED and one that allows detailed display area specification. All image file formats that can be handled are those that can be decoded by BitmapFactory.decodeStream (). It can handle bmp, jpg, png, etc. |
| Draw a Dot | pixel() *two types of different arguments | Draws a point at the specified position. There is also an option for color (white / black) and an option to invert the color when the specified color and the background are the same. |
| Draw a Line | line() *two types of different arguments lineH() *two types of different arguments lineV() *two types of different arguments | Draw a line between the two specified points. There is also an option for color (white / black) and an option to invert the color when the specified color and the background are the same. The name ending with “H” is horizontal and “V” is a process specialized for vertical. |
| Draw a Square | rect() *two types of different arguments rectFill() *two types of different arguments | Draw a square by specifying the upper left coordinates, width, and height. If the name has “Fill” in it, fill in the contents. There is also an option for color (white / black) and an option to invert the color when the specified color and the background are the same. |
| Draw a Circle | circle() *two types of different arguments circleFill() *two types of different arguments | Draw a circle by specifying the center coordinates and radius. If the name has “Fill” in it, fill in the contents. There is also an option for color (white / black) and an option to invert the color when the specified color and the background are the same. However, for circleFill (), the option to invert with the background color is disabled for the reason described in the comment in the source code. |
| Draw a Character (string) | setChar() *two types of different arguments setString() *two types of different arguments | Draws a character from the specified coordinates. You can draw ASCII code from 0x20 to 0x7E and some extra symbols. One character is 5x7 dot (display area is a 6x8 dot). Up to 21 characters x 3 lines can be displayed. There is also an option for color (white / black) and an option to invert the color when the specified color and the background are the same. It does not scroll. |
For reference, here is a display example covering ASCII codes from 0x20 to 0x7E.
If you have a request or a comment such as “I don’t like this font,” “I want a font with larger characters,” “I want a Japanese font,” etc., please add it in, referring to the source code posted in this article. Please try!
And when this library is released on GitHub, it would be great if you could do a pull request!
Oled.java Full Source Code
The source code of the library part is as follows.
How to Use the Library
- Create an “oled” folder and place Oled.java in the folder
- Import the OLED library into MainActivity.java
import com.theta360.pluginapplication.oled.Oled;
- Create an “asset folder” and place images there to handling image files
You can create the asset folder from the Android Studio menu:
[File]-> [New]-> [Folder]-> [Assets Folder]
- All you have to do is use the source code from the sample provided here.
Library Call Examples
Below is the first of three examples of library calls in the order of “Explanation of operation (including images such as animated GIF)” and “Source code.” The second and third examples will be supplied in Part II of this blog post.
In the first two examples, the full source code is available but a detailed explanation is omitted.
This leads to the natural question: “How does this display call the library?”
Please use it like checking the calling location by looking at the behavior.
All cases are based on this sample project.
Demo Drawing (mixed figures and images and characters)
Screen saver-like thing
This is the demonstration that is displayed when you first start this sample plug-in. Actually, the movement is smoother than shown here, this animated GIF drops a certain amount of frames. Please see the tweet video at the beginning of this article.
Simple image viewer
If you press the Wi-Fi button or Mode button, it will be in the state of the simple image viewer. You can return to the above state by shooting.
The displayed color image is a 192 x 170 pixels jpeg.
Again, the movement is smoother than seen in this animated GIF.
Full Source code
You don’t have to look at the demoDraw() that corresponds to the “screensaver-like thing” at the end. It’s a moly-moly code that I just wanted to make the demo flashy …
Ping Pong game and QR Code demos will be included in Part II.
Conclusion
I think we have created an OLED drawing library that can be used quite easily. There are some restrictions, and maybe… there may still be bugs, but I would appreciate it if you could point out anything you notice.
Once the display library is in place, it may be easier to create things like:
- Real-time display of edge-extracted pictures of live view with OpenCV
- Information display for shooting mode and various settings
- Histogram display from live view data
- Graphical level display
- Real-time display of waveform of sound obtained from the microphone
- Game that uses the network (such as an egg that goes out to another person’s THETA?)
- Keyboard connected to THETA, so a terminal can execute ADB commands
- Debugging information (logcat) of the plug-in sent to OLED
- And more!
We would appreciate it if you could try creating a new plug-in with your own ideas. It seems that you can make a lot of retro game-like things, breakout-like games, ultra-narrow Tetris, etc. I would be very grateful if you could publish them to the THETA plug-in store!
About the RICOH THETA Plug-in Partner Program
If you are interested in THETA plug-in development, please register for the partner program!
Please be aware that the THETA with its serial number registered with the program will no longer be eligible for standard end-user support.
For detailed information regarding the partner program please see here.
The registration form is here.