@Manuel_Couto I believe that you cannot set the output resolution of the Z1 for live streaming through the API.
However, my experience here is limited. @biviel, @craig or others may have some more insight.
From the RICOH API documentation:
@Manuel_Couto I believe that you cannot set the output resolution of the Z1 for live streaming through the API.
However, my experience here is limited. @biviel, @craig or others may have some more insight.
From the RICOH API documentation:
This is not that relevant since the example is with Linux.
The camera supports 2K streaming. It’s defined in the driver.
this provides some hint.
mCamera = [new](http://www.google.com/search?q=new+msdn.microsoft.com) WebCamTexture (1920, 1080, 30);
I have not tried it yet.
Maybe it would work?
It does seem that the resolutions are for the texture.
Is there anyway you could share your unity file containing the scripts for putting the output of the Z1 directly to the sphere in Unity without OBS? I’m assuming you still use the RTSP plug in to connect the Z1 wirelessly but don’t know how you would connect it directly to Unity without OBS.
I just ran a test with Unity and a THETA X without using OBS. This should also work with the Z1.
Greetings,
Because I’m aiming to achieve the lowest possible latency, I have opted out of the RTSP approach. Instead, I am now using the Z1 connected to the server PC and utilizing WebRTC to livestream to Unity.
The objective is to utilize a small PC, such as a Raspberry Pi or Jetson, to act as a server to capture the stream from the camera and transmit it via WebRTC.
As for RTSP, Unity does not directly support it; you would need a plugin or OBS for that. There is also another method for wireless transmission; however, this approach will limit you to approximately 10 FPS. (I can’t find the original post for this ![]() )
)
It’s possible to use motionjpeg direct to the headset with WifFi if you use browser technology.
Since I’ve been talking to ChatGPT, I asked it if I can use RTSP inside of Unity.
I got this response from ChatGPT, but did not try it.
Answer below from ChatGPT. Human did not test
Viewing an RTSP stream within Unity requires a bit more effort since Unity doesn’t natively support RTSP streams. You typically need to use a third-party plugin or library that can handle the RTSP protocol and video decoding, then display the video within your Unity scene. One of the more common approaches is to use the VLC Media Player library, which is capable of playing a wide variety of video formats, including RTSP streams. The LibVLCSharp wrapper allows you to use VLC functionalities within Unity projects.
Here’s a high-level overview of how you can achieve RTSP streaming within Unity using LibVLCSharp:
Here is a simplified example of what this script might look like:
csharpCopy code
using System;
using UnityEngine;
using LibVLCSharp.Shared;

public class RTSPStreamPlayer : MonoBehaviour
{
    [SerializeField]
    private string rtspUrl = "your_rtsp_stream_url_here";

    private LibVLC _libVLC;
    private MediaPlayer _mediaPlayer;

    void Start()
    {
        // Initialize LibVLC
        Core.Initialize();
        _libVLC = new LibVLC();

        // Create a new MediaPlayer
        _mediaPlayer = new MediaPlayer(_libVLC);

        // Create a new media for the RTSP URL
        using (var media = new Media(_libVLC, rtspUrl, FromType.FromLocation))
        {
            _mediaPlayer.Play(media);
        }
    }

    void OnDestroy()
    {
        _mediaPlayer.Stop();
        _mediaPlayer.Dispose();
        _libVLC.Dispose();
    }
}
To display the video in your scene, you can use a VideoView object, which is part of LibVLCSharp. Attach the VideoView component to a GameObject in your scene, and reference it in your script to render the video output. You may need to adapt and extend the script to properly integrate with your Unity project, handling aspect ratios, and ensuring performance is optimized.
This approach requires integrating external libraries and possibly dealing with platform-specific quirks, so be prepared for a bit of trial and error to get everything working smoothly.
That’s the one I was looking for (post).
I tried it out, but I was unable to get more than 10 fps ![]()
I believe that your solution with a server is much better. The motionjpeg from live preview is going to have a lower fps and lower resolution.
How do you get Unity to consume the WebRTC stream? Are you using a separate server for signaling or STUN/TURN?
There were a number of projects in the past using ntt skyway
Many years ago, RICOH had a web conferencing service that used WebRTC.
Currently, I’m utilizing the Bidirectional sample from Unity Render Streaming.
While I could provide guidance on setting it up, Unity does an excellent job of that already. However, if anyone requires assistance, I’m available to offer support.
Looking ahead, my goal is to enhance the sample. As I’m focusing on teleoperation, one of the webRTC peers will be a robot, necessitating a headless setup without human intervention. This setup could also prove useful, for instance, when traveling—you can simply connect your Theta to a Raspberry Pi and let it handle the rest. Additionally, I aim to enable streaming from multiple cameras.
For everyone else just trying to play with webRTC and Unity, the sample is a great tool.
(There’s one line in the code that needs to be added so you can retrieve the texture and output it to a sphere or skybox texture. However, since I don’t have access to my work PC at the moment, I can’t say for sure which line it is, but I will update this topic on Monday.)
Regarding the basic workflow and PC requirements for this:
Would you be willing to make a step by step guide for this setup? I’m also aiming for the lowest possible latency and have no experience with WebRTC so I would greatly appreciate it.
Sure, I can make something, although, I will only be able to do it next week.
That would be very helpful, please reply when you do
Greetings,
Sorry for taking so long, but this last couple of weeks have been chaotic.
Ok, so How to use WebRTC for livestreaming with an Richo Theta to Unity.
This version of Render Streaming is compatible with the following versions of the Unity Editor
This package depends on the WebRTC package. If you build for mobile platform (iOS/Android), please see the package documentation to know the requirements for building.
Unity Render Streaming supports almost all browsers that can use WebRTC.
| Browser | Windows | Mac | iOS | Android |
|---|---|---|---|---|
| Google Chrome | ||||
| Safari | ||||
| Firefox | ||||
| Microsoft edge (Chromium based) |
It may not work properly on some browsers caused by depending on the status of support about WebRTC.
In Safari and iOS Safari, WebRTC features cannot be used with http. Instead, https must be used.
1º- Create a Unity project. We used Unity 2022.3.17f1 LTS.
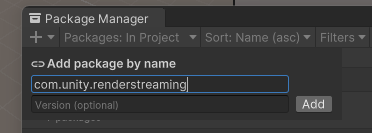
2º- Go to the Package Manager and Add by Name: com.unity.renderstreaming.
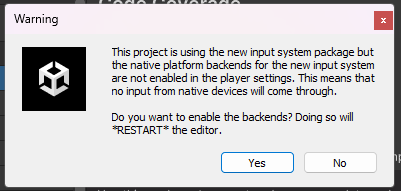
You will probably get a warning about the input system, press Yes and wait for Unity to restart.


3º- After installing the package a new window is going to pop-up “Render Stream Wizard”. This is used to correct all configurations needed for this project. Every time you open up the project this window will apear and check if everything is OK. If not, just press Fix All, and Unity will handle the work for you. (Don’t close the Render Stream Wizard, you will need it in the next step)
4º- The next thing to do is to Download the WebApp. This is a JS script that you will run in one of the peers. In this case, because we are looking to implement this in a robot, we prefer using the JS in the robot side, and the Unity app in the User side. This is also interesting if you are aiming to use a Raspberry PI or a Jetson, that you put in your backpack. That being saied, the Theta camera will be connected by USB-C to the PC with the JS (PC_JS).
So, to download the WebApp scroll down to the end of the Render Stream Wizard window. There you will find an option “Download latest version web app”. Save the file, we suggest creating a “WebAPP Folder” in the Assets, the main reason being, in the future you may want to customize the app, and this way you already have everything organized.
(Now you can close the Render Stream Wizard window)
5º- In the Package Manager import the Unity Render Streaming Samples.
As of this moment, by using any of the samples provided by Unity you will have a fully working WebRTC comunication channel.
So, how can we use this to livestream the 360º Livefeed from the theta?
The best way I found was to build upon the Bidirectional Sample. By doing this we can get a stream going with only 2 steps:
1º- Edit the Bidirectional script:
void Awake()
        {
            (...)
            setUpButton.onClick.AddListener(SetUp);
            hangUpButton.onClick.AddListener(HangUp);
            connectionIdInput.onValueChanged.AddListener(input => connectionId = input);

            // Replace this line with the following
            //connectionIdInput.text = $"{Random.Range(0, 99999):D5}";
            connectionIdInput.text = $"{00000:D5}";

            webcamSelectDropdown.onValueChanged.AddListener(index => webCamStreamer.sourceDeviceIndex = index);
            (...)
        }
private void HangUp()
        {
           (...)
            // Comment this line, so the ID channel doesn't change when the call is over;
            //connectionIdInput.text = $"{Random.Range(0, 99999):D5}";

            localVideoImage.texture = null;
        }
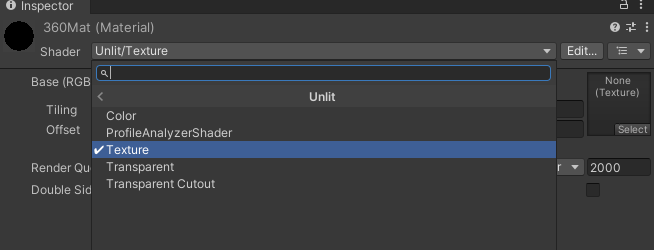
Note: The material must be Unlit, or the image will be darkened.

        // Create a new variable for the material
        public Material cam360;

        void Awake()
        {
            (...)

            receiveVideoViewer.OnUpdateReceiveTexture += texture => remoteVideoImage.texture = texture;
            // Copy the line above and edit it so that the texture is saved in the new material
            receiveVideoViewer.OnUpdateReceiveTexture += texture => cam360.mainTexture = texture;


            (...)
        }
2º- Now that we have a material with the camera livestream, we can apply it to anything we need. In our case, we apply it to a sphere. For that, we must create a sphere and them apply the material to it. We also need to invert the sphere!
using System.Collections;
using System.Collections.Generic;
using UnityEngine;

public class FlipNormals : MonoBehaviour
{
    [SerializeField]
    private Mesh mesh;

    // Start is called before the first frame update
    void Start()
    {
        flipNormals();
    }

    private void flipNormals()
    {
        Vector3[] normals = mesh.normals;
        for (int i = 0; i < normals.Length; i++)
            normals[i] *= -1;

        mesh.normals = normals;

        for (int i = 0; i < mesh.subMeshCount; i++)
        {
            int[] tris = mesh.GetTriangles(i);
            for (int j = 0; j < tris.Length; j += 3)
            {
                //swap order of tri vertices
                int temp = tris[j];
                tris[j] = tris[j + 1];
                tris[j + 1] = temp;
            }

            mesh.SetTriangles(tris, i);
        }
    }
}
Ok, at this moment you should have a fully working livestream going between the PC_JS and Unity. Although, before testing you need to check two things.
The first, and the easiest, you need to confirm that you have the Ricoh Theta UVC installed (download).
The second can be a little bit trickier, since it involves IP adresses. So, if you run the JS script in the same PC that you run the Unity there will be no problems. If not, you need to specify the signaling server IP. So, how can you do this?
In Unity, you can go to Edit > Project Settings > Render Streaming, in here you will find a URL, it should be something like “ws://127.0.0.1”. That’s the “internal IP of you machine”, it will only work if the JS is executed in the PC with the Unity project.
Now, grab the JS script and run it in some other machine, other that the one running Unity. When it starts, the first few lines will be the IP adresses associeted with the server. Here is an example:
If you have the 2 PCs in the same network use the Local IP (it’s better for safety and it should work right out of the box). If you have the PCs in different networks you have to use the Global IP. For both cases you will probably have to configure your firewall to open the port 80. For the Global IP, you will also have to configure the port-forwarding.
IMPORTANTE NOTE: Messing with IPs and all that stuff can be dangerous for people that don’t know what they are doing. Opening ports its always a big security risk. I’m no expert in the matter, so I can’t provide reliable information in this topic. What I can say is that using a VPN is better than using port-forwarding.
Alright, by now you should have a fully operational livestream set up between PC_JS and Unity. However, before diving into testing, there are a couple of key checks to ensure everything runs smoothly.
Important Note: Manipulating IPs and configuring firewalls can pose security risks for those unfamiliar with the process. Opening ports is a significant security concern. While I’m not an expert in this field, so I cannot provide further information on this, I suggest that using a VPN is preferable to port forwarding.
Now it’s time for testing!
PC_JSConnect the Theta to the PC (PC_JS);
Execute the JS script in PC_JS;
Open the browser in PC_JS and connect to: http://127.0.0.1. This will connect you to the signaling server.
This is the default page (you can change it, we will go over that in a bit). Select the Bidirectional Sample.
If no cameras, and or microphones, are detected the list will only show “camera 1”, and or “mic 1”. If that happens, don’t worry, click “Start Video”. Now you will be asked to give permissions to acesse the camera and the microphone. Allow it and reload the page.
Now the cameras and microphones will display properly.
Set the correct resolution (you can pick custom): 1024x512, 1920x960 or 3840x1920.
Press “Start Video”, the Local video should start:
Now input you Connection ID, if you change the code in Unity, it should be 00000.
Press Setup (the connection will not start since we still have to run Unity).
I believe I addressed everything in this post, but if someone finds any problems or notices something that I didn’t cover well enough, please let me know so I can update the post.
Hi again, I have a few questions about a few of the steps in this guide as I believe im very close to making this work.
The issue im having at the moment is it seems im able to get the ricoh theta Z1 camera’s output into the bidirectional menu (as shown in the screenshot) but it wont display to the sphere i created. In your guide you briefly talk about making a sphere and i think it’s likely that im missing something that im supposed to attach to it like a script or material. In that screenshot i also show the sphere’s component’s in the inspector window so if you could please tell me if there’s something im missing or doing wrong with the sphere please do.
You also talked about material that is unlit, and you named yours 360Material in the guide you posted. Am i supposed to attach this to the sphere im guessing?
If you could send your unity project as a file that would also be much easier and helpful as i could see where i’m going wrong. I’m running my js script and unity on the same pc for reference as well so i used the local ip for the render streaming url in unity. If you have any ideas they would be greatly appreciated.
Greetings @HunterGeitz,
It appears your issue is straightforward. You are missing a reference to the material in your script:
In your BidirectionalSample script, you defined public Material cam360;, but it has not been assigned in the inspector. This step is likely missing:
Please ensure you assign the material in the inspector as shown above.
Thank you, the fixes you gave worked. My question now is whether there’s a way to fix the output of the camera being mirrored or inverted from left to right when using the flipnormals script on the sphere? The ricoh theta z1 camera’s output is cast to the inside of the sphere but the camera output is mirrored and i have been trying to find a way to fix this while keeping the camera’s output on the inside of the sphere.
Right, I believe I forgot to mention that in the guide. In the sphere, change the X component of the scale to -1, that should do the trick.