Did you find a way to edit the JPGs to make them top up? I’m having the same issue and I need help.
@JBeard Not yet, but I haven’t used my Z1 since testing v1 of the DualFisheye plug-in…looking forward to testing out the newest version!
The developer, Ichi Hirota, did reply after my post to say Jpeg orientation was a Ricoh implementation (also seen in the Theta V). I would suggest setting up a batch automation action in whichever photo editing software you use to either split and rotate the jpegs or create a new set of jpgs by compressing the .DNG to .jpg.

Hi, my images seem to be automatically stacked in camera resulting in one HDR-DNG file. How do I bypass this so I get all 9 images for transfer later? Thanks.
Hi, @rhw908
Just select Bracketing mode instead of HDR-DNG.
Good luck,
Toyo
My only solution for this was to use PTGUI, per Ichi’s suggestion. It’s a $153 program, and you have to go into Panorama editors, then reselect the center point. I do this by 1st clicking on the center of my monopod mount, then clicking on the vertical line just above the middle until the mount is at the bottom, evenly spaced. (You’ll see when you get there). You can try the free version to see if it works for you, but it has a watermark all over the result.
Hi there.
I had the same issue trying to delete the files and managed to use your method too which is great. unfortunately the space once occupied with these files has not been emptied and there is no format option. I now have enough space for just 357 Images. Not sure what to do if anyone can help? I’m using my iMac.
Hello!
Need help with the following issue: when I set a 9 photos mode, in the end I still get only one HDR.DNG file, but not nine files. When I turn on all settings according to the guide, camera takes 9 photos, but in the end I still get only 1 file. Firmware is updated.
well, actually you get 2 files. 1 DNG and 1 HDR-DNG. but that’s the purpose of this plug-in I guess. If you want 9 single pictures you can do that without the plug-in by shooting bracketed RAWs.
HI -love this plugin, but trying to get the best settings.
I’ve been using HDR with 7 shots.
Few questions:
-
The resulting image is very dark. I pull it into Lightroom, use autocorrect and the exposure is still very low. I have to manually go through each image and bump up the exposure to get it properly balanced. Is this correct? Is there an optimal way to batch process all images so they come out right?
-
I’m sometimes worried with the auto HDR merging. I like having the resulting HDR so I DON’T have to merge the photos, but would like to have it store the images anyway.
-
I like using image capture (vs. ricoh’s USB tool) to pull images off the Theta Z, but it doesn’t find the images from the Dual Eye folder. Any idea why?
-
I don’t understand why I can’t “format” the drive easily to delete images and folders. Any tricks on how to “clean out” the Z1 after i take images and copy them to my hard drive?
Thanks again!
I am having the same DARK photo issues. I can lighten the image but it begins so dark that the windows end up blown out. It sure doesn’t look like HDR it simply looks like a shot that took the windows for a light reading. Are you having any luck?
Also, I use Image Capture on the Mac to delete the photos off of the Z1.
Thanks!
Hi there, just got my Theta Z1 and I have an iPhone XR and MacBook Pro, signed up for hosting with CloudPano, and I’m planning to start my Lightroom subscription. I’m totally new to all this!
I’ve been hearing about the DualFisheye plugin, but will it work with my Apple iPhone/laptop?
If it doesn’t work with iOS devices, is there anything comparable that does?
Also heard about some other plugin called Time Shift that uses one lens at a time. Is that recommended for workflow?
Do you guys have any recommendations or Lightroom presets I should look out for?
Thanks!
I don’t quite understand what’s being said here? I have an iPhone XR and Macbook Pro that I’d like to use with my Theta Z1. Is there any way to use the DualFisheye Plugin with an iPhone or iOS device controlling it?
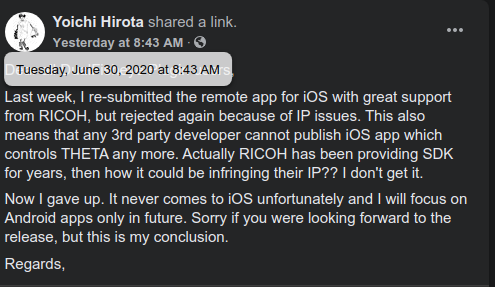
The DualFisheye Plug-in remote does not work on iOS. You can run the dual-fisheye plug-in inside the Z1. However, you won’t be able to control it with a mobile phone.
Consider buying a cheap, used Android phone on eBay or similar place if you really like the DualFisheye Plug-in.
You can also trigger the shutter with a bluetooth clicker.
You don’t need the iOS app to use the plug-in, it just makes it easier to use.
You need the plug-in.
To install the plug-in into your camera, you need the desktop app
Without the mobile app, use the buttons on the camera to control the plug-in.
"Mode" button: toggles shooting mode "Wifi" button: toggles number of shots "Wifi" button (long press): toggles 10 sec timer on/off "Fn" button (Z1 only): toggles JPG/DNG* mode*JPG takes ~1sec/shot
*DNG takes more time, ~2.5sec/shot
To speed up the process, the DualFisheye Plug-in keeps the two 180 degree fisheye images unstitched. Afterward, you can send them over to the processing devices (e.g. PC/Android) for batch processing (merging/stitching application is required).
At this point, you have the images on the camera.
You then need to get them onto your Mac computer with a USB cable.
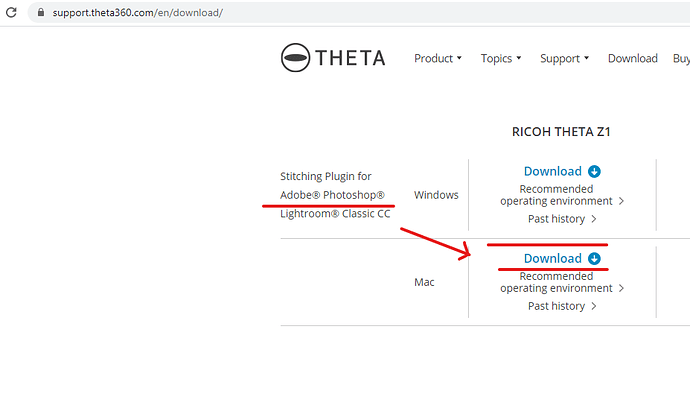
Once it’s on your Mac computer, use Lightroom Classic CC and the stitcher.
Note that if you don’t already have Lightroom Classic, you can run the stitcher standalone on the Mac with a small modification and then use free software like darktable https://www.darktable.org/
Note that I normally don’t use the plug-in. Thus, there may be errors in the workflow I describe. Other people may have more accurate first-hand information.
Suggest you get started with the free plug-in first and possible a one month lightroom subscription for $9.95/month.
It is generally easier to use lightroom with the stitcher.
If you don’t like the workflow/results, then cancel your subscription.
About timeshift
The timeshift is a workflow tool to remove the photographer from the shot automatically. This is good for high-volume real estate or casual shots. It does not improve the quality of a DNG image. If you want the very best single shot, you should look at the DFE. If you want good shots quickly, the timeshift helps speed up the process so that you don’t have to wide behind a wall for every shot.
Hi. I’ve read every post here.
My problem is that I need to use the camera on a drone, and I have an iphone, so there’s no app to shoot remotely.
You can also trigger the shutter with a bluetooth clicker.
You have to use the android plugin in order to make it work, right? So my only chance is to get an android phone?
Is there any chance to increase the timmer setting to 20 secs instead of 10?
Thanks for the help. This plugin is fantastic.
I find that the plug-in works great for automating the capture of brackets for HDR but the inbuilt HDR function doesn’t handle moving objects like cars reliably so I usually use the plug-in to capture raw brackets and then merge in post using Aurora HDR. Much cleaner result.
First off, thank you so much for this plug-in, it’s exactly what I’m after. It’s very quick to setup and to use, which is always a plus when you’re on-set.
I have one comment/request/suggestion. My use case for this plug-in is to take bracketed DNGs to be later stitched in PTGui to create a HDRI for the 3D team to light with. While I know the sun will never be able to be captured properly, it would appear that the plug-in weights the base exposure to a properly exposed image and then goes -/+ from there.
For me, the most important information to capture are light sources to the point of being able to see the filaments (bear in mind we’re talking about film lights, so up to10K kind of light sources) The shadow areas are far less important. It would be great to have a mode that is for VFX where the bias is towards highlights rather than a properly exposed mid-point.
Many thanks again for this great plug-in.
Have you looked at Authydra and posted on the Authydra topic as well? Authydra by Kasper is also open source, so maybe someone in the community can modify it? GitHub repo
Thanks for the link Craig. I looked into it, however Hirota’s approach is much more on-set friendly since I don’t need to connect to the Theta to set any values. Having to connect/dis-connect has always been an issue since, often, you’re on a production’s wifi which is always stronger so phones want to jump back on to that one. When you’re holding everyone up so you can get your HDRI you want to be as quick as possible.
He might be add this type of feature to the mobile app, which is pretty cheap. The mobile app is only on Android because there were problems with Apple restrictions in the Apple AppStore. Do you have an Android phone or are you willing to get a cheap one for the purpose of the mobile app?
Otherwise, I think the interface of the actual camera might get difficult to manage.
We can try and contact Ichi after we clarify the requirements.
