YouTube Spatial Audio Support Now Available

Notice from Ricoh.

App for computer supporting the RICOH THETA V will be released today.
RICOH THETA Movie Converter
-Spatial audio of videos recorded on the RICOH THETA V can be converted to the YouTube spatial audio format.
-Instructions
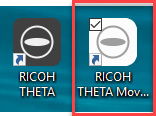
1. Drag and drop the video file you want to convert onto the app icon.
2. The converted video file (*.mov) is saved in the same folder as the original video file.
Perform a fresh install from the download page.
Download | RICOH THETA

Documentation from Ricoh

RICOH THETA Movie Converter for Windows

Purpose

RICOH THETA Movie Converter for Windows converts movie files with 360º spatial audio
RICOH THETA V outputs into YouTube movie formats.
Uploading converted movie files to YouTube, you can enjoy movies with 360º spatial audio
on YouTube.

How to install RICOH THETA Movie Converter for Windows

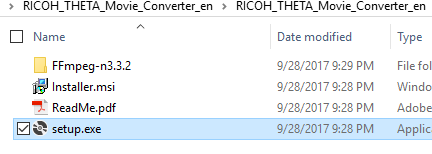
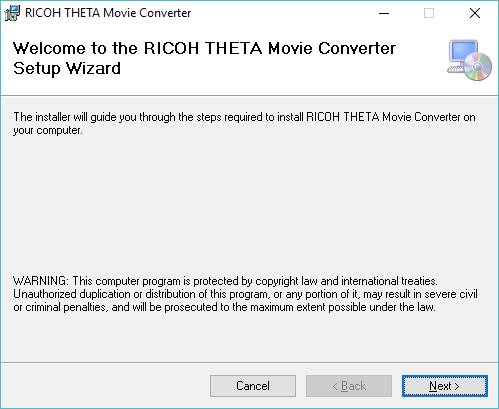
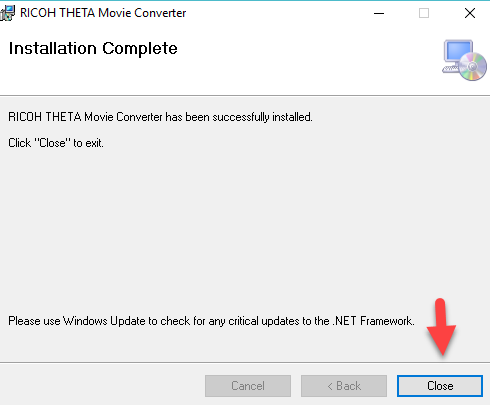
To install the converter, launch the Setup.exe supplied with the product and follow the
dialog boxes for installation.

How to use RICOH THETA Movie Converter for Windows

Follow the procedure below to convert movie files with 360 º spatial audio into YouTube
movie formats.

  1. Connect RICOH THETA V to your computer using a USB device and copy a movie file
    (for instance, R0010001.MP4) you want to convert to your computer.
  2. Start the main app for computer “RICOH THETA”, and drag and drop the movie file (for
    instance, R0010001.MP4) to it.
  3. Uncheck the [top/bottom correction] check box and click the [Start] button.
  4. Drag and drop the converted movie file (for instance, R0010001_er.MP4) to RICOH
    THETA Movie Converter on the desktop screen.
    When a dialog box appears, specify a file name and start conversion. After the file is
    converted, an MOV file (for instance, R0010001_er.mov) is output.
  5. After the MOV file is output, upload it to YouTube.

This procedure applies when the firmware ver.1.00.2 and the main app for computer
“RICOH THETA” ver.3.1.0 are used.

The procedure may change when the software is updated in the future.

For details about how to upload the files to YouTube, please visit and check YouTube.

Cautions for shooting

When using RICOH THETA V for shooting, place it on a tripod, etc. and stand it vertically.

Operating environments

Please visit and check theta360.com.


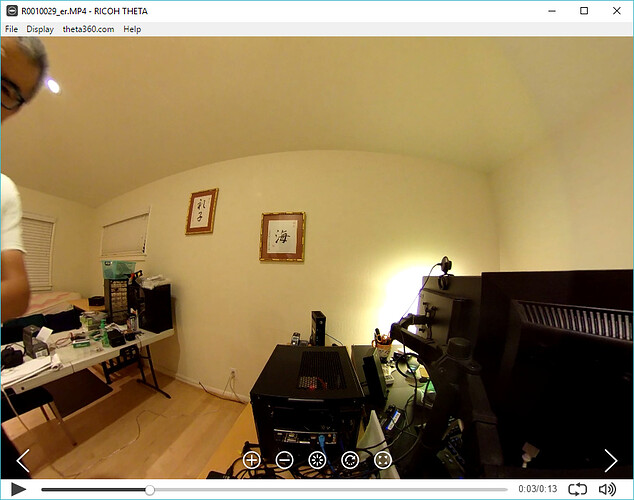
Test On Desktop to Confirm Spatial Audio Works

You need to convert the file into equirectangular format. The file must have ER in it. Verify that the spatial audio works on the Ricoh desktop app

Download Movie Converter App

https://theta360.com/en/support/download/

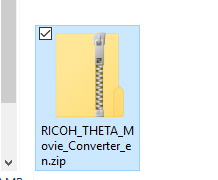
Extract

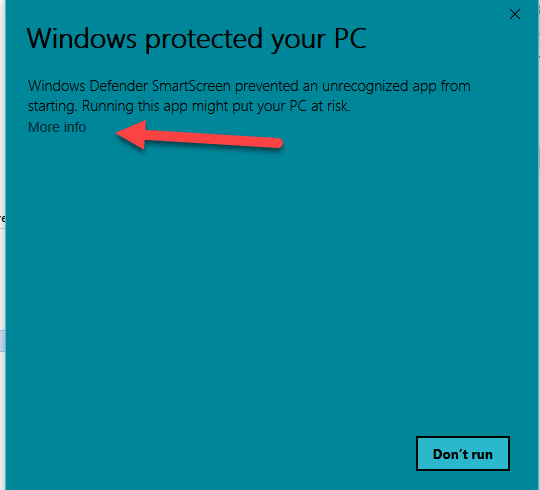
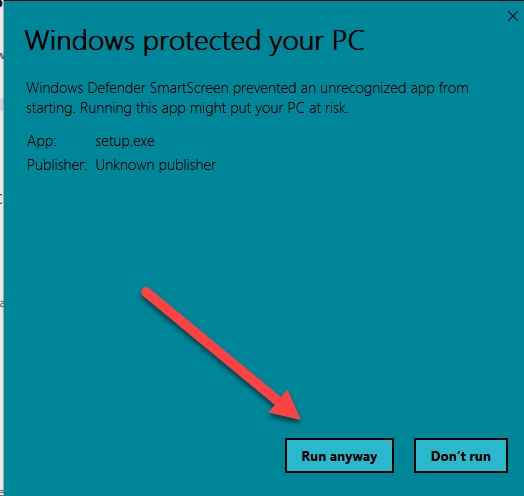
Install

Drag MP4 file onto Icon

Make sure you drag the file with ER in the filename.

Convert

Upload to YouTube

Make sure you upload the file ending in .mov

Test and Enjoy

Contribute Your Spatial Audio Test Below

If you have a YouTube video with spatial audio that you created with the THETA V, please share it with the community. Simply reply to this post and put the link into the reply. We can all enjoy your interesting use of spatial audio.
2 Likes

This note from community member @ZZChu

The beautiful side effect is that Final Cut Pro X sees all 4 audio channels once the clip is converted Whooo-hoooo!!! (The export process from Final Cut Pro X is a bit tricky though… one has to export the tracks separately, video and separate audio channels, Convert the audio to multichannel AIFF. Mux the video track and the multichannel AIFF into a new movie, and then run the Spatial Media Metadata injector. FCPX doesn’t currently do a one button share of 360 video.)

1st Test from @ZZChu

2nd Test from @ZZChu

3rd test from @ZZChu

And one more. The mics on the built in camera isn’t ideal in windy conditions. (One reason to get the external microphone they are selling for it.) I might try fashioning something like the furry miccovers. (double sided tape and furry material).

1 Like

Thanks @ZZChu, these tests videos are useful.

1 Like

I am sorry, but the resulting 4-channels soundtrack created by the Movie Converter app is not correct for Youtube.
Youtube employs the Ambix channel convention, hence the cannel order should be WYZX. Instead the Movie Converter app outputs channels in traditional FuMa (Furse-Malham) order, that is WXYZ.
But also the amplitude is wrong. In fact, in FuMa channel W should be attenuated by 3 dB. Instead the soundtrack coming out of the Movie Converter app has channel W BOOSTED by 3 dB, instead of being attenuated.
So it is necessary to extract the 4-channels WAV file form the .MOV container, reorder the channels, reduce the amplitude of W by 3 dB, and pack the new WAV file again with the video track using FFMPEG.
Really bad!
So Ricoh, please fix the Movie Converter app, so that the channels are in correct order (WYZX) and W is NOT boosted by 3 dB…

1 Like

That is really interesting. Would you have an example of a “fixed” video for me to check out? I’m embarrassed to say I don’t have a good reference on how it should actually sound.

Yes.
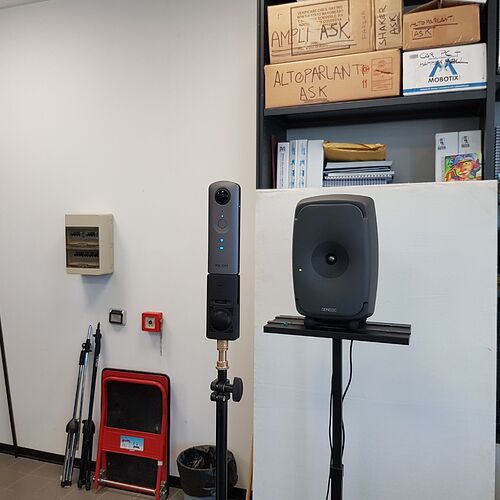
I made the test using a Genelec studio monitor placed in front of the
camera, equipped with the external microphone TA1, playing pnk noise
filtered in the 1kHz octave band.
then I rotated manually the camera, so that the spurce goes also on left,
back, right and back to front (you see the rotations in the the video). And
finally I lower the camera, so that the source becomes Front-Up at 30
degrees elevation.
I uploaded on my web server both the original .MOV coming out of your Movie
Converter app, and the version where I edited the channel order and reduced
by 3 dB the gain of channel W.

Here you see a photo of the setup:

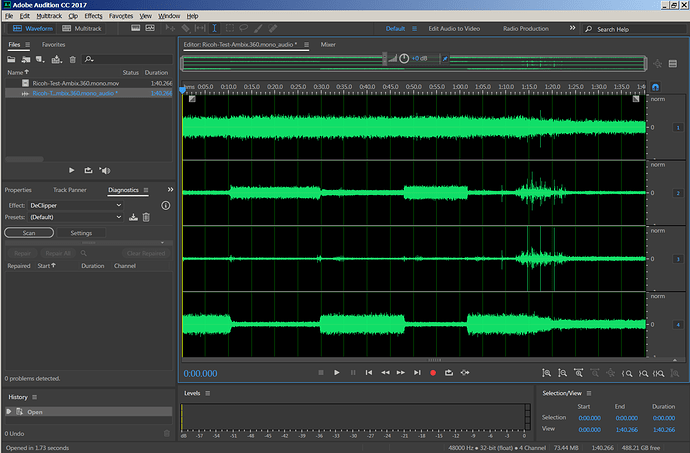
Here you see the sound track (imported in Adobe Audition CC). Please look
at the initial part of the recording, when the sound source was in front,
along axis x; it is expected that the amplitude of W is almost equal to X,
and the other two channels should be much weaker.
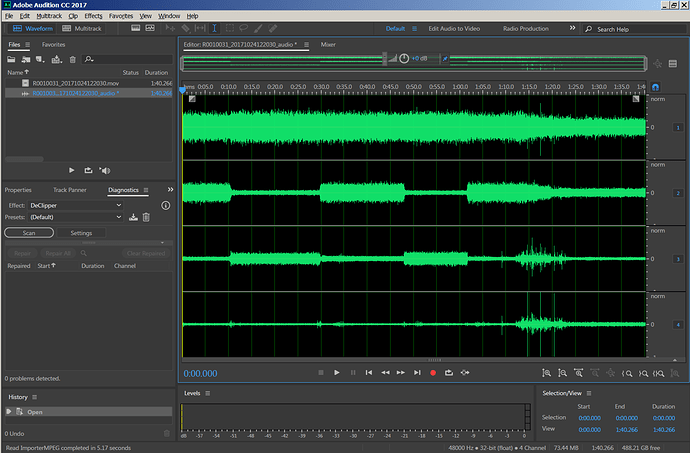
This is the original .MOV coming out:

As you see, initially the loudest channel is the second one, which becomes
weak when the source is Left or Right. Hence chennel 2 is X. Channel 3 is
the opposite, hence it is Y. And channel 4 is weak for most of the
recording, except at the end, with the source Front-Up, when it becomes
louder, almost equating X. Hence channel 4 is Z. So the order is WXYZ,
which is wrong!
Furthermore, the amplitude of W is always too large.

Here the soundtrack after channel reordering and reducing the gain of W by
3 dB:

Now the channel order is the correct one (WYZX), and the amplitude of W is
matched with X. Indeed, the amplitudes of Y and Z are still a bit too low
for me (when the source is far Left of far Right, the amplitude of Y should
match W).
I will do better measurements the next week, exploring several frequency
bands, and not just the 1 kHz octave band as in this test.

You should look and listen to the recordings using a smartphone equipped
with a good “cardboard” VR visor, we are using a Samsung S7 with a BoboVR
Z4 visor, and the Jump Inspector program.
Or you can upload the recordings to Youtube, if you prefer (I applied
proper metadata injection also to the fixed video).

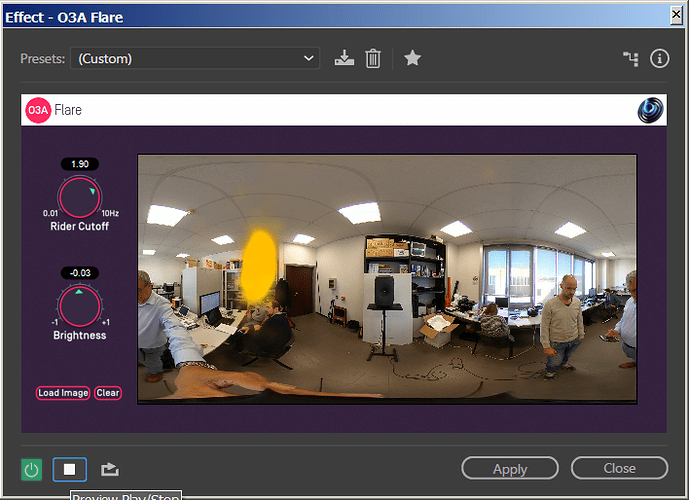
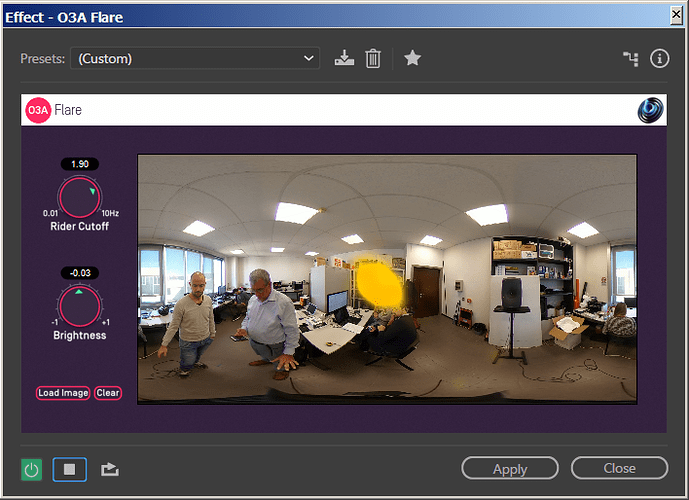
Finally, you can visualize graphically the direction-of-arrival of sound
using the free plugin called “O3A Flare”, being part of the O3A Core suite
by Richard Furse (Blue RIpple Sound):
http://www.blueripplesound.com/products/o3a-core-vst
Here what is shown when the initial part of the original .MOV file coming
out from Movie Converter is analysed:

As you see, the sound does not appear to come from the loudspeaker, it
appears on far left instead!

And here instead what happens analysing the fixed version of the video file:

Now the sound is perfectly centered with the real position of the sound
source…
I hope you can fix easily the Movie Converter app. It should be easy…
Indeed, I would also be able to extract my self the original 4-channels
soundtrack from the MP4 file recorded by the camera.
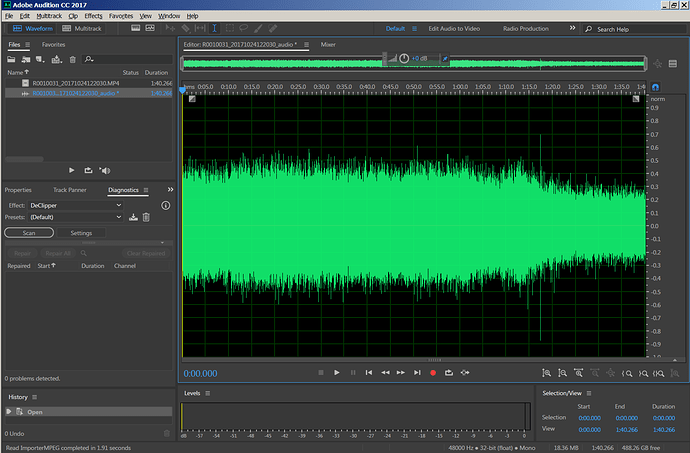
In reality I was expecting that the MP4 file did already contain the
4-channels soundtrack, instead when opening it with Audition I see only a
mono track (which is substantially identical to W):

Having to reprocess the MP4 for converting to MOV using the Movie Converter
app is not practical.
I wpould have access directly to the 4 channels on the MP4 file, instead of
having to use a converter app.

One buys the Ricoh Theta V mainly for its 4-channels microphone system, if
it was just for the 4k Video there are better alternatives at smaller
price. So one expects to have immediately access to the 4 channels
soundtrack…
So I hope that in a subsequent camera firmware update you can jut save
directly an MP4 or MOV file with a single soundtrack containing plain
4-channels Ambix signals.
Of course, also a much larger camera memory would be appreciated, as 19
Gbytes are really poor. I attempted to record Verdi’s Messa da Requiem past
week (the same day I received my Ricoh Theta V), but the recording stopped
approximately after 40 minutes due to filling the camera internal memory,
so I did loose half of the concert! At least 64 Gbytes of memory would make
this camera much better value for the money, although I would go directly
to 128 Gbytes if there was the possibility to replace the internal SD-card,
as in our previous Ricoh Theta-S unit…

Thanks.
Bye
prof. Angelo Farina
University of Parma, ITALY

3 Likes

If you want to download and test my video recording yourself, here is the
link:
http://www.angelofarina.it/Public/Jump-Videos/Ricoh-Theta-V-Test/
Bye

Angelo Farina

1 Like

Thank you.

I downloaded and put both clips on YouTube:

Your fixed clip appears at 1:40

I hope the Ricoh Theta people can take a look.

I did open already a ticket, I also hope they fix this nightmare as soon as
possible…

2 Likes

I just applied your fix to a clip—(removed my previous wrong steps) and adjusted the first channel -3db and it seems to work. Thank you for the heads up on this!

I can’t trust my ears though on what is “right” here.

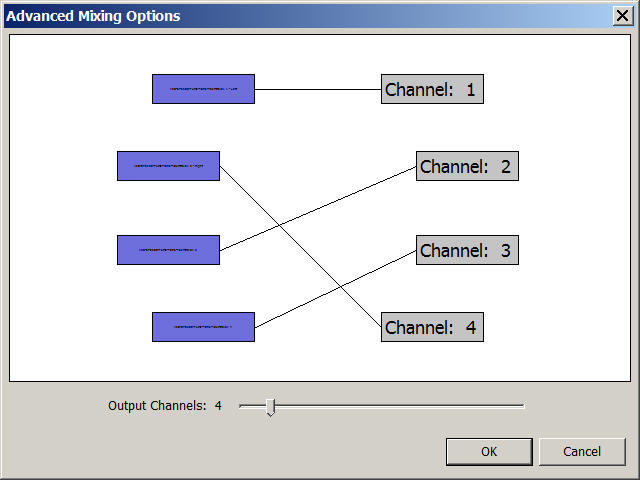
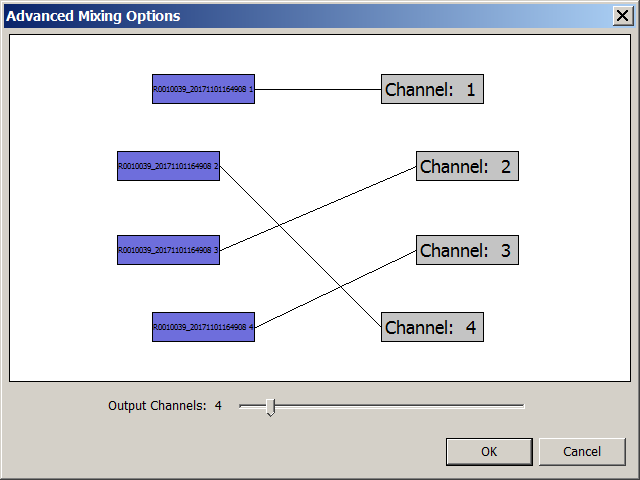
What you did is wrong.
Channel 4 was Z, and should become new channel 3. Channel 3 was Y, and
should become new channel 2. And Channel 2 was X, it should become new
channel 4.
Channel 1 was W and must be reduced by 3 dB, this is correct.
Here the channel remapping using the free program Audacity:

Bye

Angelo Farina

1 Like

Thank you! I was wondering why it sounded so flat and lifeless. I updated the clip with your instructions and it is working!

1 Like

I made a quick video showing the steps in using both Audacity and iFFmpeg (or Windows http://www.myffmpeg.com) to correct the issue using Professor Farina’s instructions.
(wrong video removed)

Very nice, but there is still one error. Initialy the gain reduction of 3dB
applied to channel W is not operational, as you did simply go down with the
playback gain of channel 1, which does not affect the amplitude of the data
saved into the file.
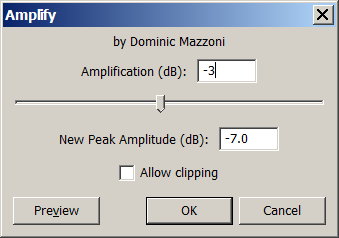
You need to apply the Amplify effect, by first selecting the whole content
of channel 1, and then go to Effect-Amplify, as shown here:

After pressing OK, you will see visually that the amplitude of channel W is
reduced, becoming comparable with that of the other 3 channels. The rest of
your giude is perfect, although I favour using FFMPEG from the terminal
window instead of using the crappy iFFMPEG. But that is juts matter of
preferences, of course, as the two programs do exactly the same job…
Thanks.
Bye

Angelo Farina

Thanks for all the help. I have updated that video.

I think @jcasman is sending this information to some people he knows at Ricoh.

Did you open a ticket using the main customer support system?

In addition to the community update @jcasman sent, I’m going to add this to another community update that I’ll send to a different manager at Ricoh.

Today I made further experiments outdoors in a very silent place with my
Ricoh Theta V, using both internal and external microphones. I have just
updated the firmware to v. 1.10.1.
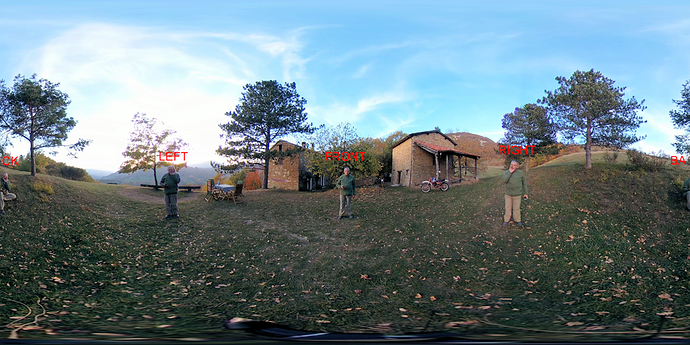
In each recording, I was talking subsequently in Front, Left, Back and
Right positions, as shown in this picture:

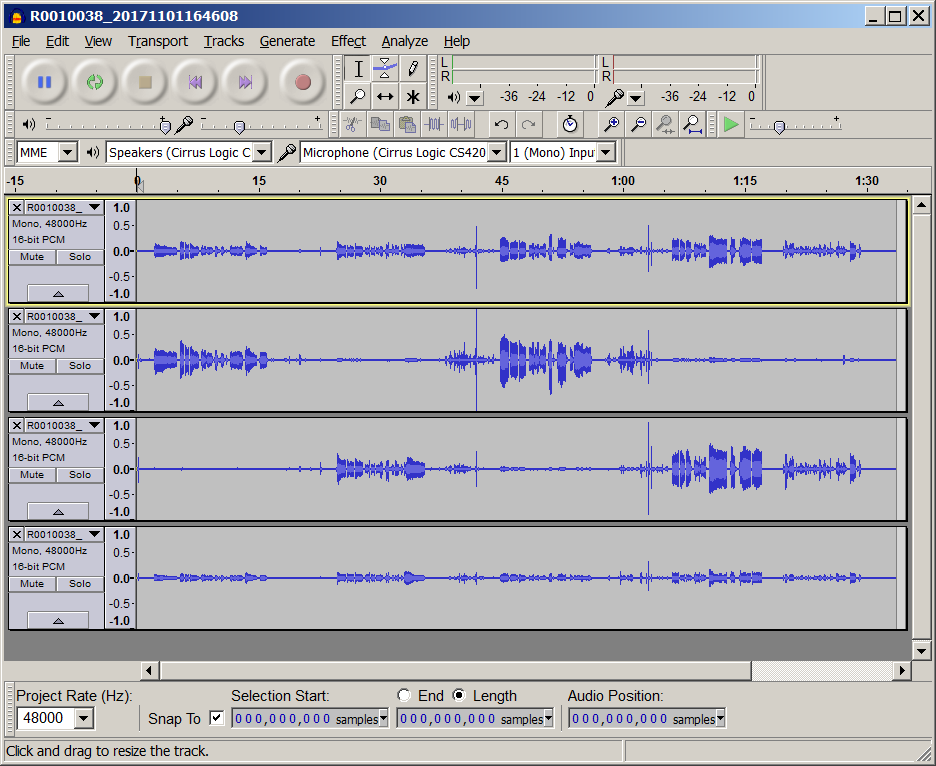
Here the results, first with the internal microphone:

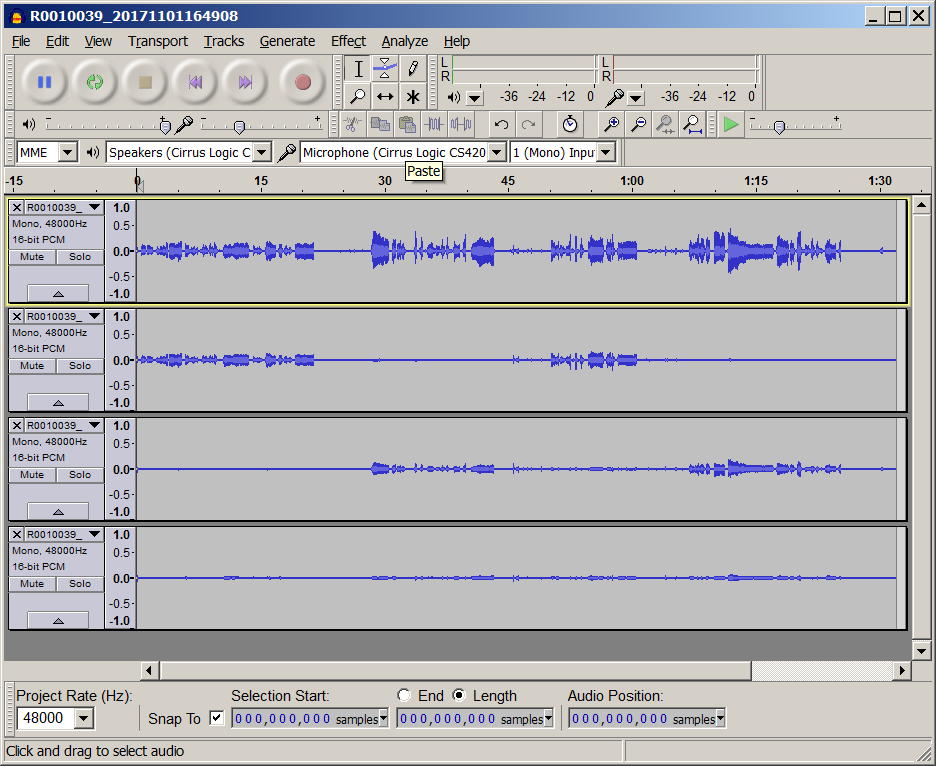
And here with the external TA1 microphone:

It can be seen (and it has been confirmed by measurements) that using the
internal microphones channel W (the first one) is much smaller than X
(approximately by 6 dB, when looking at the portion of the recording in
which I was in front and Back positions).
instead, when using the external microphone TA2, the opposite happens: now
the 1st channel (W) is louder than the second channel (X), by approximately
3dB.
This means that the recipe for fixing these wrong Ambix recordings already
suggested above and outlined in the video posted by John Chu is correct for
recordings done with the external TA1 microphone.
Instead, for recordings made with the internal MEMS microphones of the
Ricoh Tehta V, it appears that it is wrong to attenuate channel W by 3 dB,
it would instead be necessary to boost it by 6 dB!
So we have two recipes:

  • for internal microphones, boost the 1st channel by 6 dB (or attenuate the
    other three channels by 6 dB, if there is no headroom on channel 1) and
    then save the 4-channels audio file rearranging the channel order.
  • for external microphone, attenuate the 1st channel by 3 dB and then save
    the resulting 4-channelss audio file rearranging the channel order.
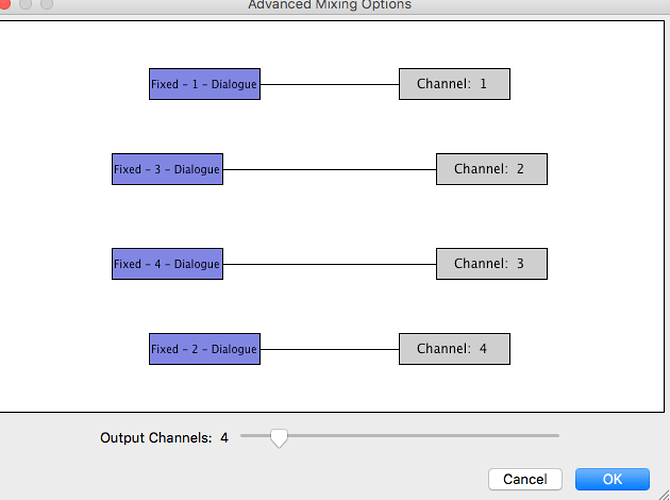
    in both cases, this is how the channel order should be rearranged for
    complying with the Ambix standard:

Bye!

Angelo Farina

1 Like

Thank you for sharing these tests. I reviewed the information with a manager at Ricoh that is influential with the THETA. He had already watched the video you made and had already sent the information to the engineering team in Japan. He understands about FuMa and Ambix. The right people are reviewing the great information you provided, including the link to this thread.

1 Like

Great, thanks! I hope they can fix the code inside the Movie Converter
program as soon as possible, taking into account the different behaviour of
the internal and external microphones. The point is that the recorded MP4
file does not seem to provide in any way the info about having recorded
with the internal or external microphones. And, as proven by my tests of
yesterday, the camera behaves quite differently in the two cases…
So perhaps the problem cannot be solved just with a modification of the
Movie Converter app, also a firmware update inside the camera will be
required.
This could be the possibility to record an MP4 or MOV file with the
4-channels soundtrack already available, and with proper metadata injection
for Youtube, without the need of the additional passage through the Movie
Converter app, which looks to me as a temporary solution.
If someone wants to repeat my tests, here you can download the 4 MOV videos
(original and fixed, internal and external microphones):
http://www.angelofarina.it/Public/Jump-Videos/Ricoh-Theta-V-New-Test/

I also loaded them on Youtube:

Theta V Original Internal: https://youtu.be/bBSs8gk_srE
Theta V Original External: https://youtu.be/naojkSbZpwg
Theta V Fixed Internal: https://youtu.be/hZxgNHiQbj0
Theta V Fixed External: https://youtu.be/BocUY7ALy7w

4 Likes